• Welcome
  • About
  • Workshops
  • FOOD FOR BLOG
  • Contact
Menu

The Cultural Kitchen

Street Address
City, State, Zip
Phone Number
COOKING CLASSES ON DEMAND

Your Custom Text Here

The Cultural Kitchen

  • Welcome
  • About
  • Workshops
  • FOOD FOR BLOG
  • Contact
Brushes Mercado-1.jpg

FOOD FOR BLOG

Preparing for Day of the Dead: Calabaza en Tacha

October 23, 2021 Maria Garza

My favourite Mexican holiday is fast approaching and I am getting ready making a couple of things that are a must in my family. First and foremost, is making Pan de Muerto (see recipe here in the blog), which is fun to make, especially because my whole family is involved; and second, is making Calabaza en Tacha, this braised pumpkin in piloncillo syrup.

Calabaza en Tacha originated in colonial Mexico, in the sugar mills. In the process of boiling aguamiel (sugarcane juice) down, they would cook whole pumpkins in the syrup in huge cauldrons called “Tachos”, so this dessert acquired the name of Calabaza en Tacha, simply meaning pumpkin cooked in the tacho. Us Mexicans love our sweets, and this dessert has survived the test of time and is still very popular today. It is eagerly awaited this time of year, when pumpkins are harvested, and it has also a place of honour in the altars of the Day of the Dead.

In Mexico, this recipe is made using Calabaza de Castilla, a native, meaty pumpkin that acquired its current name after it was taken to Queen Isabel of Castilla who liked it so much she gave it that name. If you cannot find calabaza de Castilla where you are, you can use Jamaican or pie pumpkin. The recipe I’m sharing with you today is very simple, but I know people that add other fruits to the mix - like oranges or guavas, or even pieces of sugarcane. Oranges are delicious as they impart a bit of acidity to the syrup, and guavas add a floral note. If you choose to use them, add them about halfway through the cooking time, so they don’t completely fall apart.

In many parts of Mexico, this pumpkin is served in small bowls drizzled with milk or cream, but in my house in Monterrey we always had it just in syrup. Either way, it’s delicious!

I used a medium pumpkin, knowing it would make lots, but I usually use at least half to make empanadas: simply scrape off the flesh of the cooked pumpkin pieces, place in a frying pan and mash. Cook over medium low heat until completely dry. I then use this mashed mixture and sweeten to taste to make the most addictive pumpkin empanadas.
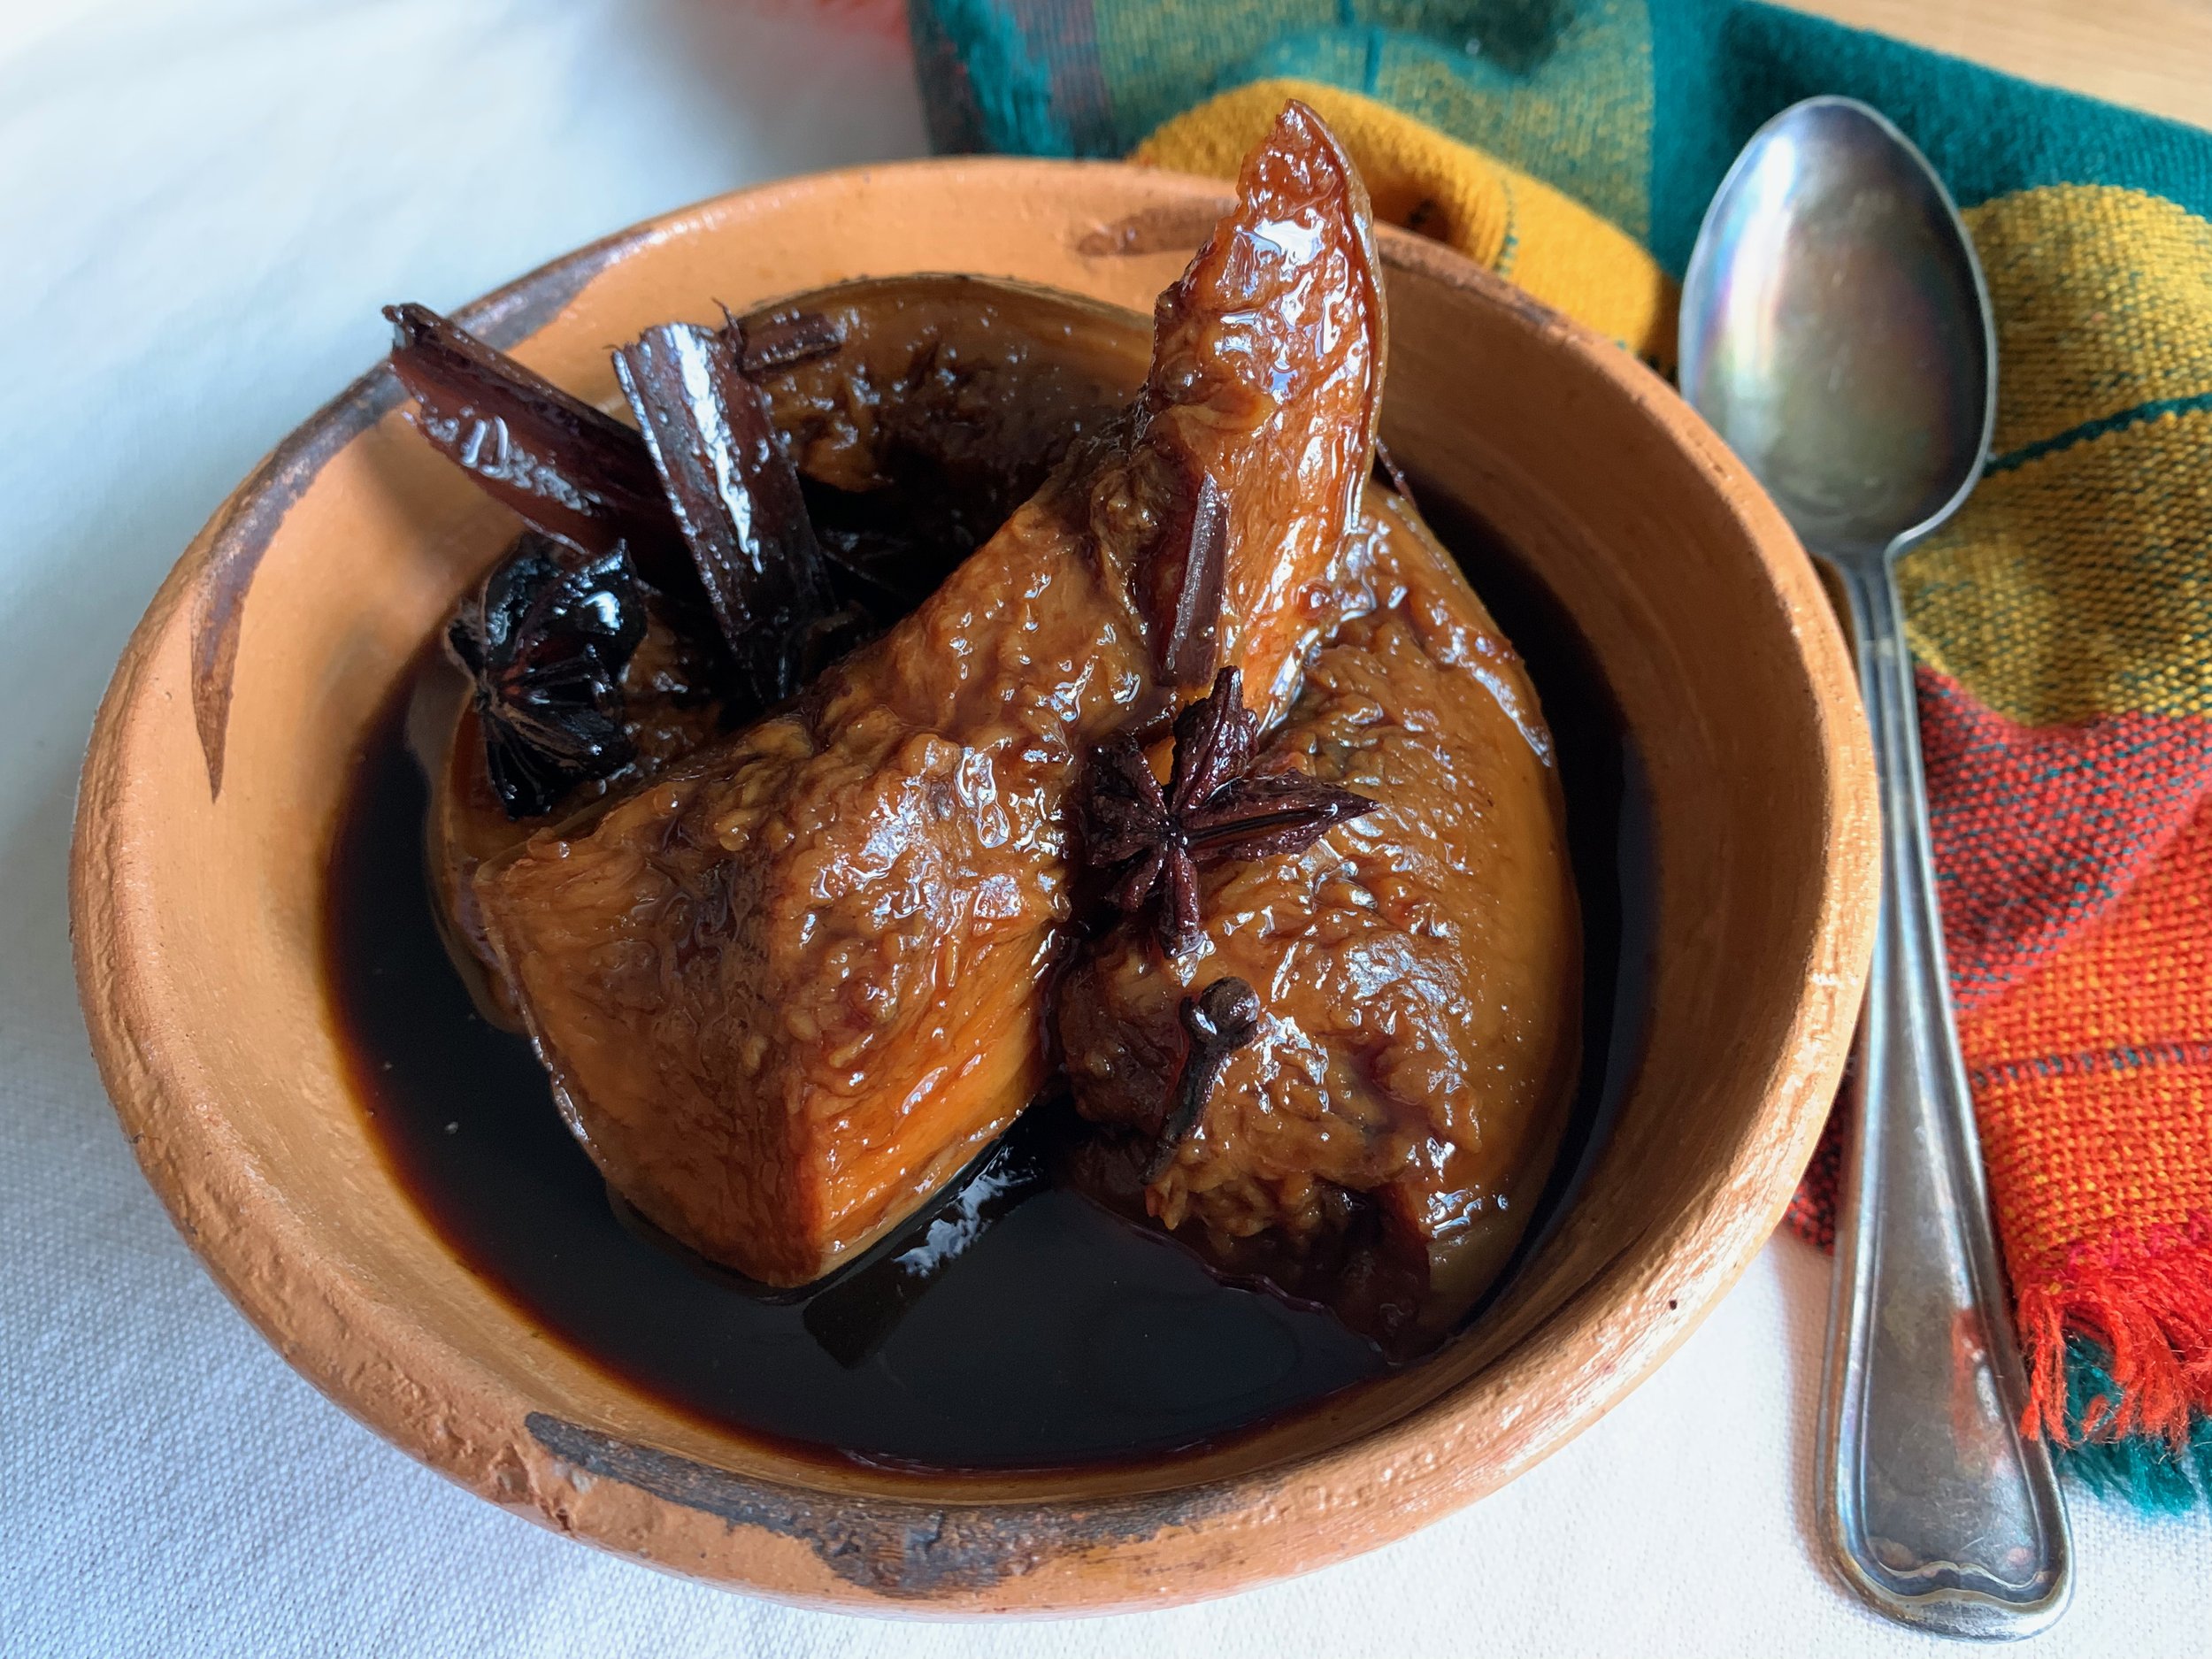
CALABAZA EN TACHA
Braised Pumpkin in Piloncillo Syrup

350g - 1000g piloncillo, demerara or dark brown sugar (*see note below)
3-4 3” pieces Mexican canela or 2 cinnamon sticks
2-3 pieces star anise
5 whole cloves
4 cups water
2200g pumpkin - de Castilla or Jamaican, but otherwise pie pumpkin is good too, seeded and cut into small wedges.

In large Dutch oven, place water and piloncillo. Bring water to a boil, turn the heat down and cover and cook for about 10 minutes, just until piloncillo is dissolved completely.  If using brown sugar, just mix it in and make sure it dissolves, it does not have to cook as long.

Add canela, star anise and cloves and then add the pumpkin, placing the bottom layer skin side down and the top layer skin side up. 

It may not look like a lot of liquid, but the pumpkin will release liquid as it cooks. Make sure the liquid is at a simmer, then cover the pot and cook, checking every 30 minutes, until the pumpkin is tender - it may take one hour or a bit longer, depending on the kind or pumpkin you’re using.

Once the pumpkin is tender, remove the pumpkin and leave the liquid in the pot. Turn up the heat and cook until reduced to a thick syrup. Be careful it does not scorch. 

When the syrup has thickened to your liking, turn off the heat and let it cool. 
Serve pumpkin, at room temperature, drizzled with syrup or milk.

* The original Calabaza en Tacha is extremely sweet and is truly candied. I don’t like things very sweet, that’s why I went with the lesser amount of piloncillo. If you want, you can increase the amount to the larger amount, and you will have a very sweet and syrupy pumpkin.

** This pumpkin is great to use as a filling for empanadas, if you remove it from the skin, mash it and cook it down in a frying pan to remove all of the moisture.

 Serves 8-10.

Comment

Chiles en Nogada, delicious and only available once a year.

September 19, 2021 Maria Garza
IMG_4901.jpeg

If Mole Poblano is Mexico’s most famous dish, then the Chile en Nogada is its equally famous, yet evanescent, partner.

While Mole is enjoyed year round, Chiles en Nogada make an appearance towards the end of August for two important reasons. First: to make them, we need specific ingredients that become only available at harvest time, and Second: we make them to commemorate the Mexican Independence and General Agustín de Iturbide, one of our war heroes. It is believed that the recipe was invented by the nuns of the Convent of Santa Mónica in Puebla in September 16, 1821, the year the war ended and Independence from Spain was achieved.

To make these stuffed poblano chiles, we need specific seasonal ingredients like apples, pears and peaches - the original and most traditional hail from the region of Calpan, in the State of Puebla. The apples are called Manzanas Panocheras, the pears are called Peras de San Juan, both very firm and sweet, and the peaches are called Duraznos Amarillos, these are firm, not soft like our northern peaches. The crowing glory of these chiles is the walnut cream sauce that covers them. Made with Nuez de Castilla, these walnuts are picked fresh and then blanched and peeled, and they make the creamiest, whitest sauce - simply delicious! Last, but not least, the poblano chile, named for the State of Puebla. These fruits are the special ingredients that are part of the meat mixture, along with almonds, raisins, tomatoes and canela. It is a slightly sweet and savoury filling for these special chiles.

Now, let’s talk about the Nogada, shall we? Nogada translates to “nut sauce”, or “full of nuts”. The original recipe is made with a fresh cheese that I don’t have available in Canada, so my recipe uses a mixture of goat cheese, cream and milk, along with walnuts, blanched almonds, a bit of sugar and salt. I also like to add a touch of Oloroso sherry to give it that sophisticated taste. The sauce is blended until completely smooth and that is that!

The traditional garnishes are pomegranate seeds and parsley, and those colours, along with the white walnut sauce, symbolize the colours of our flag.

This recipe, a real fusion of ingredients and flavours became the work of art that us Mexicans look forward to and enjoy every year. It is a masterpiece that encompasses the flavours and techniques of both the old world and the new world, something that the nuns of the time were very skillful at - making the most of what that was available to them seasonally, geographically and culturally.

Now, I have to confess that though I am a traditional cook, I am not a lover of sweet and savoury dishes, so if I’m making these chiles for myself only, I omit the fruit in the filling. However, if I’m making these for company, I go by-the-book traditional. For me, the sauce is the best part of these chiles, and whenever I make them, I feel like licking the plate!

It is important to note that there are hundreds of recipes out there for Chiles en Nogada. It boils down to families and their own recipes, like always. I am in Canada, so I will not only add my particular tastes, but I will also substitute ingredients from what’s available to me. The same thing applies in Mexico or anywhere else you may be. The original ingredients for this recipe are available locally in Puebla - where the dish originated, but those same ingredients may not be available in other parts of the country, and that’s why we see variations of recipes, and that’s OK too. I love to learn the true origins of recipes, and then I can adapt as needed.

So without further ado, here is my recipe for these Chiles en Nogada. I hope you try them and then make them to suit your own tastes. And whenever you eat them, think of Mexico and why these chiles are so special.

Chiles en Nogada
Poblano Chiles in Walnut Sauce

Nogada:
Makes 4 cups

200g plain goat cheese, softened
1 1/4 cups heavy cream
1 1/2 cups milk
1/2 cup slivered almonds
1 1/2 cups walnuts, soaked in milk for 1 hr, then drained
3 Tbsp Oloroso Dulce sherry, or to taste
4 tsp sugar or more to taste
1 tsp kosher salt, or more to taste

Filling:

2 Tbsp vegetable oil or lard
1 kg ground pork, beef or a mixture of both
1 cup diced onion
2-3 garlic cloves
2 Roma tomatoes, diced
1 small ripe but firm pear, diced
1 small Royal Gala apple, peeled and diced
1 small ripe but firm peach, diced
1 small stick canela or cinnamon, or 1/4 tsp ground
1/4 cup slivered almonds
1/4 cup golden raisins
1 1/2 tsp kosher salt, or to taste
1/4 tsp black pepper, or to taste
8 poblano chiles

Garnish:

1 cup pomegranate arils
8 sprigs flat leaf parsley, leaves only

To make the Nogada, place softened goat cheese, cream, milk, almonds, walnuts, sherry, sugar and salt in blender container. Process until completely smooth. Adjust seasonings and reserve.

To prepare the chiles, place over an open flame on the stove, barbecue or under the broiler, turning often, until skin is blistered on all sides. Place in a large bowl and cover with a plate or plastic and let them steam for about 10 minutes. Using paper towels, gently rub charred skins off. Cut a slit down the side of each chile and carefully remove all veins and seeds. 

To make the filling, in large pan, heat oil and cook meat, breaking it up as you go, until no longer pink. Add onions and cook until soft, then add garlic and tomato and cook until tomatoes are soft, about 5 minutes.

Add pears, apples and peaches and cinnamon and cook only until fruit softens a bit. We don’t want fruit to fall apart. Add almonds, raisins and salt and pepper to taste.

Fill each poblano chile with stuffing, but try not to over-stuff. Once full, it should retain its original shape and be able to close. 

These chiles are best served slightly warm or at room temperature.
To serve, place one chile per plate, cut side slightly to the side - not directly on top, so that the top of the chile appears smooth. Spoon walnut sauce over each chile and garnish with pomegranate and parsley leaves. 

Enjoy!

Makes 8. 

2 Comments

Two years later, I was finally able to make Turkish Börek.

September 1, 2021 Maria Garza
IMG_4242.jpeg

It’s been two years since my daughter Julia and I were in Istanbul on one of the most epic trips we’ve ever done. We both fell in love with the country - the people, history, architecture, culture, and of course the food!! We knew we had to cook with the locals so we searched and found a company called Cookistan (@cookistanbul). We booked a class and had one of the best experiences with our hostess Aysin and friends. 

The class was held at Aysin’s home in northern Istanbul, so the experience started with us making our way there. We met in front of the Ramada Inn Hotel in the Şişli district. While we waited for other participants, we observed the Simit seller across the street while Aysin explained how Turks eat these bagels on the go every day, either with pekmez and tahini (grape molasses and sesame seed paste, the Turkish version of peanut butter and jam) or cheese and olive tapenade. 

When our classmates arrived, we set out to explore the neighbourhood, as Aysin casually picked up ingredients needed for our class. As we walked and Aysin explained what was around us (one of the few Catholic churches and cemeteries in Istanbul, for example), we visited the local baker making bread in a tandoor-like oven; the artichoke vendor peeling artichokes so the customer could buy the cleaned hearts ready to cook; the pastry shop, where Aysin picked up the most delicious pastries; and the local grocer - I have never seen such variety of dairy products! So much yogurt, clotted cream and cheese; olives, nuts, dried fruit, tahini, cured meats, tomato and pepper pastes, spices, baklava and the most amazing and FRESH yufka dough that we used to make the most delicious meat filled pastries called Börek. It was a delightful tour around a neighbourhood that retains the small village feel, with mom and pop shops that provide everything needed to cook at home. It was nice to see that in a city as huge as Istanbul!

But back to the subject of this post. Börek is abundant in Istanbul, you can find shops dedicated to making them exclusively. Filled with meat, cheese or vegetables, they come in a variety of shapes. They can be small coils (or roses, as they call them there), large coils, rolls, or layered like lasagna. They are a popular street food and are totally delicious! Though today I’m writing about the Turkish pastry, börek is actually a family of pastries made with phyllo or yufka, enjoyed  in many countries from Central Asia, the Levant, the Balkans (we also made some in Bosnia!) and some Eastern European countries (Spanakopita anyone?).

Back to my story... when we got to Aysin’s place, we started the class by having tea and pastry (my favourite was the sweet tahini roll), and getting to know each other. Taking the class with us were two other ladies, journalists from the USA, so the conversation was very interesting!!. After a leisurely chat, we got to the work tables and started cooking. We made a delicious menu of Circassian Chicken (Turkish chicken and walnut salad), assorted dolmas (stuffed sundried eggplant, fresh zucchini and grape leaves), stuffed olive oil braised artichoke hearts, bulgur salad on lettuce leaves, the amazing meat-filled börek, and for a sweet ending, sugar syrup braised pumpkin with tahini and walnuts.

Why am I writing about this two years later you may ask? Well, let me tell you! During these two years I have been visiting every Middle-Eastern grocery store in Ottawa looking for Turkish yufka pastry (even though Ottawa is the capital city of Canada, it is still a relatively small city). Two weeks ago, I heard about a brand new (Turkish!) grocery store in Kanata, so I just had to go visit. As Julia and I walked the aisles, lo and behold, sitting right there in the freezer staring back at me was the much sought-after yufka! I almost did a little dance on the spot I was so excited! We found many other products like the sun-dried eggplants and peppers used for stuffing and the hard-to-find red pepper paste. Oh, and they make fresh simit every day! If you’re in Ottawa and you are interested in cooking Turkish food, please go visit the Istanbul Food Market on Katimavik Road. And FYI, they make a mean Turkish coffee that you can sip as you shop!

In honour of that epic search for yufka and to remember that fabulous experience we had with Aysin and Cookistan, here is the recipe for the Börek we made in class, published with Aysin’s permission. I have added a bit of spice (listed in Italics) that is my only deviation from the original recipe. Otherwise, it is just like the ones we made with Aysin. If you cannot find yulfka dough where you are, you can use phyllo (just a tip: yufka dough is round, whereas phyllo is rectangular, so the cutting of the dough will be a bit different. Also, you only use one layer of yufka to make these pastries, whereas with phyllo you would need at least two layers).

I hope you try this recipe - it is super easy to make and really delicious! Best of all, if you want, you can make double and freeze the rest for quick lunches or dinners.

Börek
Turkish Meat Stuffed Pastries - Cookistan

500g ground beef
1 large Spanish onion, grated and drained for 30 minutes (3/4 cup)
2 large garlic cloves, minced 
1 tsp Aleppo pepper, optional
1 tsp kosher salt
1/2 tsp ground black pepper
1/2 tsp ground cumin
2 sheets yufka dough, thawed
3 Tbsp olive oil
1/3 cup milk
1 egg 
2 Tbsp water

Topping:
250g plain yogurt
1 garlic clove, minced
Salt and pepper to taste
1/2 cup butter
1/4 tsp Aleppo pepper flakes or paprika
1 tsp crushed dried mint

Preheat oven to 390°F.

In large bowl, combine ground beef, grated onion, Aleppo pepper, salt, pepper and cumin.
Knead thoroughly with gloved hands until mixture is homogeneous.

Unfold yufka dough on counter and cut into 4 triangles. Mix olive oil with milk and brush dough.

Divide meat mixture into 8 portions. Spread meat at the widest edge of the dough, in the shape of a thin cylinder. Start rolling up dough from the widest edge towards the tip, keeping the roll very loose.

When you have a cylinder, then start rolling the pastry into a coil, making sure the coil is not too tight, or they may tear as they bake.

Make an egg wash by whisking egg with water. Place pastries on parchment lined baking trays and brush tops and end tips to make dough stick to coil.
Place on parchment lined baking trays and bake for 33-40 minutes, until pastries are golden brown.

To make topping, in medium bowl combine yogurt with 1 clove minced garlic. Season with salt and pepper. Reserve.

In small frying pan, melt butter and cook until foamy but not browned. Add Aleppo chili flakes or paprika.
Serve Börek warm, topped with yogurt and spiced butter and a sprinkle of dried mint.

Makes 8.

Comment

Meatballs for the win!

August 28, 2021 Maria Garza
IMG_4082.jpeg

Summer in Ottawa is sadly coming to an end, slowly but surely the days are getting shorter and the weather is starting to get cooler. That gives my body the internal cue to start making meals that are a bit more substantial, and I don’t mind spending a bit more time in the kitchen, creating delicious food.

In the spirit of cooking a bit more than in the lazy (and hot) days of summer, let me ask you... who doesn’t love a good meatball? I think meatballs are some of those super comforting and crave-worthy foods that everyone likes, and I am certainly a fan. In North America, usually meatballs are finished in a sweet, barbecue sauce-like mixture, but in Mexico, we braise our meatballs in sauce. Not quite like Italian meatballs, but just as delicious.

I have to say, I don’t make these often enough, but when I do, I fall in love with them all over again. Mexican meatballs have a secret ingredient inside: rice! Including raw rice in the mix makes it necessary to braise them in some sort of liquid, and the obvious choice is salsa. The meat is seasoned with grated onion and garlic, and I like to increase the flavour by adding some sort of pure ground chile powder, like ancho or guajillo (chipotle is you love spicy food). Some people add oats to the mixture to make it more substantial, but they are perfectly fine without.

After you shape the meatballs (not too big!), brown them nicely on all sides and then add the sauce. A very typical sauce would include chipotle chile (for albóndigas enchipotladas), but today I am using Epazote for a different and very delicious taste. If you cannot find fresh or dried epazote, go ahead and season your salsa with chipotle chile in adobo.

Make these in a large saucepan with a lid, as they will need to braise long enough for that rice to cook inside the meatballs. Simmer, covered for at least 25 minutes, until that rice is nice and soft, but be careful that the liquid does not dry out. If you find the sauce is getting really thick, add a bit more water to keep it going. When your meatballs are done, you will see the rice sticking out like porcupine needles, that’s a good indicator that your meatballs are done.

You will be adding seasoned salsa to the meatballs, but taste again and adjust seasoning at the end, if needed. Serve with your favourite veggies or rice on the side.

Albóndigas en Salsa Al Epazote
Meatballs in Tomato Sauce with Epazote

For the Salsa:
4 large Roma tomatoes, chopped
1 wedge red or white onion (about 1/2 cup)
1/4 tsp salt
3/4 cup water

For the Meatballs:
500g ground meat (turkey, chicken, pork, beef or a mixture)
3 cloves garlic, peeled and minced
1 tsp ground chile - ancho or guajillo (chipotle if you like things spicy)
1/4 cup raw rice (jasmine, long grain or basmati)
1/2 tsp salt
1/4 tsp ground black pepper

To put it all together:
1-2 Tbsp oil, butter or lard
5 leaves epazote (fresh if you have them, or 1/2 tsp dried)
1 jalapeño chile, whole, punctured with the tip of a knife
2-4 Tbsp chopped cilantro for garnish

In blender jar place tomatoes, onion, salt and water. Blend until completely smooth.
Reserve while you make the meatball mixture.

In medium bowl, combine ground meat, garlic, ground chile, rice, salt and pepper.

Using clean hands, mix everything until it holds together well. Make small meatballs, about 1”. 

In large saucepan (with lid), heat oil and start browning the meatballs, turning as they get nice and golden brown. Do not crowd the pan - you may have to do this in batches. When meatballs are browned, add reserved salsa. Bring up to a simmer and add epazote and jalapeño. 

Cover pan with lid and simmer for 25-30 minutes, checking from time to time to make sure the mixture is not drying out too much, it should be saucy enough for the rice to cook inside the meatballs.

Adjust seasoning after 25 minutes, adding more salt only if needed. 
Garnish with cilantro. Serve hot, with rice and your favourite vegetables. 

 Serves 4.

Comment

Setas a la Mexicana make a great taco, quesadilla or tetela!

August 22, 2021 Maria Garza
IMG_4180.jpeg

A few days ago, I was gifted with a large amount of wild mushrooms, so I have been eating mushroom everything for a few days! I have blended them into soup, cooked them with cream, and sautéed them in butter… but my favourite way to cook them (surprise, surprise!) is a la Mexicana.

I posted another recipe for Zucchini a la Mexicana a couple of weeks ago, and as I said then, anything can be made this way. Especially good when you have field ripe tomatoes and veggies from your garden, this recipe comes together in just a few minutes. 

Let’s talk about our mushrooms, as they are the stars of this show! I used those wonderfully firm and meaty Japanese Maitake mushrooms that look like a beautiful brown and white flower. Maitakes are a type of adaptogen, high in antioxidants, fiber, vitamins B and C and minerals. They have been used in Japanese culture for centuries for their medicinal properties and health benefits. They can be grilled, pan-fried, used in stir fries or salads, but best of all, they taste delicious!

If Maitakes are hard to find where you are, you can use oyster, fresh shiitakes (just remove the stem) or any other wild mushroom available. If you still can’t find wild mushrooms, you can use regular white or café mushooms, or even baby portobellos. Your local farmer’s market may have a vendor that would provide you with something delicious to cook. In Ottawa, I recommend Forest Floor Mushrooms, they have amazingly beautiful varieties, and they’re worth searching out for sure.

Whatever mushroom you decide to cook, they will all be delicious. Once you make this recipe, you can serve it as a side dish, but you can also make the most epic tostadas with them, or use them to make tacos or quesadillas. You can even use them for filling tetelas or making sopes. So you have a multipurpose dish that can work in many ways. In this case, you can have leftovers for days and not eat them the same way twice. That’s a win in my books!

I hope this inspires you to go out and find some wild mushrooms. Let me know if you do!

Setas a la Mexicana 
Wild Mushrooms, Mexican Style

3-4 Tbsp vegetable, avocado or light olive oil
1/2 medium white onion, diced (about 1 cup)
1 jalapeño or Serrano chile, minced (seeded if you want less heat)
1-2 cloves garlic, minced
1 tsp ancho chile powder (optional)
1 large ripe field tomato, diced (about 1 cup)
300g wild mushrooms, torn apart or chopped (4 cups), (oyster, maitake, shiitake or any mixture)
3/4 cup chicken broth
Salt and pepper to taste
1/4 cup chopped cilantro
Lime wedges for serving

In large 12” frying pan heat oil over medium high heat and cook onion and jalapeño until soft and translucent.
Add garlic and cook only until fragrant, about 1 minute. Add ancho chile powder (if using), and cook another minute.

Add tomatoes and cook for about 5 minutes, just until they start to break down. Add mushrooms, toss well in the sauce and then add chicken stock and a pinch of salt. 

Bring mixture to a boil, then turn heat down to a simmer. Place lid on pan and cook for 15 minutes. After 15 minutes, if you have a lot of liquid still left, you can remove the lid and reduce liquid to your liking. I like it to be moist but not runny.

Season to taste with salt and pepper and add cilantro just before serving.
These mushrooms are great as a side dish, but are great on tacos, tostadas, quesadillas, etc.

Serves 4.


Comment

Esquites, my favourite way of eating Corn.

August 14, 2021 Maria Garza
IMG_4120.jpeg

As you know by now, I simply adore corn. In my books - absolutely and unequivocally - Corn is King!

I have written about how corn came about and the story is nothing short of amazing (check out the story for Elotes a la Mexicana here in the blog), so I won’t repeat myself telling you the same tale. What I will tell you, though, is that us Mexicans love everything and anything made with corn - we eat it every day in the form of tortillas, tacos, sopes, tetelas and we even drink it in the form of pinole, tejuino, atole or champurrado. It is, in short, our sustenance and it is absolutely delicious in all its forms.

One of the most popular street foods in Mexico is corn, both on the cob and off the cob. Our Mexican corn is different than its Canadian or American counterparts: it is hearty, starchy and definitely not sweet. It lends itself very well to creamy, tangy and spicy concoctions and that is exactly how we love to eat it. 

If you walk the streets of Mexico, you will always come across at least one corn vendor. Some of them sell the cobs whole, either boiled or grilled, and there are the vendors that sell the corn off the cob. I tend to like it more this way, as it is easier to eat. And on the plus side, when it’s served in a glass off the cob, you can add more condiments and every bite is enveloped in that creamy, spicy, tangy goodness. Yum. It is soooo good!

In Monterrey, we call them “Elotes Desgranados”, which simply means corn kernels, but in southern Mexico, they are known as “Esquites”. The main difference is that for Esquites, the corn kernels are cooked with fresh epazote and chile de árbol, so the corn acquires a different flavour than its northern counterpart. Either way, they are both delicious and the finished product really is all about the quality of the toppings, so make sure you use good mayo (not Miracle Whip please) and crema, and quality dried chile powders and sauces. 

Today I am using the new Chillin spice blend from my friends at Spicetionary - it is really interesting because they have added amchoor (dried green mango powder), and it gives the spice blend a very nice fruity note that goes really well with this recipe. If you don’t have this particular spice, my next favourite thing to use is a good quality ground ancho or guajillo chile. In Mexico, when you buy esquites, after they add the mayo, crema, cheese and powdered chile, they give you plenty of limes to squeeze juice into your cup and a choice of many bottled salsas you can add. At home you could use Valentina, Cholula or your favourite brand. Today I am using my ultra-spicy Salsa Macha (it may be hard to find at the stores, so I will post my recipe soon!). Use what you have available, it will still be delicious!!

I have given you a guideline in the form of a recipe below, but really, it is all about you preparing your portion exactly the way you like it (like we do in Mexico!), so you decide how much of anything you want to use! You could even let everyone mix their own, exactly how everyone likes it.

I hope you go out and get some fresh, local corn so you can try this recipe. Enjoy!!

Esquites or Elotes Desgranados
aka Mexican Street Corn

3 large ears of corn, husked
1 tsp salt
10 epazote leaves (optional)
1 chile de árbol (optional)

3/4 cup mayonnaise
1/3 cup sour cream or crema
3/4 cup crumbled cotija or feta cheese, plus more for garnish
A bit of the corn cooking water, for consistency
2 tsp Spicetionary™ Chillin spice, or ground ancho chile, plus more for garnish
Juice of 1 lime, or more to taste
Salt only if needed, to taste
1 tsp Salsa Macha (optional), for garnish
2 tsp chopped cilantro for garnish

In large pot, place corn, salt, epazote and chile de árbol (if using). Cover with water and bring to a boil.
Simmer, partially covered, for 10-15 minutes, or until corn is tender.
Remove corn from pot but reserve the cooking water.
Let corn cool 5 minutes and using a knife, cut kernels off the cob.

Place kernels in medium bowl, you should have about 3 cups. Add mayonnaise, sour cream, 3/4 cup cotija or feta cheese, 2 tsp Spicetionary™ Chillin spice or ground chile, juice of 1 lime and 1- 2 Tbsp of the warm corn cooking water. The water is only needed to make the consistency a bit creamy, we don’t want it to be soupy, so you decide how much you use. Season to taste with salt only if you need it - it will depend on the type of cheese you’re using.

Divide mixture amongst 4 bowls or glasses. Garnish with more cheese, spice and a drizzle of salsa macha, if using. Top with a bit of cilantro and enjoy!

Serves 2-4.

Comment

Calabacitas a la Mexicana are the perfect summer side.

August 8, 2021 Maria Garza
IMG_4016.jpeg

August is finally here! I love this time of year because the market stalls are brimming with fresh produce, from the last of the strawberries to peaches, blueberries, apples, knob onions, garlic, beautiful green, purple and yellow beans, all kinds of peppers (did I tell you about my pepper garden yet?), beautiful plump tomatoes of all sizes, bright golden corn, cucumbers, zucchini, etc.  Walking through markets has always been one of my favourite activities!

If you go to any market stall this time of year, you will find everything you need to make the perfect salsa, the perfect fruit cobbler or the perfect Calabacitas a la Mexicana, which is our dish for today. Whenever you see anything called “a la Mexicana” it means it will have a sauté of onions, chiles and tomatoes, which incidentally are the colours of our Mexican flag, hence the name!

I love things cooked a la Mexicana, and very often you will see eggs cooked this way for breakfast (they’re delicious by the way!), but there are many other ingredients you can cook like this: beans, cactus paddles, potatoes, mussels, shrimp, chicken, beef or pork steak, you name it! Once you know the technique, you can apply it to many other things and you can make your own dish a la Mexicana.

I think for many Mexican cooks, this is the default way of making things. If I’m uninspired, I reach for this technique and I can make a LOT of things, so make this part of your arsenal! All you need are ripe tomatoes, white onions (in Mexico we prefer to cook with white Spanish onions, but if all you have is red or yellow, it is perfectly fine - just do not substitute green onion, that is a different flavour profile), some sort of spicy chiles - Serranos would be my choice, but where I am in Canada they are hard to find, so my next choice is Jalapeños. Use whatever you have available, but the chiles should pack some punch. The last ingredient, and this is optional, is cilantro. In essence, you will be making your own cooked salsa and then whatever you add to it will be stewed in it. That’s it! Brilliant, isn’t it?

So let’s get down to the recipe. It is a very easy technique, and you can vary quantities as you wish, adding more tomato if you want it saucier, or more corn if you love corn. You can omit the corn if you don’t have it and you can even cook in some chorizo at the beginning with the onion (that is another delicious variation!). The most important thing is not to overcook the zucchini - you want it to be tender, but still retain its shape. I love cilantro, but if you don’t, then omit it. 

I hope you make this recipe and learn the “a la Mexicana” technique. Let me know what you create!

Calabacitas a la Mexicana
Zucchini, Mexican Style

1 Tbsp vegetable oil
1 small onion, diced (about 2/3 cup)
1 Serrano or Jalapeño chile, minced (seeded if you want less heat)
2 small cloves garlic, minced
1 large ripe tomato, diced (about 1 cup)
2 small zucchini, cut into 1/2” pieces
1 large ear of corn, kernels cut off with a knife
1/4 cup water or broth
Salt to taste
2-4 Tbsp chopped cilantro (optional)

In medium sauté pan, heat oil and cook onion and chiles over medium high heat until soft and translucent, about 5 minutes. Add garlic and cook for 1 minute.

Add tomato and cook until tomatoes break down and become saucy. Add zucchini and corn and stir well. 

Add water and bring to a boil. Cover and simmer for 10-15 minutes, until zucchini is tender but still firm. Season with salt to taste and stir in cilantro at the last minute.

Serve warm.

Serves 4. 

Comment

Stewed Beans with Wild Greens, comfort in a bowl.

August 1, 2021 Maria Garza
IMG_3977.jpeg

It is at times like these that I am so glad to be “working” all the time. You see, I have a full-time job and The Cultural Kitchen is my beloved side gig. That does not mean that I only work when I have classes, instead the brain is engaged full time, and when I cook something epic I know I can use in the future, I go ahead and write my recipes and take the photos I need for future posts.

That’s what happened with this recipe. Last weekend, as I told you, I went to visit my friend Thuy at her garlic farm, and she gave me wild greens - purslane and amaranth. Last post was about eggs with purslane, which was my epic breakfast then, but the following day I used the amaranth, knowing full well that on week days, after full days in a test kitchen, I come home and only cook quick meals (the ironic life of a chef, I know).

So fast forward a few days and you find me laid low, sick as a dog… so much so that I even went to get tested for Covid-19. As I sit here, I’m waiting for results, hoping for a negative outcome, of course. I am double vaccinated, so I really hope it’s just a case of a bad summer cold. 

Which brings me back to the fact that I routinely go through the exercise of writing new recipes as I make them (usually on weekends), and taking photos to use at a later date. For this weekend’s blog post, am I ever glad I do this, as I am laying on the couch writing these words.

So back to the recipe… last week we talked about Quelites, or wild greens as we know them in Mexico. Thuy gave me a bunch of gorgeous, crisp, red and green Amaranth, and I could not let those go to waste. Amaranth, Amaranto or what you may know as Callalloo is used in many parts of the world, including Asia, Africa, the Caribbean and Latin America. It is a super green, a great source or vitamins, minerals and fibre. The tender leaves can be used in salads, and the tougher leaves and stems can be stewed, as I’m doing today.

These hot summer days I am all about quick, easy recipes, and these beans are not only delicious and good for you, but super quick to make. You know I always have cooked beans in the fridge, but if you don’t feel like cooking your own, just open and rinse a can and you’re good to go! If you just happen to serve a fried egg with your stewed beans, then I would say you have very good taste and you’re in for an epic breakfast. But these beans make a perfectly delicious side dish too, so go ahead and source out some amaranth and let me know if you give this recipe a try. If you can’t find it, then you can use Swiss chard, spinach or kale. Either way, it will be delicious. Buen provecho!

Guiso de Frijoles con Quelites de Amaranto
Stewed beans with wild amaranth greens

2 Tbsp manteca or oil of your choice
1/2 of a small red or white onion (about 1/4 cup), diced
1 clove garlic, minced
1 tsp ground ancho or guajillo chile (optional)
2 cups cooked beans (pinto, black turtle or bayos)
1-2 cups bean broth (use chicken or vegetable stock if you’re using canned beans)
4 cups wild amaranth (or Swiss Chard, spinach or kale), chopped into 1” strips
Salt to taste
Crumbled queso fresco, cotija or feta cheese for garnish
Salsa
Corn tortillas 

In large deep frying pan, heat manteca and cook onion until softened. Add garlic and cook only until fragrant, about 1 minute. Add ground chile and cook for another two minutes.

Add beans and bean broth and bring mixture to a slow boil.

Add greens and stir to combine. Lower temperature to simmer and cover pot. Cook for 10 minutes.
Season with salt to taste.

Serve hot garnished with cheese, with salsa and tortillas on the side.

Serves 2-4


Comment

Quelites star in these Huevos con Verdolagas en Cazuela.

July 25, 2021 Maria Garza
IMG_3952.jpeg

Many, many years ago, before I started The Cultural Kitchen, I was teaching workshops for Loblaws Upstairs Cooking School, and that’s where I met Chef Thuy Nguyen. Thuy is a bundle of energy, with a sparkling and lovable personality. We hit it off and I can humbly say that Thuy was my teacher for everything Vietnamese and other Asian cuisines. She took me for a foodie tour through Chinatown at a time when I did not know much about Asian cuisines. It was an education for sure and to this day I frequent the same shops she showed me.

My trajectory and Thuy’s were parallel - we both taught for Loblaws and then the OCDSB, she even taught classes for me in the early days of The Cultural Kitchen, and her classes were always sold out! Later on we went our separate ways and as it often happens, years went by without any contact.

Fast forward to today… Thuy found me through social media and we reconnected immediately. I found out Thuy and her friend Navin have a garlic farm on Moodie Drive and when I saw they were selling fresh organic garlic I just had to visit!

So that’s were my friend Alex and I went yesterday morning. First of all, seeing Thuy after almost 20 years was amazing, she has the same energy and spirit as always and it was great to catch up. She gave us a tour of the farm and as we walked she kept pointing out many “weeds” that have all kinds of medicinal properties. She really is a fountain of information! We made our way to the giant garlic patch where she showed us the varieties they are growing, from the medium hot Majestic to the hotter Red Russian, to the giant Elephant Garlic. They have everything from mild to hot and it’s all organic and beautiful. Thuy loves having people visit the farm and anyone can volunteer to help out with everything from weeding to harvesting, so if you’re in Ottawa and want to go help out, Thuy and Navin will appreciate it!

I learned a lot about garlic and how it’s grown and harvested and of course I came home with a bundle of the most beautiful medium hot Majestic that will last me through the coming year, but what this post is about is those “weeds” Thuy kept showing us along the way. You see, in Mexico we treasure “Quelites”. The word comes from the Náhuatl “quilitl”, meaning edible herb. Quelites are wild edible greens and there are up to 500 varieties in Mexico. Most of these quelites are not grown as crops, but instead are just “picked” when in season - they grow in fields, near other crops, as long as there is a water source. Some of the most known quelites are verdolagas (purslane), amaranto (amaranth), radish tops, watercress, lamb’s quarters and epazote. Many of these are grown as proper crops, but hundreds of others are wild and collected just after the rainy season, and they will mostly show up at the local mercados. In the world of food, quelites can range the gamut from greens that can be used in salads to more hearty ones that can be used in “guisos” or stews, or even stuffed, as in the case of zucchini blossoms. But what is certain, quelites are a great source of nutrition in the form of vitamins, minerals, folic acid and fibre.

At the end of our walk at the farm, Thuy picked a whole bunch of amaranth and verdolaga, what you would know as purslane, so that’s what I’m going to show you today. I will make something with the amaranth later today, but this morning I made the most delicious and healthy breakfast.

Verdolagas are very commonly used in Mexico, they show up at the table stewed in salsa or scrambled in eggs. More contemporary cooks use the tender leaves in salads. We could say verdolagas are a super food, as they are loaded with potassium, magnesium, iron, calcium, beta carotene, vitamins A, B and C and omega-3 fatty acids!

This morning I made a quick “guiso” (stew) with vegetables from my garden and some of that delicious garlic I got yesterday from Thuy. You can make this mixture and scramble the eggs into it, but I prefer an egg with a runny yolk, so I simply cracked the eggs on top and covered the pan for a couple of minutes to set the whites. Serve garnished with cotija or queso fresco, some cilantro and your favourite salsa - and lots of corn tortillas on the side. If you don’t have verdolagas, you can use spinach or any other greens you may have on hand, like kale or Swiss chard. It’s a delicious way to start your day!

Huevos con Verdolagas en Cazuela
Skillet Eggs with Purslane Stew

2 Tbsp vegetable or olive oil
1/2 cup white onion, chopped
1 small serrano or jalapeño chile, minced
1 garlic clove, peeled and minced
2 Roma tomatoes, chopped (1 1/3 cups)
3 cups verdolaga (purslane) leaves and tender stems
1/4 cup chicken stock or water
Salt to taste
4-6 eggs
1/4 cup crumbled cheese, like cotija, queso fresco or feta
A few sprigs cilantro
Salsa
Corn Tortillas

In medium frying pan (cast iron works great), heat oil over medium heat and cook onion and chile until translucent and starting to get a little golden. Add garlic and cook only until fragrant, 1-2 minutes.

Add tomatoes and cook for 2-3 minutes, until they start to break down and become saucy.

Add verdolaga leaves and tender stems and chicken stock or water and bring to a boil. Turn heat down to simmer and cook until verdolaga is tender, about 5 minutes. Season to taste with salt.

Crack the eggs into the pan and cover with lid. Cook 5-6 minutes, until whites are set but yolks remain soft.

Serve straight out of the pan, garnished with cheese and cilantro. Make sure salsa and tortillas are available for everyone to help themselves.

Serves 4-6.

Comment

Cantaloupe Agua Fresca two ways.

July 18, 2021 Maria Garza
Agua_de_Melon.jpg

As many of you know, I grew up in Mexico and my culinary curiosity, at a young age, was fed on the most part by my Nanny and my Dad. My Nanny cooked the traditional Mexican fare every day and oftentimes you’d find me right there beside her in the kitchen, taking it all in. My dad, on the other hand, was the foodie of the house, and he would spend some of his free time on Sundays reading his favourite food magazine: the now defunct Condé Nast Gourmet. With every new issue, he would find inspiration to make whatever he craved (now you know where I got that from!). My Dad only cooked when Nanny was off, so on Sundays I would watch him make his favourite food, as he explained to my young self what he was doing. Dad created many amazing meals and I hold beautiful memories of those days with him in the kitchen.

When I left home - and Mexico, I just had to get my own subscription to Gourmet! Not only did it make me feel close to my Dad, but I learned a lot from it: I learned to read about food and later on to talk about food, and it also influenced me on how to write recipes so they would be understandable and achievable for the home cook. As you may imagine, I was very sad when Gourmet shut down, but I still have many of my favourite issues in my library!

Eleven years after I left Mexico (and at the very beginning of my career in food) Gourmet published my first recipe: Agua de Semilla de Melón. It was one of my proudest moments, and the first thing that came to my mind was: "look Dad! Gourmet published one of my recipes!” In fact, when I told him, he immediately went out to buy his own issue (those days, you could not buy a subscription in Mexico, you had to buy magazines on the newsstands) and he didn’t waste any time telling all his friends about it.

Twenty four years later, I am still at it and enjoying every minute of this creative process. My life and profession revolves around food and I would not have it any other way. Food is so linked to culture and it creates those special moments with the ones we love. I don’t think I will ever get tired of sharing my humble knowledge and passing it on to others.

So in memory of that very first publication, I share with you these recipes: Agua de Melón, two ways. The first one is what Gourmet published, it is made with the seeds of the cantaloupe (us Mexicans are frugal people and we don’t like to waste anything!), and the second one is made with the flesh. Whenever I make Agua de Melón, the seed drink (called horchata) is my own particular treat, as it only makes 2-3 cups of this light cantaloupe water. The second one is a full flavoured, beautifully coloured and refreshing drink.

Agua de Melón can be made with cantaloupe or any melon you may have on hand, and it can be spiked with rum, tequila or vodka, if you are so inclined. Either way, I hope you make it part of your Aguas Frescas repertoire!

Horchata de Melón
Cantaloupe Seed Agua Fresca

Seeds from one large cantaloupe
2 cups water
Sweetener of choice to taste

Scrape seeds and soft membrane off a large cantaloupe into blender jar. Add 2 cups water.
Process for a full minute on high speed. If your blender is not too powerful, you may have to process a bit longer.

Pour through a fine sieve into a small pitcher. You can add up to one more cup of water if you want a lighter tasting drink.
Sweeten to taste. Refrigerate to chill or serve over ice.

Makes 2-3 cups

AGUA DE MELÓN
Melon Agua Fresca

4 cups fresh melon chunks (such as cantaloupe, honeydew melon, watermelon) peeled, and seeded
1 1/2 cups water
Sweetener of choice, or to taste
2 tablespoons lime or lemon juice, or more to taste

Place fruit and water in blender jar. Blend until smooth and pour into large pitcher.
Add more water to make 2 litres. Add sweetener and lime juice to taste.
Refrigerate to chill or serve over ice.

* You can add extra flavorings (mint to honeydew, orange juice to cantaloupe, and blended raspberries to watermelon) if you like.

Makes about 2 litres.

Comment

Gorgeous and golden-hued, these Sweet Potato Scones are heavenly.

July 11, 2021 Maria Garza
IMG_3819.jpeg

I have a hidden sweet tooth, but a very discerning one. I am not one for eating just anything sweet, instead opting for indulging in pastries that are simple, yet divine. Enter the scone here - I could have lived a past life in Britain, because I simply adore scones, the richer and flakier the better. My favourite ones are currant scones, but these sweet potato ones are a very close second.

Sweet potatoes are part of my Mexican heritage, and are one of the native ingredients of my country. The orange golden spuds feature prominently in Mexican cooking and are very often used to make sweet custards or desserts. There’s nothing better than a roasted sweet potato simply served drizzled with crema and garnished with chopped pecans (look for that recipe here in the blog), or a puree mixed in with eggs and baked into a delicious custard. Another favourite is a candied sweet potato called “fruta cristalizada” famous all over Mexico. So for me, it’s not a stretch to want to include sweet potatoes in a pastry that I love so much. So here it is worked into a rich, beautifully coloured scone.

In the Southern United States you will often find sweet potato biscuits - those are the cousins of the scones. I prefer a tall, flaky pastry and for this we need to have a dough that’s a bit firmer and handled as little as possible so the butter does not have a chance to soften - that will help it with the flakiness. If you don’t happen to have buttermilk on hand, you can use whipping cream instead. My mashed sweet potatoes were very firm, so if yours are moist, you may have to reduce the amount of liquid by 1 or 2 tablespoons, the clue is not to have a sticky dough. As we shape the scones, we also need to cut the dough straight down so that the scones can bake tall and straight (I use a pastry cutter for this, but a chef’s knife works just fine), and for best results, the dough must be fridge cold (or even frozen) before it goes into the oven.

Biscuits often bake at a higher temperature for a shorter time, but I like to bake my scones at 375°F for a bit longer so they have time to cook on the inside as they brown beautifully on the outside. Serve scones warm, slathered with butter and your favourite jam - I love apricot preserves.

You can double the recipe and freeze unbaked scones, or you can bake and freeze baked scones. Either way, you won’t regret having them on hand for your next afternoon tea or decadent breakfast.

Sweet Potato Scones

2 1/2 cups All Purpose flour (300g)
1/3 cup granulated sugar (66g)
3/4 Tbsp baking powder (9g)
1/2 tsp Diamond Crystal kosher salt (1.5g) (or 1/4 tsp table salt) 
1/4 tsp ground Mexican canela or freshly grated nutmeg
3/4 cup cold unsalted butter, cut into small bits (170g)
1/2 cup cold mashed roasted sweet potato (105g)
1/2 cup buttermilk (125ml)
1/4 cup whipping cream (63ml) + 2 Tbsp for brushing scones
1-2 Tbsp coarse sugar for garnish

Optional add-ins: zest of one lemon, candied ginger, pumpkin seeds (they look great as a garnish)

Preheat oven to 375°F.

In food processor, place flour, sugar, baking powder, salt and canela or nutmeg. Add cold butter and pulse a few times, until you have small pea sized butter pieces. If you’re adding lemon zest or candied ginger, add them at this point.

Mix buttermilk and cream and add to mixture in food processor. Pulse a few times until mixture comes together in processor bowl.

Turn out dough onto your board and knead gently a few times, just until it comes together, but do not overwork the dough, and most importantly, don’t let the dough get too warm. Press the dough into a circle that’s 1 1/2” thick and cut with a knife or pastry cutter into 8 wedges.

Place dough wedges on parchment-covered baking tray and refrigerate at least 30 minutes before baking. (You can also freeze dough and then bake from frozen).

Before baking, brush wedges with cream and sprinkle with coarse sugar. Place in hot oven and bake for about 25 minutes, until bottoms are golden brown. If you’re baking from frozen, bake for 32-36 minutes, until golden brown.

Cool baked scones on rack and serve with your favourite jam.

Makes 8 scones.


Comment

A Mother Sauce: Roasted Poblano Salsa

July 4, 2021 Maria Garza
IMG_3727.jpeg

In the world of Salsas, the sheer variety is immense. I have posted many recipes for all different kinds of them, and yet, there is so many more to write about! I have always said there are as many salsas as there are cooks out there, and that is a very true statement. Each person puts his or her own spin or shall we say “flavour” into their creations.

I have always made poblano salsas in the traditional way - that is, charring the poblanos over live fire until blackened, then steaming them before peeling and deveining. That yields a very smooth and terse sauce that is delicious. Today, though, I decided to simplify the process and create something that can be used in many ways. You can, of course, use this salsa on your tacos, but where this sauce shines is in the classic poblano creamy sauces for either chicken or pasta. The next place I’m going to experiment is using it in an aguachile, but it would also work really well mixed into a chicken broth for a poblano seasoned soup, or cooked into shredded pork carnitas or poblano rice. So many delicious variations in my head!

But who am I to dictate your gastronomic creations? When you make this salsa, go ahead and let your imagination fly. I love that it works on its own or it can be the base for many different dishes. This recipe makes a large batch, enough to use some in your first dish and then freeze the rest for another few later on.

This salsa has just the right amount of spice, that kind of heat that comes on slowly and then just lingers on the tongue… but if you want more, just add more Serranos or Jalapeños to the mix. Up here in Canada, poblanos are never spicy, but wherever you are, it is a good idea to seed and devein them just in case you get the scorcher types like they sometimes are in Mexico.

Go ahead and make a batch of this salsa and taste something that all of us Mexicans adore - Poblano chiles. If you want to see a step by step, visit my Instagram highlights.

Salsa Asada de Chile Poblano
Roasted Poblano Salsa

4 large poblano chiles (500g)
1 large white onion (200g)
4 large tomatillos, husked (200g)
5 Serrano chiles, stemmed (50g), or substitute Jalapeños if you cannot find Serranos
6 large cloves garlic, unpeeled (20g)
3 Tbsp olive oil
1/2 tsp salt, or to taste
1 1/2 cups chopped cilantro (50g)
1 cup water

Stem, seed and devein poblanos, then cut into 2” chunks. Cut onion into 2” chunks, and quarter tomatillos.

Place poblanos, onion, tomatillos, whole Serranos and unpeeled garlic on rimmed baking sheet. Drizzle with olive oil and sprinkle with salt. Toss to coat and roast in a 425°F oven for 30-45 minutes, tossing once or twice, until nice and soft and slightly browned.

Remove from oven and let cool for 10 minutes. Peel garlic cloves and then place all vegetables in blender jar. Add chopped cilantro and 1/2 cup water. Blend until smooth, adding up to 1/2 cup more water to get to the consistency you want. Taste and adjust salt content.

Makes about 3 cups.

2 Comments

A bowl of comfort: Fideos Secos con Chorizo

June 27, 2021 Maria Garza
IMG_3659.jpeg

There is no question we have all been living the strangest times. This last year and a half has been one of the scariest, most stressful and challenging years I can recall, and though we have all been in this together, we have all lived a totally different experience, based on our individual circumstances.

Yesterday, I was fortunate to receive my second Covid-19 vaccine and based on many people’s reaction to it, I was wondering how it would affect me. Many I know have had a bad reaction to the vaccine and I’ve been hoping it would not be too bad for me. Nevertheless, my arm was very sore and I felt very fatigued, enough to take an afternoon nap.

Forcing myself to get up to cook, all I wanted was something comforting, something that would not take too long to cook and it would be delicious. Granted, this is not the easiest thing in the world to make compared to cooking pasta and adding some butter and Parmesan cheese, but it was what I was craving and since I had everything on hand to make it, I forged on.

I have written about “Sopas Secas” before (check out my blog post about yummy Tacos de Fideo), but I’m not sure they have got the recognition they deserve. Sopas Secas are the result of a true fusion in Mexico - using pasta, but cooking it with a tomato salsa instead - they’re like a cross between an Italian pasta dish and the Spanish Fideuà. I would say they resemble the Spanish version more because they are made exclusively with Fideos, that thin egg vermicelli pasta. Adding the tomato salsa to it is a very common way to flavour dishes in Mexico, and it is not surprising the dish evolved this way, as it is what Mexican cooks know and do every day, whether they are making eggs, stews or salsas!

So what are Sopas Secas, you ask? Well, the name literally translates to “dry soup”, which is misleading because this is not a soup at all, but in Mexico we say a wet soup is anything that’s liquid, and dry soup are “dry” rice dishes and fideos. You can attribute this to the quaintness of the language and just carry on. :-)

A sopa seca would be your grain component and would be a side dish to whatever you are eating, so it could be your rice or your fideos. Then you would have your main protein and a starch in the way of beans or other vegetables to complete your main dish. Fideos Secos will always be flavoured with tomato, and very often you will see them enhanced with chorizo - it’s just a match made in heaven. The little amount of chorizo enriches the dish without making it heavy. As usual, the garnishes crown the dish in the form of avocado, crumbled cotija (or feta) cheese, cilantro and a generous drizzle of crema. A splash or lime juice and extra chipotles in adobo take it over the top.

Dig in with a spoon or put this in a tortilla to make a spectacular taco. Either way, you will be in Mexican pasta heaven!

Fideos Secos con Chorizo
Vermicelli with Chorizo

1 guajillo chile, stemmed, seeded and deveined
2 small vine tomatoes, chopped (1 1/2 cups)
1/2 small onion, chopped (3/4 cup)
1 clove garlic, peeled and chopped
1/2 cup water
2 Tbsp vegetable oil
100g raw Mexican chorizo
2 cups (150g) fideos (thin egg vermicelli noodles)
3 cups chicken stock (or water)
Salt to taste
2 avocados, sliced
1/2 cup crumbled cotija or feta cheese
2 Tbsp chopped cilantro
1/4 cup Mexican crema or crème fraîche
Lime wedges
Chipotle chiles in adobo, optional

Heat up comal or frying pan over medium heat and toast guajillo chile just until fragrant, a few seconds per side - make sure it does not burn.

In blender jar, place toasted guajillo, tomatoes, onion, garlic and 1/2 cup water. Blend until completely smooth. You should have about 1 1/2 cups salsa.

Meanwhile, in large saucepan, heat 2 Tbsp oil over medium high heat and cook chorizo, crumbling as it cooks, until it’s golden brown and a bit crispy. Remove 2 Tbsp and reserve for garnish.

To the pan, add fideos and stir as you cook - you want to get the pasta nice and golden. This will take 5-10 minutes.

Add blended salsa and stir to cook until sauce is thick and dry - 5-10 minutes.

Add stock (or water) and salt to taste and bring up to a strong simmer.

Lower heat and simmer gently, uncovered, until pasta is tender and liquid is mostly absorbed -we want a semi-dry pasta. This will take 12-15 minutes, depending on your cooking temperature.

Serve garnished with reserved chorizo, avocado, cotija cheese, cilantro, and a drizzle of crema. 
Serve with lime wedges and chipotles in adobo.

Serves 4. 

Comment

Camarones Enchipotlados are creamy, spicy and totally delicious!

June 20, 2021 Maria Garza
IMG_3586.jpeg

In all these months of pandemic, and to avoid unnecessary trips to the grocery store, I’m sure many of us have learned to work with what we have. I think many of us have become better cooks, and have had time to experiment, whether out of necessity or just for fun.

Most of my recipes are born of a combination of factors: at the top of the list are cravings - my stomach rules for sure! If I’m craving something, then it will happen. Second: I cook with what I have - most of the time, I will look in my fridge and freezer and I will make something up using what’s available. I admit experience helps a lot here, but if you’re not at the point where you can make things up with ingredients you already have, be patient - it all comes with practice. Third, fourth and fifth: the desire to cook something delicious, that reminds me of home and will be done quickly make up for the rest.

That is how this recipe came about… I had a bag of raw wild Argentinian shrimp (the best!) in my freezer, and half a jar of crema that needed to be used, so I put them together and added a few ingredients and I had the most delicious tacos in 15 minutes flat. Yes, you have to think ahead to defrost the shrimp, but luckily if you put them in cold running water they thaw very quickly, just make sure you drain them thoroughly before you cook them. I always have chipotle chiles in adobo in the fridge and herbage in the form of chives and cilantro. And tequila? Well, yes, what kind of Mexican would I be if I didn’t have tequila in the house?

A couple of important tidbits: this dish comes together very quickly, so have all your ingredients ready and measured before you start cooking. Cook over medium high heat and whatever you do, don’t overcook the shrimp! One minute per side is all they need because then they will finish cooking once you add the tequila and crema. If you’re worried about the alcohol, or you don’t have any, you can omit the tequila. You can make them as spicy as you want - just add more chiles! I made tacos with these, but you can take this recipe more into the realm of a main course if you serve it with white rice and some roasted veg.

Either way, I hope you make these and let me know what you think! For a step by step, check out my Instagram highlights.

Camarones Enchipotlados
Creamy Chipotle Shrimp

340g raw wild Argentinian shrimp, thawed, peeled, deveined 
Salt and Pepper to taste
1 Tbsp butter
1 clove garlic, minced
3-4 Tbsp of your favourite tequila
1/2 cup Mexican crema, crème fraîche or sour cream
1-2 tsp chipotles in adobo, minced, or more to taste
Chopped cilantro and chives for garnish
Corn tortillas for serving

In medium bowl, toss shrimp with salt and pepper to taste.

In large frying pan, melt butter over medium high heat. Add garlic and cook for one minute, just until fragrant.

Add seasoned shrimp and cook for one minute per side - they should still be raw inside.

Add tequila and carefully ignite to flambé. Let flames subside as you shake the pan vigorously.

Immediately add crema and chipotles and quickly stir shrimp into sauce.

Add cilantro and chives and serve immediately with corn tortillas.

 Serves 2-3.

Comment

Another refreshing Agua Fresca: Horchata

June 13, 2021 Maria Garza
IMG_3520.jpeg

The origins of horchata go way back - in Spain, and more specifically in Valencia, a drink called Horchata de Chufa was made and still is popular today. That particular drink is made with tiger nuts, but in Mexico and many parts of Latin America, we make our horchata with rice and it is yet another one of our beloved aguas frescas.

Typically, horchata is a drink of soaked and blended rice mixed in with condensed and/or evaporated milks, then sweetened and flavoured with canela - Mexican cinnamon. I really like that kind of horchata, but I love coconut even more, so I make my horchata with rice, but instead of using milks, I go for a blend of coconut water and coconut milk, making this a vegan drink.

Any kind of rice works here, but it doesn’t have to be anything expensive - long grain works just fine, but the most important step for making horchata at home is to take the time to soak the rice. Soaking softens the grains and makes the mixture easier to blend. You can soak as little as three hours, but it is better to do it overnight. If you have a really powerful blender, it’s OK to soak less time, but if not, it’s best go overnight.

Once you blend, let the machine do its thing for at least one minute, or even more (you know your blender best), to make sure the grains are thoroughly ground. Pass the mixture through a very fine sieve (I like to use a nut milk bag), and then pour into a pitcher, sweeten to taste and that’s that!!

To serve, you can garnish with a few fun things as we do in Mexico. If you walk the markets and decide to buy a glass of horchata, it will likely come garnished with small pieces of cantaloupe and chopped pecans. Delicious! If you don’t want to go that route, a sprinkling of cinnamon will do the trick. Just make sure you serve over ice.

Another idea that is super delicious is to make an iced horchata latte - pour a shot of espresso in an ice filled glass and top with horchata. Trust me, it will become a favourite summer drink.

So go and make a pitcher of horchata and enjoy this gorgeous weather!

Horchata de Coco
Coconut Agua Fresca 

1/2 cup rice 
1 cup coconut milk
3 1/2 cups coconut water
1” piece canela or cinnamon
Sugar or sweetener of your choice to taste
Ice cubes

Soak rice and canela in cold water for three hours, but you can leave it overnight at room temperature.

Drain rice and canela and place in blender with coconut milk and 1 cup coconut water. 

Blend until completely smooth.

Pass the liquid through a fine strainer or nut milk bag and pour into a pitcher. Stir in remaining coconut water and add sweetener to taste.

Serve over ice, garnished with ground canela.

Makes 1 litre.

Comment

Cactus Pico de Gallo, different, healthy and delicious!

June 6, 2021 Maria Garza
IMG_3394.jpeg

This recipe came about because I recently bought a new (and gorgeous) MadeIn carbon steel comal from Masienda. This comal is a piece of art. It is very large and heavy duty, and for its maiden voyage I wanted to make something super delicious.

Of course, the first thing I cooked in it were corn tortillas, but immediately after I was on a mission to make the most delicious Tlacoyos (find a recipe for them here in the blog). So I made three fillings: requesón (ricotta, onion and cilantro), mashed potato and tomato and refried beans with chipotle chile. I made a beautifully hydrated masa and proceeded to cook my tlacoyos.

But, you see, a tlacoyo is not complete without its toppings, and one of the most traditional toppings is made with nopales. Nopales, or cactus paddles, are a beloved in Mexico, and their use goes back thousands of years, to the time of our natives. Nopales have long been used for their medicinal properties, as they are very good for you: full of fibre, high in calcium, they help to regulate blood sugar, and cholesterol levels, among many other things.

Aside from all the good stuff, nopales are delicious. I have to confess, if nopales are not prepared properly, I have a hard time eating them. You see, they have that slimy thing going, just like okra, and I am not a fan of the slime. But, if you prepare them this way, most of that slime goes away.

Nopalitos, as they’re fondly called in Mexico, appear at the supper table very often, and as I say, we love them! Whether grilled on the barbecue, roasted in the oven, stewed with other vegetables, with scrambled eggs, or in salads just like this one, you can make tacos out of all those versions and they’re really, really good.

This recipe is a popular one at the start of a long meal - a pico de gallo of sorts, very fresh and light. You can eat it with chips, mix it with guacamole, or use it as a topping for your tlacoyos. Either way, it’s delicious and easy to make.

Pico de Gallo de Nopalitos
Cactus Pico de Gallo

3 medium cactus paddles, cleaned and diced
1 tsp salt

1 ripe vine tomato, diced
1/4 cup Spanish onion, diced
1/2 serrano or Jalapeño chile, minced
1/4 cup chopped cilantro
Juice of 1 lime
Salt to taste

First you have to clean the cactus: very carefully, and using tongs, trim the outer edge of the cactus paddle, about 1/8” of the edge, to remove most of the thorns. Then, using your knife, scrape off the rest of the thorns off both sides of the paddles, making sure none remain. As if you were peeling a carrot, doing that horizontal motion, but using your knife instead. Once they’re clean on both sides, run your hands over the surface to make sure they’re perfectly smooth and no thorns remain.

Once the cactus is clean of thorns, cut them into strips and then across into small dice. Place them in a medium bowl and add 1 tsp salt. Mix it in and let them rest for 15-30 minutes. The longer they rest the more slime will come out.

Rinse under cold running water until no slime remains. Let them drain completely and place them back in the bowl. Add the tomato, onion, chile, cilantro, lime juice and salt only to taste. Remember, they were cured in salt, so you may not need much more. Serve right away.

*if you have leftovers, the next day they will be very slimy, so you may have to drain them and re-season.

Makes about 3 cups.

Comment

Eggplant is the star in this delicious Smoked Eggplant Dip

May 30, 2021 Maria Garza
IMG_3238.jpeg

My fascination with Turkey began about a decade ago, and not surprisingly, it began through its food. I discovered a quaint Turkish restaurant in my neighbourhood and my education on Turkey, its food and its culture began with a platter of meze. The fact that this recipe comes in on the 568th anniversary of the conquest of Istanbul is pure coincidence.

On that Turkish platter there was what you would expect: lamb kebabs, stuffed grapevine leaves (dolma), carrot and yogurt dip, marinated roasted bell peppers, cucumbers, tomatoes and olives, feta-like cheese and eggplant salad. Out of all those things, what made me fall in love was that eggplant salad (you can find that Charred Eggplant Salad recipe here on the blog).

In fact, eggplant features in Turkish recipes very often, from salads and dips, to stews and the famous Ottoman stuffed eggplant dish called Imam Bayildi (translating roughly to The Imam fainted, presumably because it is so delicious). There is no question that in the Middle East and the Mediterranean, eggplant is a beloved vegetable (but technically a fruit, in the family of nightshades, like tomatoes).

When I was in Istanbul, during one of my cooking classes, I learned that one of the favourite dolmas (stuffed vegetables) are made with small eggplants that are cut and hollowed out, then dried in the sun and strung up into long strands that are sold in markets for the purpose of making these delicious meze. The same happens with peppers, and then you only have to stuff them and braise them. Unfortunately, outside of Turkey these are hard to come by, but it only goes to illustrate the love affair they have with eggplants.

Today, I want to show you how to make a delicious smoked eggplant dip, it is similar to Baba ghanoush, but it is made with yogurt instead of tahini. It is outrageously good and light. It will make a perfect addition to your meze spread.

I really like the smoked taste of the eggplant when it is charred over an open flame, but this recipe can also be done by roasting the eggplant in the oven (that is also a less hands-on approach to making this recipe). The second key to the success of this recipe is that once the eggplant is cooked, it has to drain completely, so your spread is not watery. Roasting and draining the eggplant can be done a day ahead. Putting it together once this is done is super fast.

Serve your smoked eggplant dip with some veggies like cucumbers, mini bell peppers and tomatoes, along with some good pita bread or naan, and olives and some feta cheese. You will have a delicious and healthy platter to enjoy with your family.

Smoked Eggplant Dip

2 medium eggplants
3/4 cup pressed yogurt, or Greek yogurt
1 clove garlic, minced
Juice of 1 lemon
3-4 Tbsp extra virgin olive oil
Salt and pepper to taste
Pomegranate arils for garnish
Pita bread or veggies for dipping

Pierce eggplants with a knife a few times, then place directly over an open flame, either on the stovetop over a rack, or on the barbecue, turning every few minutes so they roast and char evenly, about 35-40 minutes. Alternatively, you can place eggplants on a baking tray and roast at 450°F for about 40-45 minutes, until completely tender and charred.

When they are done, let them cool enough to handle, and then cut them in half and scrape the flesh off the skin. Place flesh in colander set over a plate and let them drain completely, 1-2 hours. This can be done a day ahead.

When eggplant has drained completely, chop it very fine. Place in a medium bowl and add yogurt, garlic, lemon juice, olive oil and salt and pepper to taste. Mix until combined and serve in a small bowl, garnished with pomegranate arils and a drizzle of olive oil. Serve with pita bread and veggies.

Makes about 3 cups.

Comment

As the weather warms, it is time for Aguas Frescas!

May 23, 2021 Maria Garza
IMG_3209.jpeg

As soon as the weather starts to get nice and warm, I start craving Aguas Frescas. I have written about them before, but there is infinite variety in what you can make, and making aguas frescas is a great way to a) use up fruit (or vegetables) that may be getting a bit old in the fridge, b) getting more servings of said fruits and vegetables into your daily meal plan, and c) having a healthy, delicious and refreshing drink on hand! Spiking these drinks is optional, if you’re feeling like a party too!

I think for me, I associate these drinks with hot weather, not that you have to - you can make these year round, of course. An Agua Fresca can be as simple as a cool Limonada- no blender required, you can add chia seeds and limit the sweetener to make it super healthy and very traditional. But for a bit more pizzazz, make an agua fresca in the blender and let your imagination fly! I love making mango strawberry lime, papaya lime, guava chia, raspberry pineapple basil, blackberry mint, and so on… you get the picture, just put a few fruits together and throw them in the blender, add water, sweetener to taste (sugar, honey or agave syrup) and usually a bit of lime or lemon for more punch. Some of these require the mixture to be strained, like the berries, but otherwise, I leave the mix as is and you get the added benefit of the fruit’s fibre.

Next time you find yourself with an abundance of fruit or veggies and herbs, try making an agua fresca!
You will feel like summer is a party!

Agua Fresca de Piña, Pepino y Menta
Pineapple, Cucumber and Mint Cooler

1 cup pineapple chunks
1 Lebanese cucumber, chopped
1/4 cup fresh mint leaves
3 cups water
Sweetener of your choice to taste, optional
Ice cubes for serving

Place pineapple, cucumber, mint and water in blender container. Process until completely smooth.
If desired, you can pass the mixture through a strainer, but if your blender is powerful, you won’t need to do this.
Transfer the mixture to a pitcher and add sweetener to taste.
Serve over ice cubes.

Makes 1 litre.

Comment

The perfect Sunday brunch dish is a plate of Chilaquiles.

May 16, 2021 Maria Garza
IMG_2958.jpeg

Looking back through my blog posts, I am shocked that I have never shared the recipe for chilaquiles! This most delicious dish is nothing but a clever way to use up stale tortillas. Much like there are thousands of recipes to make use of stale bread, in Mexico there are recipes to make use of old tortillas, and many of them make their way to the breakfast table.

Migas con huevo and Chilaquiles are but two of the easiest and most delicious ways to use those corn tortillas that may have been living in your fridge for two or 7 days!

What I love about making migas (migas are softly fried pieces of corn tortillas that then get an egg and you make a scramble — and Boom! a five minute meal!) and chilaquiles is that they come together so quick with items I usually have in my fridge.

As they say, breakfast is the most important meal of the day, and with these chilaquiles, you will start your day right! You can dress up chilaquiles by adding shredded cooked chicken (leftover rotisserie chicken, anyone?) and a delicious crispy-edged sunny side up egg. The toppings are as they say, icing on the cake. A side of beans would make this meal very well rounded indeed!

Next time you find yourself with old tortillas, some salsa and perhaps some leftover chicken, why don’t you make chilaquiles? You can use red or green salsa - whatever you have in the fridge; the chicken and the egg are optional, but once you try them like this you won’t go back!

For a step by step, check out my stories on Instagram. Buen Provecho!

CHILAQUILES VERDES PARA DOS        
Fried tortilla wedges with green salsa for two

3 corn tortillas, each cut into 8 wedges 
2-3 Tbsp vegetable oil for frying the tortillas
2 eggs
2/3 cup warm Salsa Verde or Salsa Roja
1/2 cup warm shredded cooked chicken
2 Tbsp crumbled cheese (cotija or feta work well here)
1 radish, thinly sliced
Handrul cilantro leaves
2-3 Tbsp crema, crème fraîche or sour cream diluted with a bit of milk

In large frying pan, heat vegetable oil. When it’s hot, add the tortillas and fry until crisp. Remove and drain on paper towels. Reserve. 

Meanwhile, fry the eggs the way you like them, I like them sunny side up.

Transfer the fried tortilla wedges to two serving plates and pour the warm salsa over them. 

Top with the chicken, then the egg. Garnish with radish, cilantro and then drizzle with crema. Serve immediately, with more salsa on top.

Serves 2.

Comment

Huaraches are the biggest Antojitos, and really delicious!

May 9, 2021 Maria Garza
IMG_3037.jpeg

A while back, I posted a photo of the huaraches I learned to make from my Nana, in Monterrey, and at that time, a well known Mexican chef gave me grief telling me what I made was not a huarache as it was not a filled masa cake. 

You see, the huaraches in Mexico City (and other parts of Mexico) have a filling of beans, whereas in other parts of Mexico, the masa is cooked like a thick oblong tortilla and then topped with beans, salsa and the rest of the toppings. Same ingredients, different method, but all delicious.

It is very obvious that as Mexico is a huge country, there will be variations of methods from region to region, and this is a perfect example of that fact. 

Having said that, there is no question that these bean filled Huaraches are delicious, and when you visit a market in Mexico City, you will invariably see the ladies making the biggest antojitos you have ever seen.

The word huarache is derived from the Purépecha word kwarachi,  which means sandal, and it perfectly describes the shape and size of these treats! In the markets you will find the same bean fillings, made with different coloured masas, the toppings could be chorizo, shredded chicken, or thinly sliced steak, but always garnished with lettuce, salsa, cheese, crema and radishes.

This huarache in the photo is made with blue bolita Belatove maize I nixtamalized and ground into masa, but at home you can use the commonly found Maseca to make yours.

Whether you make the recipe with the beans inside the masa or on top like my Nana’s, you can be assured these will fly and will transport you to the markets of Mexico.

Huaraches de Frijoles con Chorizo
Bean Filled Masa Cakes with Chorizo

2 cups Maseca
1/2 tsp salt (optional)
1 Tbsp manteca (rendered lard) or shortening
2 - 2 1/2 cups warm water as needed for masa
200g Mexican chorizo
1 cup seasoned cooked pinto or black beans, drained
1/2 Tbsp chipotle chiles in adobo
1/4 cup manteca or vegetable oil
1 cup of your favourite salsa
3 cups shredded iceberg lettuce
1/2 cup grated cotija or feta cheese
2-3 radishes, thinly sliced
1/2 cup crema, or sour cream thinnned with a bit of milk
Cilantro leaves for garnish

In medium bowl, combine maseca, salt and lard. Slowly start adding warm water and knead until you have a smooth pliable dough. You may not need the full amount of water so start adding it slowly and only add what you need. Cover and reserve while you prepare the chorizo and beans.

In medium skillet, cook chorizo - you may not need any oil, depending on the chorizo you have. If you find it’s dry, add a tiny bit of vegetable oil to cook it, crumbling as you stir. It should be completely crumbled, and won’t take too long to cook, about 5 minutes. Reserve.

In blender or food processor, blend beans and chipotle chile. Mixture should be fairly dense, as they will be the filling for the huaraches. If they are too thick, add a bit of water, but make sure they are not runny.

Preheat comal, cast iron griddle or pan over medium heat. Divide masa into 8 portions. Line your board with a piece of plastic (a cut out resealable bag works great). Make an elongated shape with your masa and hold it in your hand. Make a dent in the centre and fill with about 2 tsp bean paste. Enclose the filling with the edges of the dough and gently roll into the cigar shape again. 

Place dough on plastic and gently start pressing it as you stretch it with the palm of your hand. Continue to pat it down and stretching until your huarache is about 1/4” thick. It should have an oval shape and it will be about 12cm long.

Gently flip huarache with the plastic onto your hand. Peel off the plastic and transfer to the hot comal, gently laying it down onto hot surface.

Cook for 2 minutes and using a spatula, flip to cook the other side, another two minutes or until lightly browned. Continue with the rest of your huaraches. Place them on a rack as they come off the griddle. This can be made in advance.

To finish your huaraches, heat lard or oil in skillet and pan fry for 2-3 minutes per side, making sure they are crisped and warmed through.

Remove to a plate lined with paper towels to absorb some of that oil, then transfer to plates and spread with salsa and garnish with lettuce, chorizo, cheese, radishes, crema and cilantro.

Makes 8.


Comment
← Newer Posts Older Posts →

Copyright © 2025 The Cultural Kitchen
All Rights Reserved

1936 Ranchwood Way Orleans, Ontario K1C 7K7
613.762.0940