• Welcome
  • About
  • Workshops
  • FOOD FOR BLOG
  • Contact
Menu

The Cultural Kitchen

Street Address
City, State, Zip
Phone Number
COOKING CLASSES ON DEMAND

Your Custom Text Here

The Cultural Kitchen

  • Welcome
  • About
  • Workshops
  • FOOD FOR BLOG
  • Contact
Brushes Mercado-1.jpg

FOOD FOR BLOG

Mexico's Black Gold: Cuitlacoche.

November 12, 2023 Maria Garza

Cuitlacoche, also known as huitlacoche or corn smut, is a delicacy that has a fascinating history and a unique flavour profile. Prized since the days of the Aztecs, this Mexican culinary treasure presents itself as an inky gray-black, bulbous growth on ears of corn. Outside of Mexico, corn smut is treated as a disease on the plant, but for us, it is a treasure. Although it may not look appealing at first glance, once cooked, cuitlacoche transforms any dish into an amazing experience. Its earthy, nutty, and slightly sweet corny flavour adds depth and complexity to a variety of dishes, making it a prized ingredient in Mexican cuisine.

I realize for most people outside of Mexico, with the exception of some places in the States, cuitlacoche is not available (unless you know a chef who knows a farmer who grows corn and happens to have corn smut on his crop!) so if this is the case, use this recipe but substitute mushrooms - after all, cuitlacoche is a type of mushroom!

This preparation can be used for making tacos, but it can also be used as a filling for empanadas (the fried masa kind), quesadillas or as a filling for sopes or gorditas.

TACOS DE CUITLACOCHE
Corn Smut Tacos

1 Tbsp vegetable oil
1 small onion, diced
1 serrano or Jalapeño chile, minced (or more to taste)
1 clove garlic, minced
1 Roma tomato, diced (about 3/4 cup)
Salt to taste
300g fresh cuitlacoche, cleaned
1/4 cup chopped cilantro
Tortillas
Salsa of your choice
Pickled onions for garnish (optional)

In medium skillet heat oil over medium heat. Add onion and serrano or Jalapeño chile and cook until softened, 3-4 minutes.

Add garlic and cook until aromatic, 1-2 minutes.

Add tomato and cook until it softens and starts to break down. Season with salt to taste.

When tomatoes are soft, add cuitlacoche and cook for a few minutes, until softened and it releases its liquid.

Add cilantro and stir to combine. Adjust seasoning and serve.

Makes tacos, top with cilantro leaves and salsa. If you have some pickled onions, they make a great garnish.

Serves 4 as an appetizer.

Comment

Guacamole with Chile Piquín Aioli and Chicharrón, the perfect combination.

October 21, 2023 Maria Garza

Every time I go home to Monterrey one of my highlights is getting together with my cousin Geral Derby. She is also a Chef and when we are together we have so much fun because we love cooking together and of course eating together! We talk about food non-stop and compare and share recipes. The best kind of fun for us who love to cook!

I visited Geral in her home and she made this recipe that I am sharing with you today. Picking the tiny but fiery piquín chiles right from her plant outside is where we started and it only got exceptional from there. Chile Piquín is the jewel of the North, and it is our pride and joy. If you have a salsa in Monterrey, chances are it will have chile piquín. It is very spicy and not available fresh to us up North, but dried is readily available, so go ahead and use dried if you decide to make this recipe (and I really think you must!).

The recipe starts by making a loose aioli with the softened chiles and garlic. I encourage you to make this in the molcajete or mortar and pestle, as you will have the best results, but if you don’t have one, you could emulsify the aioli in a blender and then carry on. Use a neutral flavoured oil here - olive oil would be too strong for this recipe. Grapeseed or avocado oil are great choices. In Mexico, jocoque is a type of yogurt that is hard to find in Canada but Balkan Style yogurt or even Greek yogurt would work fine. The guacamole by itself is amazingly delicious, but if you can find pork chicharrón, then use that for the topping. It makes outrageously delicious tacos. If you can’t buy it where you are, I have a recipe to make it from pork belly, check it out here.

This recipe is a great starter for your next party. Pair it with Hibiscus Mezcalinas like Geral made for me that day and you will be happy indeed!

Guacamole con Aioli de Chile Piquín y Chicharrón de Puerco
Guacamole with Piquín Chile Aioli and Pork Chicharrón

1 Tbsp fresh or dried chile piquín (or more if you really want things spicy)
4-5 garlic cloves (3 if they are large), halved lenghtwise
1/3-1/2 cup grapeseed or avocado oil, divided
Salt to taste
Juice of 1 large lime
3 ripe avocados
1/2-2/3 cup jocoque or plain yogurt
1 cup chopped warm chicharrón

In small frying pan, heat up 1 Tbsp oil and cook chiles and garlic over medium heat only until softened (be careful if you’re using very fresh chiles as they may splatter). Once they are soft (but not brown) transfer everything to a mortar and pestle.

Start pounding the chiles and garlic and add some salt. Continue until you have a smooth paste. Add lime juice and continue to pound as you start drizzling in oil as you stir. Add only enough oil to emulsify the mixture, the texture will be like salad dressing.

Add the cubed avocados and start mashing using a potato masher or a fork. I like the texture to be a bit chunky, but you decide what you like. Add yogurt and stir. Adjust seasoning and serve with diced chicharrón and tortillas. You don’t really need salsa as you have piquín chile within the guacamole, but if you want more, go ahead and serve with your favourite salsa.

Serves 6 as a starter.

Comment

Arepas are the perfect vehicle for all kinds of fillings.

September 22, 2023 Maria Garza

Arepas, the beloved culinary gem of Venezuela, have been an integral part of the country's cuisine for centuries. These delicious corn cakes, with their crispy exterior and soft, doughy interior, have roots in pre-hispanic times when indigenous tribes in Venezuela relied on corn as a staple food. Ancient Mexicans also consumed similar dishes made from corn, which speaks to the widespread tradition of corn-based cuisine in the Americas. The word "arepa" is derived from the indigenous Tupi language, meaning cornbread. Arepas are also consumed in other countries like neighbouring Colombia and Panama.

Originally, arepas were created by grinding corn kernels and shaping the resulting dough into flat, round cakes. These cakes were then cooked on a hot stone or clay griddle known as a budare. Over time, the cooking techniques and ingredients used to prepare arepas have evolved, incorporating regional variations and culinary influences.

To prepare arepas, you need a specific type of flour - it is called Harina PAN, and it is a pre-cooked corn flour (not to be confused with the Mexican corn flour). The harina PAN is mixed with water and sometimes salt, then formed into flattened disks. These disks are cooked on a griddle or a skillet until they develop a golden-brown crust on both sides. The result is a deliciously crispy exterior that contrasts beautifully with the softer, doughy centre. They can be enjoyed plain, acting as the daily bread and a perfect accompaniment to any meal; or filled with a variety of mouthwatering fillings. Traditional fillings include shredded beef, chicken, avocado, black beans, cheese, and plantains. Arepas can be topped with a variety of sauces, such as the popular Venezuelan avocado sauce called guasacaca.

These Cheese Arepas are easy to make and absolutely delicious, especially paired with the avocado based Guasacaca. Once you make these, you can venture into trying other fillings, they are absolutely delicious!

AREPAS DE QUESO
Cheese Arepas

2 1/4 cups warm water, or more as needed
1 Tbsp butter
½ tsp salt
2 cups Harina PAN corn flour
1 cup mozzarella cheese, grated
12 slices Havarti or Provolone cheese

In medium bowl, mix water, butter and salt. Mix until butter melts and start adding corn flour, mixing with your hands until it comes together and forms a fairly moist dough that does not stick to the bowl nor your hands. Add shredded cheese and mix well. Let dough rest 5 minutes, covered.

Divide dough into 1 ½” balls and flatten with your hands until they are about ¼” thick. Cook arepas over medium heat on a dry griddle or frying pan, about 4 minutes per side, or until golden. As they are cooked, place them on a tray in a 300°F oven while you cook the rest, to keep them warm. Split open and stuff with sliced cheese, then return to the oven for a few minutes to let the cheese melt. Serve with Guasacaca.

GUASACACA
Avocado Sauce

1/2 cup onion, roughly chopped
1/2 green bell pepper, seeded, deveined, and roughly chopped
1 large ripe avocado, peeled and cut into chunks
1 small clove garlic, chopped
1/2 cup fresh parsley leaves
1/2 cup fresh cilantro leaves
1 Jalapeño chile, chopped, optional
2 Tbsp red or white wine vinegar
½ tsp salt, or to taste
¼ tsp black pepper
2 Tbsp olive oil

Place onion, bell pepper, avocado, garlic, parsley, cilantro, Jalapeño (if using), vinegar, salt, pepper and olive oil in bowl of a food processor and blend until smooth. Taste and adjust seasoning.

Let stand at room temperature for at least 30 min for the flavours to blend.

Serve sauce at room temperature with arepas, fish, grilled meats or vegetables.

Makes 12 arepas and 1 ½ cups Guasacaca.

Comment

Lentils are really good for you, but they are just as delicious!

September 3, 2023 Maria Garza

I don’t know how the summer has been where you live, but here in Ottawa, it’s been either really rainy, really hot or not that warm! This does not seem like the regular hot summers of the past, and early mornings almost feel like Fall is coming (which it is). So as the weather starts to change, I want to eat soup. I am not much for vegetable soups, but if it’s bean or lentils, I’m your girl.

This (vegan) lentil soup is a flavourful and nutritious meal that satisfies both the taste buds and the appetite. Bursting with wholesome ingredients, this soup is a light but hearty blend of tender lentils, vibrant vegetables, and aromatic flavours. The lentils add texture, while the vegetables add a colourful array of nutrients. The combination of flavours is outstanding, with hints of earthiness from the lentils, sweetness from the vegetables, and a touch of warmth from the red pepper paste. It is a one-pot wonder that offers a perfect balance of protein, fiber, and vitamins, making it an ideal choice for those seeking a healthy and plant-based meal. Whether enjoyed on a chilly day or as a comforting weeknight dinner, this lentil soup is a delicious and nourishing option for vegans and non-vegans alike.

As beans or legumes go, lentils are the easiest because they don’t need to be soaked and cook fast, so making this soup is a feasible quick dinner that can be accomplished in half an hour. Lentils are inexpensive, but also really good for you, providing lots of fiber and plant based protein, so I invite you to add them to your meal prep repertoire! Make a large batch and eat it throughout the week.

SOPA DE LENTEJAS
Lentil Soup

1 Tbsp olive oil
1 medium onion, diced
2 carrots, peeled and diced
2 stalks celery, diced
1 clove garlic, minced
1 tsp Turkish red pepper paste (mild or hot)
1 tsp tomato paste
1 large tomato, diced
1 cup tomato puree (you can simply blend some fresh Roma tomatoes to make this)
1 1/2 cups brown lentils
6-8 cups vegetable stock
Salt and pepper to taste
½ cup chopped cilantro
Lime wedges for serving

In medium saucepan heat oil over medium heat and add onion, carrot and celery. Cook until starting to get soft, 3-4 minutes.

Add garlic and cook for a minute, then add red pepper and tomato pastes. Mix to combine and then add diced tomato and tomato puree. Mix and cook until tomatoes change colour, about 5-7 minutes.

Add lentils, stock and salt and pepper to taste. Bring up to a boil, then turn heat down, cover and simmer until lentils have softened, 20-25 minutes.

When lentils are tender, add cilantro. Serve with lime wedges.

 Serves 6.

Comment

This Greek Fava Dip is so good you'll want to make it again and again.

August 19, 2023 Maria Garza

A few months ago I was researching recipes for an upcoming Greek class, and even though I’ve taught this class multiple times, I like to make different dishes every time. That’s one thing I love about my job, I am always trying new things, so today I am sharing with you everyone’s favourite recipe in my last Greek class.

I have not been fortunate to travel to Greece, but it is definitely on my bucket list. All those beautiful towns, the people, the beaches, the music, the archaeological sites and of course the food! I love the brightness, the simplicity and the un-fussiness of Greek food and I always associate it with the people you are sharing that food with. All around good feelings for Greek things in general.

So I came across this recipe, and it caught my interest because even though its name says Fava, it is not actually made with fava beans. Instead, the main ingredient is yellow split peas! You need to cook the peas with humble ingredients like onions, garlic and carrots, simmer them in stock until softened to be finally blended into the dip. At the end, you emulsify with olive oil and brighten with lemon juice. Easy, right?

There is one thing to pay attention to in this recipe though, make sure you cook the mixture uncovered, and long enough to evaporate most of the liquid, otherwise you will get a really runny dip and that’s no fun at all! The mixture does thicken up as it stands after blending but it will not do that if you haven’t evaporated most of the stock first, so be mindful of that. If you can see the bottom of the pot as you run the spoon through the mixture, then you’re good to go.

The toppings in this recipe can vary from cook to cook, it could be as simple as some sliced onion and capers, or you could roast some mini tomatoes and use those instead. Always finish with a good drizzle of your best extra virgin olive oil, serve with pita bread and enjoy!

GREEK FAVA, YELLOW SPLIT PEA DIP

1 cup yellow split peas
1 litre boiling water
6 Tbsp extra virgin olive oil, divided
1 medium carrot, diced (3/4 cup)
1 medium red or white onion, diced (3/4 cup)
1 clove garlic, chopped
2 bay leaves
1 sprig rosemary
Salt and pepper to taste
1 litre vegetable stock or water
Zest and juice of 1 lemon

Garnish:
2 Tbsp capers
4 Tbsp thinly sliced red onion
2 Tbsp olive oil

In large bowl, place split peas and add the boiling water. Stir for 10 minutes, then drain and reserve.

In large saucepan, heat 2 Tbsp olive oil and add carrot, onion, garlic, bay leaves and rosemary. Cook until vegetables start to soften and then add drained split peas, vegetable stock, salt and pepper. Bring to a boil, then turn down to medium low heat and cook uncovered, stirring often, until split peas are very tender and mixture is thick, about 25-30 minutes.

Remove bay leaves and rosemary and transfer mixture to the food processor. Add remaining 4 Tbsp olive oil, zest and juice of one lemon and process until smooth. Fava will thicken as it cools.

Serve fava in a bowl, garnished with capers and red onion. Drizzle with a bit more olive oil.

Makes about 3 cups, serves 6-8 as a meze.

Comment

Empanadillas de Atún, a Spanish classic.

August 12, 2023 Maria Garza

During my last trip to Spain I traveled to a few places, I went from Madrid to Andalucía, then up to Galicia and finally Asturias. As a good traveler, I walked and walked - it is the best way to see places! Of course, when you put in so many steps, you build an appetite, so I also sampled a lot of delicious food along the way.

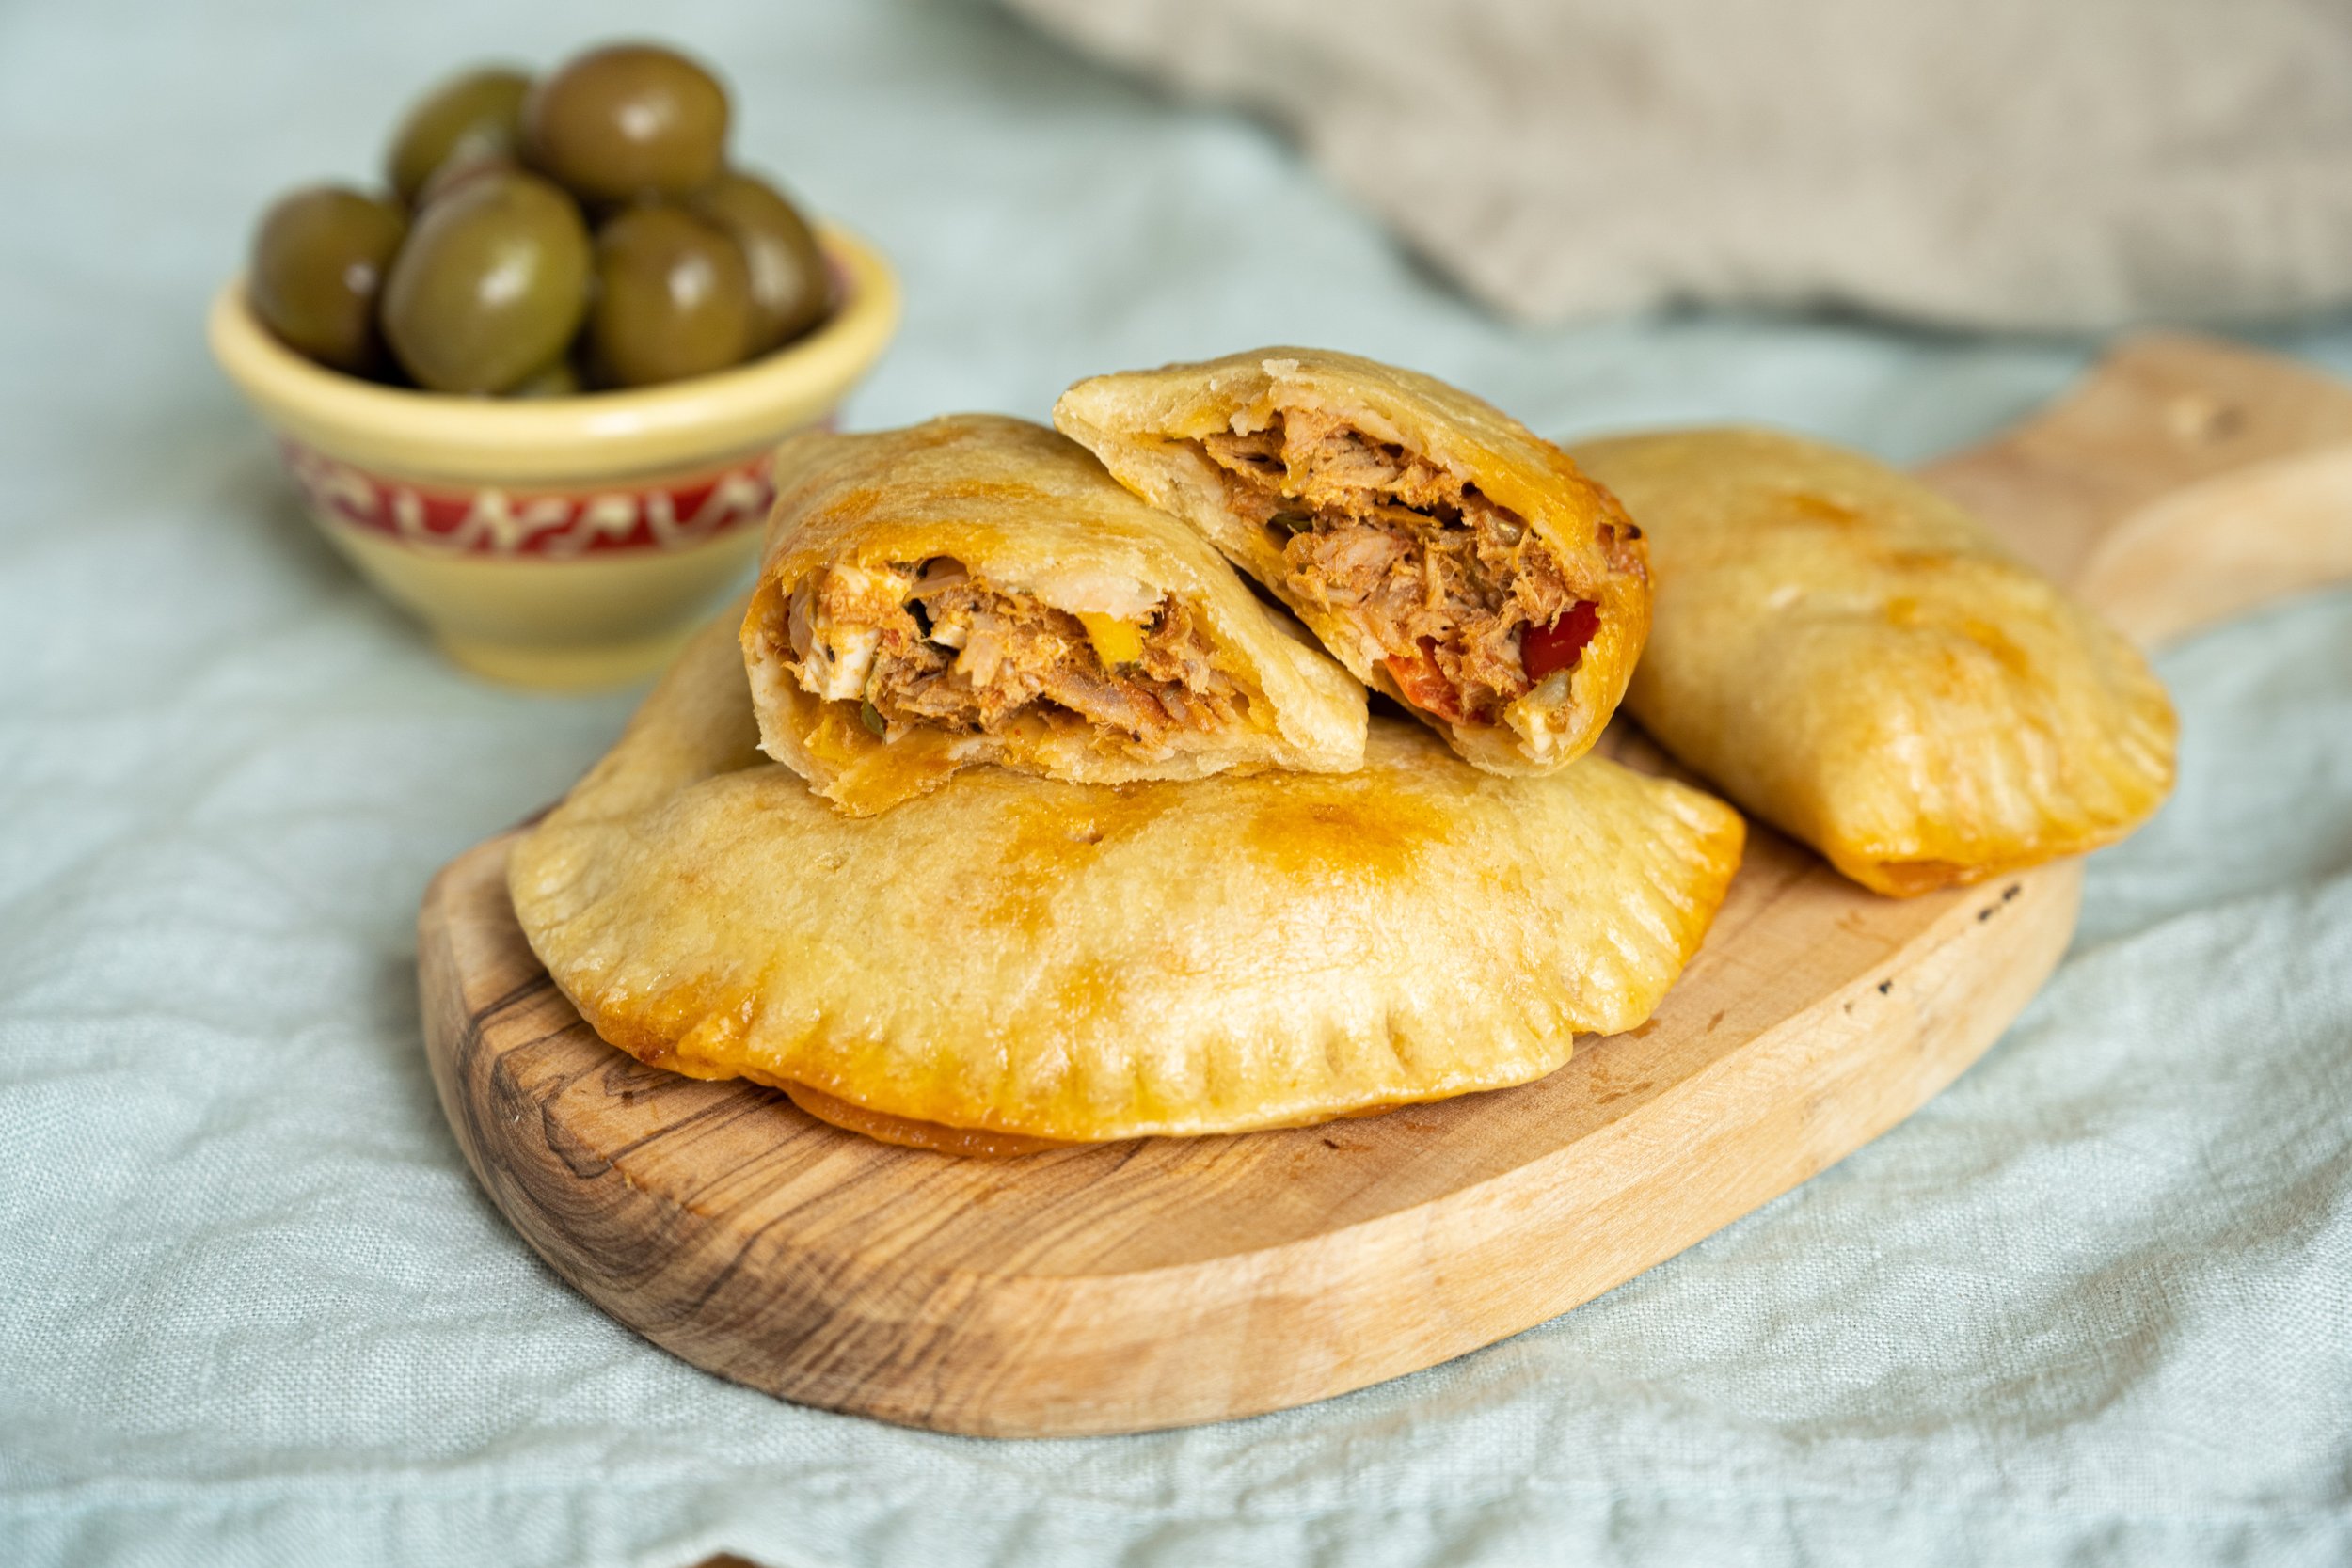
One of the things I love (and ate a lot of) is Empanadas, in all shapes and forms, and with all kinds of different fillings. Every region has its own specialty, but my favourite is the one made with tuna. Spain, and specifically the region of Galicia in the northwest has a thriving canned seafood business, so it stands to reason that the main ingredient of their version of empanadas is tuna.

In bakeries, coffee shops, restaurants and tapa bars you will see the large versions of this recipe - usually in square or rectangular form that they simply cut into squares. You can buy a piece and then enjoy as you walk or sit and people watch - my favourite pastime when I travel. Back at home, I prefer to make these in small form, for individual servings that look pretty but are just as delicious.

This recipe is inspired by those I sampled there. The dough is made with olive oil - it is a very elastic dough, easy to work with and very flavourful because of the oil. The filling is a classic sofrito of onions, peppers and tomatoes with the addition of tuna, hardboiled eggs and capers. If you happen to have leftover filling, it makes a great crostini topping.

I make the dough and let it rest, then I use my tortilla press to make the dough circles, it goes very fast this way. Of course, if you don’t have a press, you can simply use a rolling pin, but try not to use a lot of flour when you do, as it will make the dough tough.

Serve these Empanadillas as part of a Tapas spread, or have them with a salad for a great lunch or light dinner. They freeze extremely well, so go ahead and make a large batch!

EMPANADILLAS DE ATÚN
Tuna Empanadas

Dough:
1/2 cup extra virgin olive oil
2/3 -1 cup water
1/2 tsp kosher salt
3 cups all-purpose flour*

Filling:
2 Tbsp extra virgin olive oil
1 small onion, diced (3/4 cup)
1 small red bell pepper, diced (2/3 cup)
1 small green bell pepper, diced (2/3 cup)
1 garlic clove, minced
2 medium tomatoes, grated and skins discarded (1 cup)
1 tsp Pimentón de la Vera Dulce or paprika
¾ tsp kosher salt, or to taste
Freshly ground black pepper
1 Tbsp tomato paste
4 x 99g cans tuna in olive oil, drained and flaked
1/4 cup finely chopped parsley
2 hardboiled eggs, diced
¼ cup capers, chopped 

Egg Wash:
1 large egg
1 Tbsp water

In a large bowl, whisk together the olive oil, 2/3 cups water, and salt. Gradually add the flour, stirring with a wooden spoon, until the dough comes together and no dry bits of flour remain. If dough is stiff, add a bit more water until your dough feels right (*see note). Scrape the dough onto a clean work surface and knead by hand until the dough is smooth and no longer sticks to your hands or the counter. Transfer the dough back into the bowl, cover, and let rest while preparing the filling.

In large frying pan, heat olive oil over medium heat. Add onion and bell peppers and cook, stirring occasionally, until soft, 5-6 minutes. Add garlic and tomatoes, pimentón de la Vera, salt, black pepper and tomato paste. Cook over medium heat until thick and most of the liquid has evaporated, 8-12 minutes.

Add the tuna, parsley, hardboiled eggs and capers and mix gently. Adjust seasonings and cool completely.

Preheat oven to 375°F. Line two baking sheets with parchment paper.

Divide the dough into 22 equal pieces and roll into balls. Working with one dough ball at a time, use your palms, a rolling pin or a tortilla press to press into a circle.

Place 2 Tbsp filling on one half of each dough round. Fold the dough over the filling and press the edges together. Press firmly with a fork or make a decorative edge.

Place empanadas on lined baking sheets and prick with a fork to let steam escape. In a small bowl, whisk the egg with water and brush empanadas with egg wash.  Bake for 28-30 minutes, rotating halfway through, until golden brown underneath. Let cool on racks for a few minutes. You can serve warm or at room temperature.

* A note on the flour: I have tested this recipe using different brands of all purpose flours, and depending on which kind you use, you may need to add more water to get the texture of the dough right. If your dough is stiff with 2/3 cup of water, add more, a bit at a time, until your dough feels smooth and pliable. It is also important to let it rest so the dough can properly hydrate before you use it.

Makes 22.

Comment

Pretty in Pink Crispy Hibiscus Tacos

August 5, 2023 Maria Garza

I am not one to follow trends at all, it just so happened that I had some leftover roasted beets and I had been wanting to test making coloured tortillas, so one thing led to another and I finally made these VERY PINK tortillas. They turned out so well that I needed to use them for something special.

Everything you see on social media right now is all about Barbie Pink, but any association these pink tacos may have with Barbie is purely coincidental.

All that aside, these fried taquitos are so good, easy to make and could be plant based if you swap out the cheese to a feta style vegan cheese. I have another recipe for hibiscus tacos here in the blog, but these have the addition of cheese and cilantro. The salty cheese gives them amazing flavour and when we add the fried element to them it takes them to another dimension. When you are feeling like you want something with that street food vibe, then make these tacos. I am sure you will love them!

This recipe starts with hydrating hibiscus flowers. I encourage you to find whole dried flowers at your Latin or Middle Eastern grocer (hibiscus tea bags will not work here). Once you cook the flowers in water, don’t waste that ruby hued water and make some tea - just add the sweetener of your choice and thin it out with water to suit your taste, then chill and enjoy. After that, chop the flowers to make these tacos. Once you have the hibiscus mixed with the tomatoes, onions and chiles, let it cool before you add the cheese, as we don’t want the heat to melt the cheese right away. This mixture can be made ahead for up to three days, ready to make tacos whenever you crave them.

TAQUITOS DORADOS DE JAMAICA
Crispy Hibiscus Tacos

1 cup dried hibiscus flowers
4 cups water

1 Tbsp vegetable oil
1/2 cup diced onion
1 Jalapeño chile, minced
1 clove garlic, minced
1 vine or Roma tomato, diced (about 3/4 cup)
3/4 cup crumbled panela, feta or cotija cheese, plus more for garnish
1/3 cup chopped cilantro
Salt to taste

10 corn tortillas
2-3 Tbsp vegetable oil for pan frying

4 cups shredded iceberg or green leaf lettuce
1/2 cup crema, crème fraîche or sour cream
Pickled onions
Salsa of your choice
2 avocados, cut into wedges

In medium saucepan, bring 4 cups of water to a slow boil. Add hibiscus flowers and simmer, covered, for 15 minutes. Strain and reserve water for making hibiscus tea.

Cool hibiscus flowers, then chop into small pieces - you should have about 1 1/3 cups. Reserve.

In large frying pan, heat oil and add onion and jalapeño. Cook over medium high heat until softened, about 5 minutes.

Add garlic and cook for one minute. Add tomato and cook until tomatoes are very soft, about 4-5 minutes.

Add reserved chopped hibiscus flowers and mix well. Let this mixture cool down for at least 10 minutes, then add cheese and cilantro. Season with salt to taste. You can make this mixture up to two days ahead.

When ready to make tacos, warm up some tortillas, then add some hibiscus mixture to each tortilla, amount will depend on the size of your tortillas, but they should only have enough to contain mixture nicely while folded without spilling out. Fold filled tortillas gently.

Heat up a comal or large frying pan and add only enough oil to coat the surface. Add folded tortillas and cook for about 2-3 minutes per side, turning as you cook until tortillas become crunchy and filling is warmed up.

Drain on paper towels, then place on a bed of lettuce, garnish with cheese and pickled onions. Serve with avocado wedges and salsa.

Makes about 10 tacos.

Comment

Panela Oreada is a little known thing but it is amazing.

July 22, 2023 Maria Garza

My travel bug started at an early age. I still remember the fist airplane ride I ever took, it was in a small engine plane and I was with my Grandmother on our way to San Antonio, Texas. I think I was around 6 or 7 and it was the best experience ever! A few years later, around 13, I took my first solo flight, but this time I was on my way to Guadalajara, Jalisco, to visit my aunt Celina. That was the first of many trips to visit her and her family, and I always enjoyed my stays with her.

Over the years I have learned so much from my Aunt! She is a great cook, impeccable hostess and we always have so much fun talking recipes and eating really good food. She kindly shared her recipe for Cuachala and Carne en su Jugo - both recipes from Jalisco - you can read about those here in the blog. I admire her because her house always looks like it could be in a magazine, and the one thing I adore and would love to be able to emulate is having the table ready and set at all times. Try as I may, I can’t seem to be able to do it!

In any case, I’m sure my aunt forgives me for not having it quite all together as far as the table settings go, but what’s important here is the FOOD! Today’s recipe is yet another one I’ve learned from her. I had never seen this anywhere before she made it during one of my visits. Panela Oreada translates to “aired panela cheese”, and you can find this kind of special cheese in very specific mercados in Mexico, not everyone carries it. Luckily, it is extremely easy to replicate at home. All you need is time and patience.

Queso Panela is a very fresh, lightly salted cheese popular in Mexico. Its texture is very humid and porous, and it lends itself well to pan frying or grilling. It is served as an appetizer, but it can also be used to stuff peppers, or grated to top fried tacos or tostadas. It is one of the most consumed cheeses in Mexico. But if you age it, the rind becomes thicker and a golden yellow colour, and it becomes a more elegant cheese, perfect as a starter, especially if you serve it with salsa and tostadas. Pour yourself a beer or a glass of white or rosé wine and you will be happy indeed. If you close your eyes, imagine you are in my Aunt Celina’s terrace enjoying a great dinner.

Panela Oreada con Salsa Verde con Aguacate
Lightly Aged Panela Cheese with Avocado Salsa Verde

Panela Oreada:
1 panela cheese, preferably round, about 200g
Corn tostadas
Salsa Verde con Aguacate

Place panela cheese on a rack over a tray and refrigerate, uncovered, for 2-3 days, turning every day until cheese is no longer dripping. It will develop a thin yellow rind and will be firm to the touch.

Small cheese rounds will be ready in 2-3 days, but if your cheese is larger, it may take a bit longer. You decide when yours is ready.

Serve as an appetizer with corn tostadas and Salsa Verde con Aguacate.

Salsa Verde con Aguacate:
350g fresh tomatillos, husked and washed (about 6)
1 Jalapeño chile, whole
Handful of cilantro, 1/2 - 3/4 cup, chopped, or more to taste
1 small garlic clove, chopped
1 small avocado, pitted and cubed
2 Tbsp minced white Spanish onion, rinsed and drained
Salt to taste

In medium saucepan, place tomatillos and Jalapeño and cover with water.

Bring to a boil, then reduce temperature and simmer only until tomatillos start to change colour, about 5 minutes.

Remove from liquid and place in blender jar along with cilantro and garlic.

Add 2 Tbsp of the cooking liquid and blend until fairly smooth.

Pour onto large bowl and let cool for 10-15 minutes. Once cool, add cubed avocado and rinsed onion. Adjust seasoning and serve.

Salsa makes 2 cups. Serves 4-6 as an appetizer.

Comment

Hot summer days call for tasty, chilled soup, like this Spanish Gazpacho.

July 14, 2023 Maria Garza

When the weather gets a little bit too hot, cold soups are absolutely satisfying and help bring that temperature down, at least while you’re enjoying them. In southern Spain, where this Gazpacho originated, summer temperatures reach the high 40’s Celsius, so we can understand the desire to eat and serve these kinds of soups. Simple and few ingredients make this fabulous concoction, so it is important to find the best available to you. Red ripe tomatoes, Spanish sherry vinegar, the best extra virgin olive oil you can find, and pimentón de la Vera, the famous Spanish smoked paprika are things you should pay attention to, and if you do, you will have the most delicious Gazpacho to enjoy when the weather gets hot.

Today I’m especially excited because I was gifted some amazing extra virgin olive oil by my friend Josée, (@chef_without_frontiers_), owner of Finca Tres Geckos (@tres.geckos) in El Perelló, Cataluña, Spain. As far as olive oils go, it does not get any fresher than this! And it really shines in this Gazpacho. If you’re in Ottawa or Montreal, let me know and I can put you in touch.

Some people, especially in North America, prefer their gazpacho chunky, but I like mine pretty smooth. For that, you absolutely need a good blender. Make it at least one or two hours before you plan to serve it, and always serve it chilled. You can present it as an appetizer in small glasses or as a starter in bowls.

Gazpacho Andaluz
Chilled Spanish Tomato and Vegetable Soup

4 large Roma or vine ripe tomatoes, cored and roughly chopped (600g)
1/2 medium English cucumber (1 1/2 cups), roughly chopped plus more for garnish
1/2 red bell pepper (1/2 cup), roughly chopped, plus more for garnish
1/2 green cubanelle pepper (1/2 cup), roughly chopped, plus more for garnish
1 Tbsp minced shallot
1 small garlic clove, peeled, optional
¼ cup extra virgin olive oil
2 Tbsp sherry vinegar or red wine vinegar
1 tsp kosher salt
1/2-3/4 tsp Pimentón de la Vera (smoked paprika)
1 small baguette
Extra virgin olive oil for garnish

In blender jar, place tomatoes, cucumber, cubanelle and bell peppers, shallot, garlic, olive oil, sherry vinegar, salt and pimentón de la Vera and blend until smooth. Taste and adjust salt and vinegar as needed.

Refrigerate for 2 hours, or up to 2 days.

Serve garnished with diced cucumber and bell pepper, a drizzle of olive oil and croutons. 

To make croutons, cut baguette into 1/2” cubes, place on a sheet pan and sprinkle with salt and pepper; drizzle with olive oil. Bake at 375°F for 12-15 minutes, or until golden brown and crunchy.

Makes 900ml; serves 4 as a starter or 8 cocktail servings.

Comment

Berry Bannock Shortcake, in celebration of Indigenous food and the owners of this land.

July 1, 2023 Maria Garza

Let me start by saying I acknowledge that I live on the traditional and unceded territories of the Algonquin peoples and their descendants, and I am grateful to you for sharing your beautiful land with us.

Canada Day is here, and though I am thankful to have made my second home in this country, it gives me great pause to celebrate this day knowing that what constitutes that Canadian pride has come at such a high cost to the original peoples of this land.

As a Mexican, I know full well the impact that colonization has, and more than 5 centuries later, the rippling effects are still felt in many ways; Canada, being such a young nation, has a long way to go towards reconciliation and it is something we all should be working very hard towards. Educating ourselves on the Indigenous history of this land, and the impacts of settler colonialism are ways that we can work towards reconciliation.

A week ago, I attended a culinary workshop by (Métis) Chef Jenni Lessard at Madahoki Farm during the Summer Solstice Festival. What a pleasure it was to meet her! Chef Jenni generously shared stories of her childhood growing up in northern Saskatchewan and told us a bit of her life story. To me, it is fascinating to hear the love and respect she and her people have for their food and traditions. It is so different to the Western ways and that made a profound impact on me. Having just met Toñita Reyes and Modesta Ramírez, two indigenous traditional cooks from Guerrero, Mexico, I was reminded that there are many similarities there: the love and respect for the land and what it offers is as clear in ancestral and present Mexico as it is with the indigenous people in ancestral and present Canada.

Today’s recipe is my humble way of celebrating Canadian indigenous food, and totally inspired by the bannock we made in Chef Jenni’s class. As I learned, there are many styles of bannock - fried, baked or grilled over an open fire, but it is a simple bread, very quick to put together and so delicious in its simplicity. My version is a riff on Strawberry Shortcake, it is hearty with the use of Red Fife whole grain flour (milled right here in Ottawa by Almanac Grain), then baked and slathered with Saskatoon berry jam. Topped with soft whipped honey cream or yogurt and sweet local strawberries, it makes a delicious and wholesome treat. Let me know if you try it!

Berry Bannock Shortcake

1 cup Red Fife Whole Grain Flour (or any whole wheat flour)
1 cup All Purpose Flour
1/2 tsp kosher salt
1 Tbsp baking powder
2 Tbsp packed brown sugar
1/4 cup vegetable oil
1 cup well shaken buttermilk or milk
6 Tbsp Saskatoon Berry Jam
2 cups whipped cream or Greek yogurt sweetened to taste with honey
3 cups sliced strawberries

Preheat oven to 375F.

In medium bowl, combine both flours, salt, baking powder and brown sugar. Mix everything together so no sugar clumps remain.

Make a well in the centre and add oil and start mixing with a spoon. Add buttermilk and continue to mix until all liquid is incorporated and there are no dry spots left.

Flour the counter and remove dough from bowl. Pat it onto a rectangle, making it about 1” thick.

Cut it into 6 squares and place them on a parchment lined sheet pan. If desired, sprinkle with a bit of brown sugar.

Bake for 22-24 minutes, until bottoms are golden brown. Let cool completely on rack.

When ready to serve, split bannock and spread berry jam on bottoms. Top with cream and berries and enjoy!

Makes 6.

Comment

Greek style Lamb Meatballs are simple to make and deeply satisfying!

June 17, 2023 Maria Garza

I think every culture has its own version of meatballs. Whether they are made with lamb, pork, beef, fish, seafood or a combination of proteins is determined by country, tradition, religion and availability of ingredients due to geography, and economic situation of each region in question. In some countries that are surrounded by water, seafood or fish meatballs may be popular, as in many parts of Asia, whereas in most of the rest of the world, meat is more prevalent. In much of the Middle East, where the population is largely Muslim, lamb or beef meatballs are the staple, but in Europe and the Americas, beef, veal or pork (or a combination) are what’s popular.

I will never discriminate, I like them all! Tiny shrimp meatballs in a flavourful Vietnamese style broth are delicious; polpette from Italy, often served in a zesty tomato sauce are the ultimate comfort food; Turkish, Persian or Middle Eastern köfte are melt in your mouth delicious (many people say that’s where all meatballs have descended from); Spanish albóndigas spread to the Americas after colonization and they are made in a variety of ways, sometimes poached, sometimes braised in sauce and all delicious. Fish meatballs are famous in Bangladesh; in Wales they mix beef with liver and heart, and in South Africa they mix beef with ostrich or venison. Some are roasted, some are breaded and deep fried, others are served in broth while others are simmered in broth or gravy. All are satisfying and make fabulous meals.

This recipe is for a Greek style lamb meatball. Choose lamb that is fatty, because it tends to dry out if it’s very lean. I go to a Middle Eastern butcher and he grinds it with plenty of fat, so the meatballs turn out juicy and succulent. The flavouring in these meatballs is pretty standard, except for the mint, which goes excellent with lamb. Feel free to add more cumin or cayenne pepper if you like a bit more spiced meat. If you have time you can mix the meat and seasonings and let it rest in the fridge for a few hours so the flavours will meld together nicely. I like to make smallish meatballs and bake them. I have also pan-fried them, but the ease of baking them wins hands down. Serve them with a salad, tzatziki, plenty of Greek pita bread and some lemon wedges and you can enjoy an amazing meal.

Greek Style Lamb Meatballs

Meatballs:
1 kg ground lamb
1/4 cup red or white onion, finely chopped
2 garlic cloves, minced
1 egg, slightly beaten
2-3 Tbsp bread crumbs
1 tsp ground cumin
1 cup fresh mint (loosely packed and finely chopped)
3/4 teaspoon kosher salt
1/2 tsp black pepper
1/8 tsp cayenne or Aleppo pepper or more to taste

Tzatziki:
1/2 English cucumber, unpeeled
1 Tbsp extra-virgin olive oil
1 Tbsp lemon juice
1 tsp lemon zest (optional)
1 tsp kosher salt, or to taste
1 Tbsp fresh mint, finely chopped (optional)
1/4 cup fresh dill, finely chopped
2 cups Greek yogurt

Lemon wedges
Greek pita bread

For the meatballs:

Preheat oven to 375°F.

Place lamb in large bowl with red onion, garlic, egg, bread crumbs, cumin, mint, salt, pepper and cayenne pepper. Mix thoroughly to distribute the ingredients evenly. With a small ice cream scoop, form the mixture into 48 meatballs. Use your hands to shape them smoothly into round balls.

Place the meatballs on sheet pan and bake for 10-12 minutes.

Arrange the meatballs on a serving platter. Serve with tzatziki, Greek pita and lemon wedges..

Tzatziki:

Place cucumber, olive oil, lemon juice, lemon zest, salt, mint and dill in a bowl and mix well. Add the Greek yogurt and mix well. Adjust seasoning to your taste.

Can be made 3 hours ahead.

Makes 48 small meatballs.

Comment

Chickpeas from scratch, so easy and so delicious!

June 10, 2023 Maria Garza

As I switched to a mostly Mediterranean diet for health reasons, I started to cook and eat more legumes. Being Mexican, I have always cooked beans from scratch, but I had not bothered to cook chickpeas, always thinking they were way more work than making beans. In a way, this is true, as chickpeas require a bit of advance prep - mainly soaking; if they are not soaked, they take FOREVER to cook and nobody wants to deal with that! But if you own a pressure cooker or Instant pot, making chickpeas is pretty easy.

The most important reason for switching to cooking your own chickpeas is that they are not only delicious, but they are budget friendly and you control what goes into the pot when you make them. You will be rewarded with the softest, tastiest little bites that can then be transformed into so many other dishes.

I make a pot of chickpeas every week, and then I make my crispy chickpeas that I eat in my salads every day (I may have to admit I am addicted to them). I also make hummus and this outrageous warm chickpea and tahini concoction that I learned from Yotam Ottolenghi. If I had a celebrity cook crush, it would be him. I love the way he cooks, his flavour combinations and his presentations. I have a secret love affair with Middle Eastern food and I have learned quite a few things from reading his books and experimenting. When I came across this recipe, I was pleasantly surprised to see that he cooks his chickpeas pretty much the way I cook mine. It is actually a very simple method, but really worth the time.

So this blog post is about learning to cook chickpeas from scratch, and then you can go forth and use them any way you want, but I strongly suggest making this warm Msabbaha, as Ottolenghi does. It is like a chunky, softer hummus that is totally addictive. You will be happy you did!

Chickpeas, and Warm Chickpeas with Tahini (Msabbaha)

 2 cups dried chickpeas
1 tsp salt (optional)
Water

To cook chickpeas:
Soaked and drained chickpeas
Water
4 cloves garlic or 1 small onion, halved, or both
1 tsp salt
2 bay leaves

Warm Chickpeas with Tahini (Msabbaha)
2 cups cooked chickpeas
1/2-1 cup chickpea broth
3 Tbsp tahini paste
1 tsp ground cumin
Lemon juice to taste
Salt and pepper to taste

Topping
3 Tbsp extra virgin olive oil
2 Tbsp sliced almonds
2 garlic cloves, thinly sliced
1/3 cup chopped flat leaf parsley
1 tsp Aleppo pepper
1/2 tsp sumac (optional)

Soak chickpeas in large container, covered by at least 10 cm of water. Add salt, if using, cover and leave on the counter for 12-18 hours - chickpeas will absorb water and expand. If it’s too hot where you live, refrigerate until ready to cook.

The next day, drain water and place in pressure cooker with 1 tsp salt, garlic or onion, bay leaves and enough water to cover chickpeas by 10 centimetres.

Bring to high pressure over high heat, then once it reaches high pressure, turn heat down and cook for 1 hour. Let pressure release on its own, then cool chickpeas. To store, refrigerate chickpeas in their broth.

If you want to make Msabbaha, while chickpeas are still warm, place in a large bowl along with 1/2 cup of the cooking liquid. Add tahini, cumin and lemon juice. Mash with a fork, until you get the texture you like, but it should not be too smooth - add a bit more broth if you need it.

Season to taste with salt and pepper and add more lemon juice to taste. Place on platter or individual plates.

For topping, and just before serving, in small frying pan heat olive oil over medium heat. Add garlic and sliced almonds and cook until golden, 2-3 minutes, just make sure mixture does not burn!

Immediately pour onto chickpeas and garnish with parsley and Aleppo flakes. Add sumac if you like.

Serve with flat bread.

Serves 2.

Comment

Spicy Shrimp and Guacamole Tostadas, easy, fresh and delicious.

June 3, 2023 Maria Garza

I am always looking for recipes that I can cook quickly after a long day at work, and shrimp are the stars because they can be ready in no time at all! They’re a great source of protein and can be dressed in so many different ways.

For me, shrimp need to be spicy, and this recipe incorporates a few different types of chiles to make them very exciting! Of course, if you don’t have all these ingredients, you can stick to only chipotles or even serranos or Jalapeños, don’t let that stop you!

I love using pink wild-caught Argentinian shrimp because they are so meaty and tender, and they usually come already peeled, so it’s even quicker to use them; but if they’re not available to you, use whatever large shrimp you can get your hands on. Unless you live on the coast, buy frozen shrimp, as they will be the freshest. If you think ahead, thaw overnight on a tray in the fridge, but if you’ve forgotten, place the shrimp in a bowl and fill with cold water, change every 5 minutes so it remains cold, and do this until shrimp are soft, which should not take more than 30-45 minutes.

You can serve these shrimp as a Tapa with sliced baguette, use them in a pasta dish or simply serve with rice or quinoa, but I love making tostadas incorporating a base of guacamole. It is a delicious and fun appetizer.

Tostadas de Camarón Enchilado
Spicy Shrimp Tostadas

340g 31-40 shrimp, thawed, peeled and deveined (I like wild pink Argentinian shrimp)
Juice of 1 large lime, or more to taste
1 tsp ground guajillo chile
1-2 tsp minced chipotle chile in adobo, or more to taste
1 Tbsp minced serrano or Jalapeño chile
1 Tbsp minced red onion
Salt to taste
1 Tbsp extra virgin olive oil
2 cups guacamole
Small corn tostadas
Lime wedges
Salsa Macha or your favourite salsa

Using a paper towel, dry shrimp so there is no surface moisture left in them. Place in a medium bowl and add lime juice, guajillo chile powder, chipotle chile, serrano chile, red onion, salt and olive oil. Let shrimp marinate for 15 minutes while you make some guacamole.

When ready to eat, preheat the grill and place grilling basket on the grates. Place shrimp on the basket and cook for about one to one and a half minutes per side, just until the shrimp firm up a bit, we don’t want to overcook them.

If you don’t have a grill, you can cook them in a skillet over medium high heat, the same way.

Warm up some tostadas, spread them with guacamole and mound the cooked shrimp on top. Drizzle with salsa macha and serve with lime wedges.

Serves 2-3.

Comment

Greek Almond Cookies, something sweet and delicious.

May 13, 2023 Maria Garza

One of the things I love most about my job is that I am always learning, experimenting and of course, tasting foods from all over the world. Not for nothing is my business called The Cultural Kitchen!

I don’t know what comes first for me, is it my love for food, my love for travel, my love for culture, my love for learning, my love for eating or my love of sharing. I think it is a perfect combination of all of those that keeps me going and striving to learn something new every day. For me, it is truly a joy to spend my days in the kitchen cooking, experimenting and coming up with recipes that I can teach in my classes. The kitchen is my happy place.

I am preparing my next class and we will be making the foods of Greece. For every class I teach, I go on a little “trip” the weeks prior as I nail down the menu for that particular class. In this case, I’ve been cooking Greek food and having all sorts of fun making some dishes I have not made before, or tweaking some others, like these Greek Almond Cookies. I love how many cultures have their very own take on this cookie, and one of my favourites is the Mexican version of these, called Polvorones de Nuez.

These cookies come together super quick with items you likely have in your pantry, save some roasted almonds, and for flavouring, a bit of rose or orange blossom water and brandy. The rose or orange blossom water is key in these, and if you like that flavour, go ahead and mist the baked cookies with a bit more before you dust them with icing sugar. I like to keep these cookies a bit on the less sweet side, but if you prefer a bit more sweetness, roll them in the icing sugar rather than dusting.

These cookies keep well in a tin, but in my experience, they go fast! Enjoy with a cup of tea or coffee.

Greek Almond Cookies
Kourabiedes

1 cup raw almonds
250 butter, room temperature (1 cup + 2 Tbsp)
2/3 cup icing sugar, plus more for dusting
2 1/4 cups all-purpose flour
1/8 tsp salt
1 tsp baking powder
1 tsp vanilla
2 tsp rose water or orange blossom water
2 Tbsp brandy

Preheat oven to 350°F.

 Spread almonds on sheet pan and bake for 15 minutes or until fragrant and toasted.

Remove and cool. Once cool, chop almonds finely. 

In large bowl combine butter and icing sugar.

Add flour, salt and baking powder and mix to combine. 

Add the vanilla, rose water, brandy and almonds, and mix well. 

Shape the cookies using a small ice cream scoop, and place on parchment lined sheet pans. Make them round and make a slight indentation in the centre of the cookies to flatten them slightly.

Bake for about 20 minutes, or until bottoms are light golden.

Cool cookies completely.

Dust cookies with icing sugar.

Makes about 60 cookies.

Comment

Stuffed Jalapeños should make your next taco.

May 7, 2023 Maria Garza

In my hometown of Monterrey, it is common to eat tacos for breakfast, lunch and dinner. There are taquerías of all kinds, from the ones that only make barbacoa, or steak tacos, but then there are the ones that make tacos sudados (steamed tacos), tacos de canasta (another variation of steamed tacos, built in a basket), tacos de guisados (stew tacos) and so many more! You could eat a different kind of taco for every meal of the week. It is a sensory delight!

At one of my favourite joints, at least when I lived there was Tacos Mode, at el Centrito in San Pedro. They had a great variety of tacos, from chicharrón en salsa verde to potato to the best bean tacos, but one of my absolute favourite was the Jalapeño Relleno taco. Like a mini stuffed poblano, but spicier, and the perfect size for a taquera tortilla.

Regular stuffed jalapeños are made with a picadillo filling, then battered and fried. They are so spicy but you want to continue eating them even if they are burning your mouth like hellfire. You can’t imagine, but trust me, they are delicious!

Last week I made picadillo and luckily I had some leftover, and then I came across some of the biggest Jalapeños I have ever seen - the universe was conspiring for me to make these, and I need to share this with you so you can make them too! I prefer to skip the batter part, as I like to make these healthier (though I confess, I dislike frying food in copious amounts of oil). I am deviating from the original recipe, but they still taste absolutely amazing.

So next time you find yourself with leftover picadillo, make some stuffed Jalapeños, they make a great appetizer (or main taco meal!). These are usually very spicy, and the roasting intensifies the heat level, so make sure you seed and devein completely to mitigate that a bit. And it may be a good idea to wear gloves as you seed and devein them, as the capsaicin can burn your skin.

Serve with tortillas and your favourite salsa and make it a party!

Jalapeños Rellenos
Stuffed Jalapeño Chiles

12 large Jalapeño chiles
2 cups leftover and cold Picadillo
12 small corn tortillas
Your favourite Salsa

Char chiles over an open flame or under the broiler until skins are completely blistered and blackened all over.

Once they are all done, place them in a bowl and cover them so they can steam for about 10 minutes, this makes the skins come off easier. I like to use a paper towel to remove the skins.

Make a “T” incision at the base of the crown, just below the stem, going only halfway down the height of the chile (don’t cut all the way through, we want the stem to stay attached). Carefully, using a paring knife, cut off the seed pod and all the veins. If you leave veins, the chile will be very spicy. Continue with all the chiles.

Stuff with 2-3 Tbsp picadillo - this will depend on the size of your chile. You want to use enough to shape them back the way the chiles were when whole, though they don’t have to be closed, you should leave the tops exposed to show the filling.

Place chiles cut side up on a baking tray. At this point, you can refrigerate until ready to use, up to two days. When ready to eat, preheat the oven to 375°F and cover the tray with tin foil. Bake until warmed through, about 15 minutes.

Serve on tortillas with your favourite salsa.

Makes 12 tacos.

Comment

This Picadillo makes the best Chiles Rellenos.

April 30, 2023 Maria Garza

Picadillo is one of the most popular meals in Mexico. Every cook makes their own version, whether for stuffing poblanos or jalapeños, for eating with beans and rice or making tacos or burritos. It is one of the easiest and tastiest dishes you can make! Economical, easy to make and versatile, that’s why we like it so much. It is especially kid friendly too.

I have posted another recipe for picadillo here in the blog, but this one I like particularly for stuffing peppers, as it has more concentrated tomato flavour and it is more compact. Poblanos are our stars when we think of stuffing peppers, but you can also stuff anchos or fiery jalapeños.

For these peppers, I prefer making a pork picadillo, but you can certainly make it with beef, veal, or a combination of meats. The only thing you need to be mindful of, is to dice your potatoes and carrots small, no more than 1/4”, so they can cook fairly fast; also, we don’t want them to be too chunky in the peppers. If your picadillo is very loose when the vegetables are cooked, simply cook it a bit longer, uncovered, to evaporate the liquids. It needs to be fairly dry so the chiles rellenos are not runny. I like to serve these on a pool of guajillo tomato salsa for a nice presentation.

CHILES RELLENOS DE PICADILLO CON SALSA DE TOMATE Y CHILE GUAJILLO
Stuffed Poblano Peppers with Tomato Guajillo Salsa


Picadillo - Ground Beef Hash
2 large Roma tomatoes, chopped (2 cups)
1/2 tsp ground cumin
Salt and pepper to taste
350 g lean ground beef, veal or pork, or a mixture
1 medium onion, diced (3/4 cup)
2 garlic cloves, peeled and minced
1 medium carrot, peeled and diced (3/4 cup)
1 medium non-starchy potato, peeled and diced (1 cup)
1 Tbsp tomato paste
1/2 tsp Mexican oregano
1/4 cup water

Chiles - Peppers
4-5 poblano chiles, roasted, peeled and deveined

Salsa de Tomate con Chile Guajillo – Guajillo Tomato Sauce
2 large Roma tomatoes
2 cloves garlic, chopped
1 small onion, chopped
1 chile guajillo, toasted on dry skillet until aromatic, then seeded and crumbled
1/4 cup chicken stock
1 tsp vegetable oil
Salt to taste

For the Picadillo:
In blender jar, combine tomatoes, cumin, salt and pepper. Process until smooth. Reserve. 

Heat oil in sauté pan and cook meat until no longer pink. Add onion and garlic, and sauté until onions are translucent; add carrots, potatoes, tomato paste, Mexican oregano and cook for one minute. Add the blended tomatoes and water and bring to a simmer. Cover and cook until potatoes and carrots are tender, 15-20 minutes. If it is still too wet when the vegetables are tender, cook, uncovered, until most of the liquid has evaporated. Correct seasonings. Reserve for stuffing peppers.

Char poblano chiles over an open flame or broil until skins are charred. Place in a bowl and cover them to steam. Remove skins and then cut a slit down the side to carefully remove veins and seeds. Stuff peppers with picadillo and place on plate with the cut side up. Reserve and keep warm.

For the Salsa:
Place tomatoes, garlic, onion, guajillo and chicken stock in blender container or food processor and process until very smooth.

In medium saucepan, heat the oil and cook the sauce until reduced, about 10 minutes. Season with salt.

Serve stuffed chiles with salsa.

Serves 4-5.

Comment

Saffron Panna Cotta is a very easy, yet sophisticated dessert.

April 15, 2023 Maria Garza

As the weather gets nicer, and by that I mean warmer (I’m in Ottawa after all), I start looking for cool desserts, and panna cottas are perfect sunny weather treats! These are so easy to make and so delicious! Panna cotta in Italian means cooked cream, so you just warm up some cream, add sweetener and some gelatin and you have a panna cotta.

Traditional panna cottas are flavoured with vanilla, with a simple fruit or compote garnish. Today, I’m giving these a north African twist, by using Moroccan saffron and culinary argan oil. The result is a gorgeous yellow dessert that reminds me of Spring and sunny days to come, with a subtle sweetness and a je ne sais quoi essence - it is hard to descipher the flavour, but it is so yummy you don’t want it to end!

I’ve been using this culinary argan oil by Idora, and let me tell you, it is DELICIOUS! It is an organic roasted argan oil and I wanted to use it on other recipes (I drizzle it on my salads every day); when I was gifted their saffron to try out I came up with this recipe. Both ingredients make these panna cottas special, but if you don’t have the argan oil, you can still make the saffron panna cotta. A tip on the saffron, make sure you crush it to a powder before adding it to the cream, as it will colour and infuse the cream much better than leaving the strands whole - since it is an expensive spice, you want to make the most of it.

If you’re in Ottawa and want to try these products, send me a message and I’ll put you in touch with the vendors. Otherwise, you can order from their website. I hope you try this recipe and let me know what you think!

Saffron Argan Panna Cotta

400 ml 35% cream plus enough milk to make 2 1/4 cups total
3-4 Tbsp sugar, or to taste
1/4 tsp saffron threads, crushed
1 Tbsp culinary argan oil
Pinch salt
2 Tbsp water
2 1/4 tsp unflavoured gelatin
Chopped pistachios or almonds for garnish

In small saucepan place cream, milk, sugar, saffron, argan oil and salt. Heat over medium low heat, stirring, until sugar has completely dissolved. Bring it just to a slow simmer, then turn off the heat and steep for 30 minutes.

Meanwhile, in small bowl, mix water and gelatin. Let it soften for 2 minutes.

This recipe makes about 600ml, pour mixture into 4 small glasses or jars, cover and chill for 6 hours, preferably overnight. Serve, garnished with pistachios.

Serves 4.

Comment

Huevos Rancheros make an epic breakfast.

April 2, 2023 Maria Garza

On weekends, when I have a bit more time to cook breakfast, I often make Huevos Rancheros. This is truly a decadent but easy meal that will give you energy for the whole morning. All you need to serve with your eggs is a bit of salsa and avocado, but if you have beans, they make a perfect pair.

Huevos Rancheros come together really fast, all you need is to soft fry a corn tortilla (never wheat flour!), then quickly fry some sliced ham and fry an egg. There are choices in all of these simple steps. For example, you can cook the tortilla a bit longer if you like it crispier; adding cheese in between the tortilla and the ham is optional, but I love doing this as it adds a bit more protein to the final dish. The egg, well, we all have our preferences, but I like mine barely cooked - the yolk super tender, but you are the master of your own domain, so cook the eggs the way you like them. After that, serve with salsa and avocado, and beans if you have them.

If you are cooking for your family, preheat your oven and have a sheet pan ready. Soft fry all the tortillas first and put them on the sheet pan, then add the cheese on those tortillas and keep them in a warm oven. Then cook all the ham and put it on top of the tortillas, and last, cook all the eggs. Keeping the tortillas in the oven is a great way to make sure everyone gets a warm meal - as no one likes cold eggs! Huevos Rancheros for a crowd? No problem.

Next time you have a craving for a delicious Mexican breakfast or brunch, look no further!

Huevos Rancheros
Ranch Style Eggs

2-3 Tbsp vegetable oil
4 corn tortillas
4 slices ham
4 slices melting cheese such as Menonita, Monterey Jack or Havarti
4 eggs
Salt and pepper to taste
Salsa of your choice
Avocado slices

Heat a large frying pan and add oil.

Soft fry tortillas, only a few seconds per side, we are only looking to warm them up and soften them.

Remove to a baking tray and put a slice of cheese over each tortilla. Keep in a warm oven.

Fry ham slices in same pan, also very quickly, we are only looking to warm it up. Place a slice of ham over each tortilla. Keep in the warm oven.

Next, fry eggs. To cook over easy, crack eggs onto frying pan, sprinkle with salt and pepper and cook over medium heat for 1-2 minutes, then flip carefully and cook on the second side for 1-2 minutes.

Place a cooked egg over each tortilla and serve immediately, topped with salsa and avocados.

Serves 2.

Comment

Quick, easy, creamy, spicy shrimp make the best tacos!

March 26, 2023 Maria Garza

Shrimp is one of the quickest things you can cook, making them a great choice for any day of the week. These creamy, spicy, succulent shrimp come together in 10 minutes and they make a great taco! But they can also be a delicious pairing for pasta or a side of rice or quinoa.

I confess, for the longest time I was not a fan of shrimp, but I’ve come to realize it’s the small shrimp I don’t like; I prefer the larger, meatier ones, so I tend to buy the wild Argentinian pink shrimp, or like in this case, the large, 16-20 per pound size. They cook in 2-3 minutes, so it is important to have your mise en place done so you can get through the recipe quickly.

For this recipe, there are a couple of things that I do to simply my prep. First of all, defrost the shrimp on a small tray in the fridge overnight - the tray will catch any liquid that invariably leaks out from the bag, saving you the cleanup job after. Second, when I buy a can of chipotle chiles in adobo, I purée the whole thing and then store in a jar in the fridge. That way, I don’t have to chop (they stain your boards horribly!) when I need them. I usually have crema or crème fraiche on hand, but you can use whipping cream or sour cream; if you use whipping cream, you will have to remove the shrimp from the pan before you add it, to give the cream a chance to reduce without the shrimp overcooking. Just let it boil down and once you have the right consistency, add the shrimp and finish your dish. Use whatever tequila you have on hand. I usually drink a reposado tequila, so that is what I use, but white or silver works great. I would not use an aged tequila here, but if that’s all you have, go for it! Other than that, this is a super simple dish to make.  

Camarones Enchipotlados al Tequila
Creamy Chipotle Shrimp with Tequila

340g raw 16-20 shrimp, thawed, peeled and deveined
Salt and Pepper to taste
1 Tbsp butter
1 clove garlic, minced
3-4 Tbsp of your favourite tequila
1/2 cup crema, crème fraîche, sour cream or whipping cream
2-3 tsp chipotles in adobo, minced, or more to taste
4 Tbsp chopped cilantro plus more for garnish
Corn tortillas for serving

In medium bowl, toss shrimp with salt and pepper to taste.

In large frying pan, melt butter over medium high heat. Add garlic and cook for one minute, just until fragrant - make sure it does not burn.

Add seasoned shrimp and cook for one minute per side - they should still be raw inside.

Add tequila and ignite to flambé. Let flames subside as you shake the pan.

Immediately add crema and chipotles and quickly stir shrimp into sauce.

Add cilantro and serve immediately with corn tortillas.

 Serves 2-3.

Comment

This Salsa de Tomate con Chile Guajillo is delicious and versatile.

March 19, 2023 Maria Garza

In every Mexican household there is an unwritten rule: to have at least one type of salsa in the fridge at all times. Usually there are two or three varieties, because different salsas have their best applications, so we have to be prepared!

Usually, there is a green and a red salsa in my fridge, and a third is the popular Salsa Macha that goes with many things (including non-Mexican recipes - it is brilliant in Asian dishes!). When making tacos, if there is a variety of salsas, I will often use at least two, because I cannot decide which I like best! When eating a steak, you need salsa, and in my breakfast eggs, a spoonful of salsa is a must. So you see, salsa is a mandatory component of many Mexican meals.

There are hundreds of ways of making salsa, and I never use a recipe. I know, I have been making salsa for years, but really, it is a combination of tomatoes or tomatillos, onions and/or garlic and chiles, whether fresh or dried or a combination, adding herbs like cilantro if you like. If you play with these things, you will come out with salsa, and the beauty of the game is that every salsa is a bit different.

Salsas can be raw, cooked, roasted or oil based, as in the case of Salsa Macha. You can find lots of different salsa recipes here in the blog, but if you embrace your adventurous spirit, you can make your own and feel confident in your choices by knowing you are making your very own salsa.

If you use fresh chiles, your salsa will be bright, but if you use dried, your salsa will have a deeper more complex flavour; dried chiles also give you a different, denser texture, especially when you use the larger chiles like guajillos or anchos, that’s why when making salsas for enchiladas, for example, we always use dried chiles, so the salsa has a better coating ability.

Today’s salsa is a combination of fresh and dried chiles, but it is not too spicy. It is a cross between the fresh and dried chile salsas and I am really pleased with how it turned out. It can be used in any application, including coating tortillas for enchiladas, so it is pretty versatile. You can substitute ancho chiles for the guajillos if you like, and if you don’t have piquín, simply omit them (though that would be another different salsa!). Have fun with it and let me know how it goes!

Salsa de Tomate con Chile Guajillo
Tomato Salsa with Chile Guajillo

1 Tbsp vegetable oil
4 small Roma tomatoes, cut into chunks
2 Jalapeños, stemmed and chopped
1 wedge of onion (about 1/4 cup), chopped
1 guajillo chile, stemmed and seeded
2 tsp dried piquín chiles
3 small cloves garlic
Salt to taste
1/3 cup water

In medium frying pan, heat oil over medium heat and add guajillos and garlic. Make sure to cook guajillo quickly, turning after a few seconds to fry on both sides - we don’t want to burn it, just toast it in the oil. This will take only a minute or two.

Add jalapeños and onion and cook 2-3 minutes, then add tomatoes and piquín chiles. Stir for a minute, then add water and salt. Cover pan and simmer for 10 minutes.

Transfer everything (including any leftover liquid) to the blender and process until smooth. Adjust seasoning and serve.

Makes about 2 cups.

Comment
← Newer Posts Older Posts →

Copyright © 2025 The Cultural Kitchen
All Rights Reserved

1936 Ranchwood Way Orleans, Ontario K1C 7K7
613.762.0940