• Welcome
  • About
  • Workshops
  • FOOD FOR BLOG
  • Contact
Menu

The Cultural Kitchen

Street Address
City, State, Zip
Phone Number
COOKING CLASSES ON DEMAND

Your Custom Text Here

The Cultural Kitchen

  • Welcome
  • About
  • Workshops
  • FOOD FOR BLOG
  • Contact
Brushes Mercado-1.jpg

FOOD FOR BLOG

One bowl of goodness is Carne en su Jugo.

November 21, 2020 Maria Garza

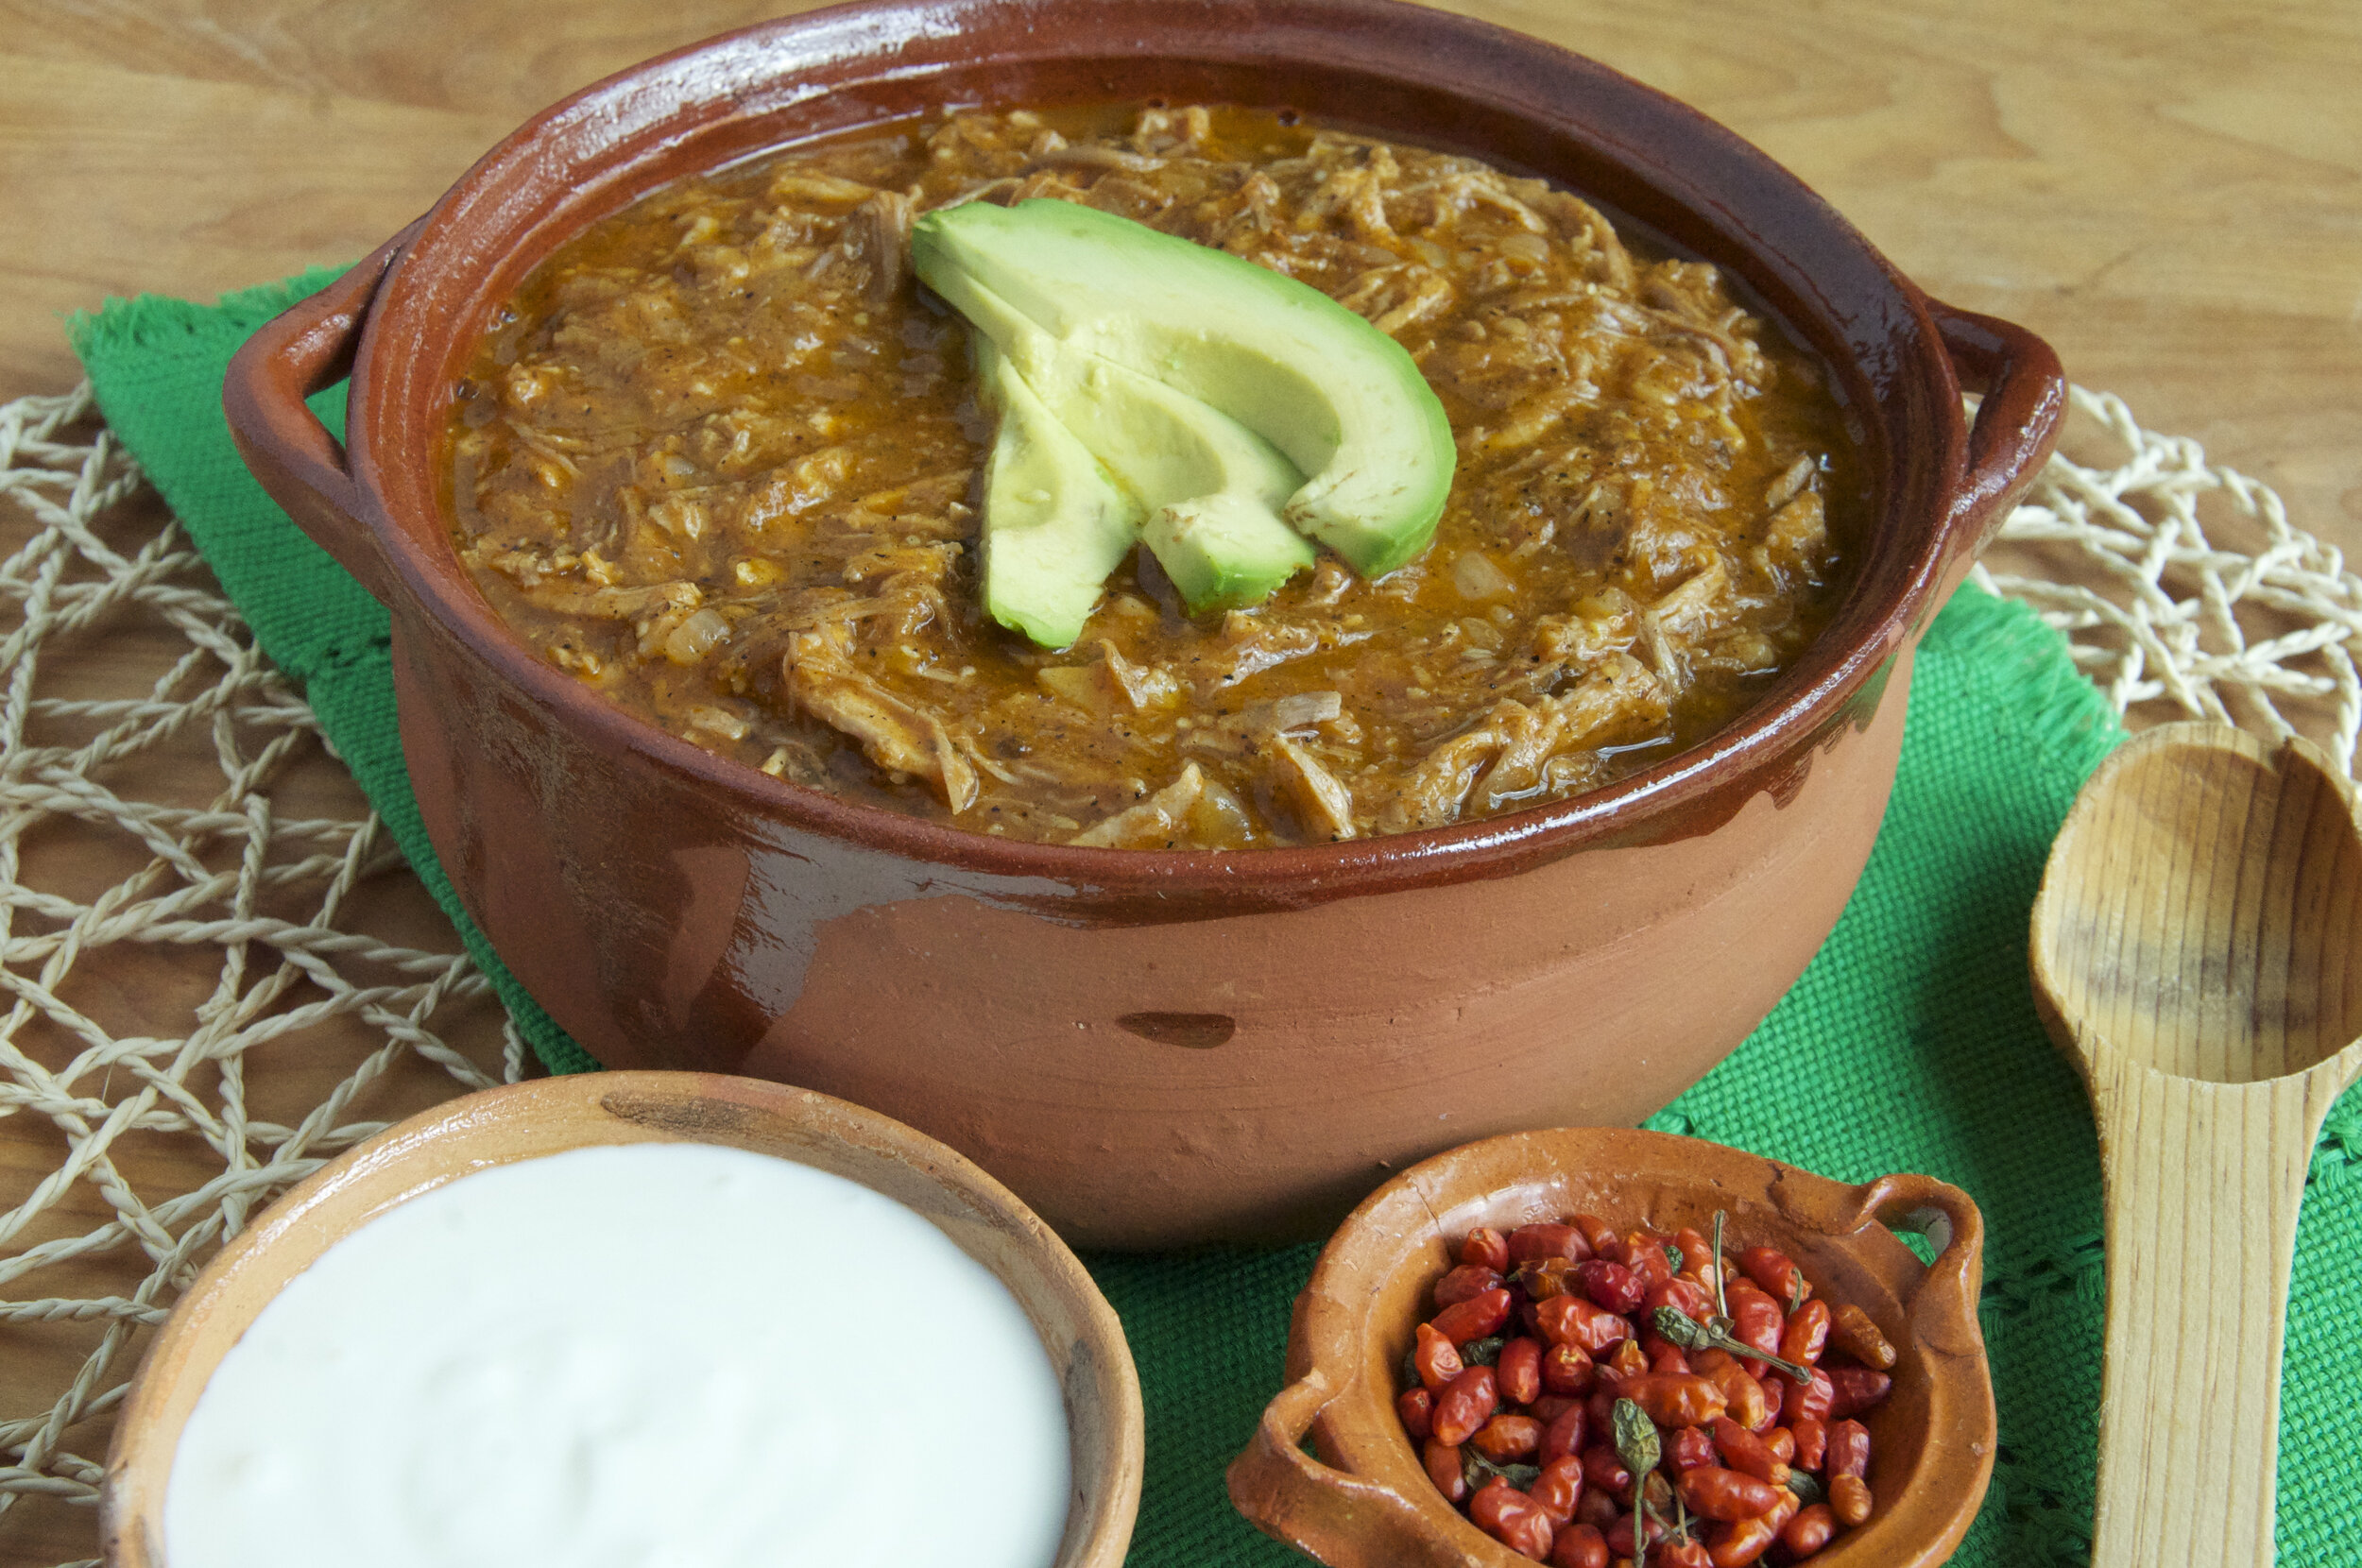
As the weather gets cooler in my part of the world, I crave warming, comforting food. And usually, what I crave first will be food from my beloved Mexico. This dish is a specialty of Guadalajara, Jalisco. When you think of it, it has the least imaginative name on the planet, but the dish itself is heavenly. Tender meat strips, simmered in brothy salsa are served alongside whole beans in their juice, and this makes the combination a delicious kind of “soup”.

In Guadalajara, Jalisco, back in the year 1965, there was a hot dog vendor named Juan José Galvez Ceballo, whose nickname was “el Gallo”. As the story goes, he was the one who invented this dish and started selling it to party-goers late at night. Soon, everyone forgot about his hot dogs and the beef in its juices became very much sought after. Nowadays, it is an iconic part of the gastronomy of Jalisco, and a trip to Guadalajara is not complete unless you try Carne en su Jugo in a restaurant or two.

The origins of this dish are very humble, simply a mix of meat and beans with their broth, garnished with bacon, onions and cilantro. Humble or not, this dish has evolved, and different cooks make it in slightly different ways, but the end result is always delicious.

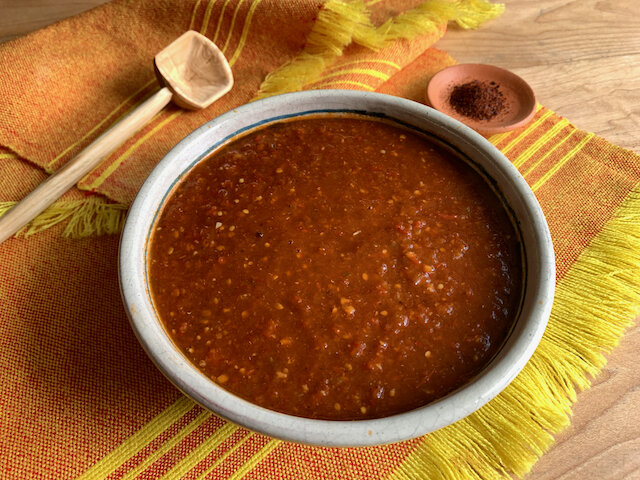
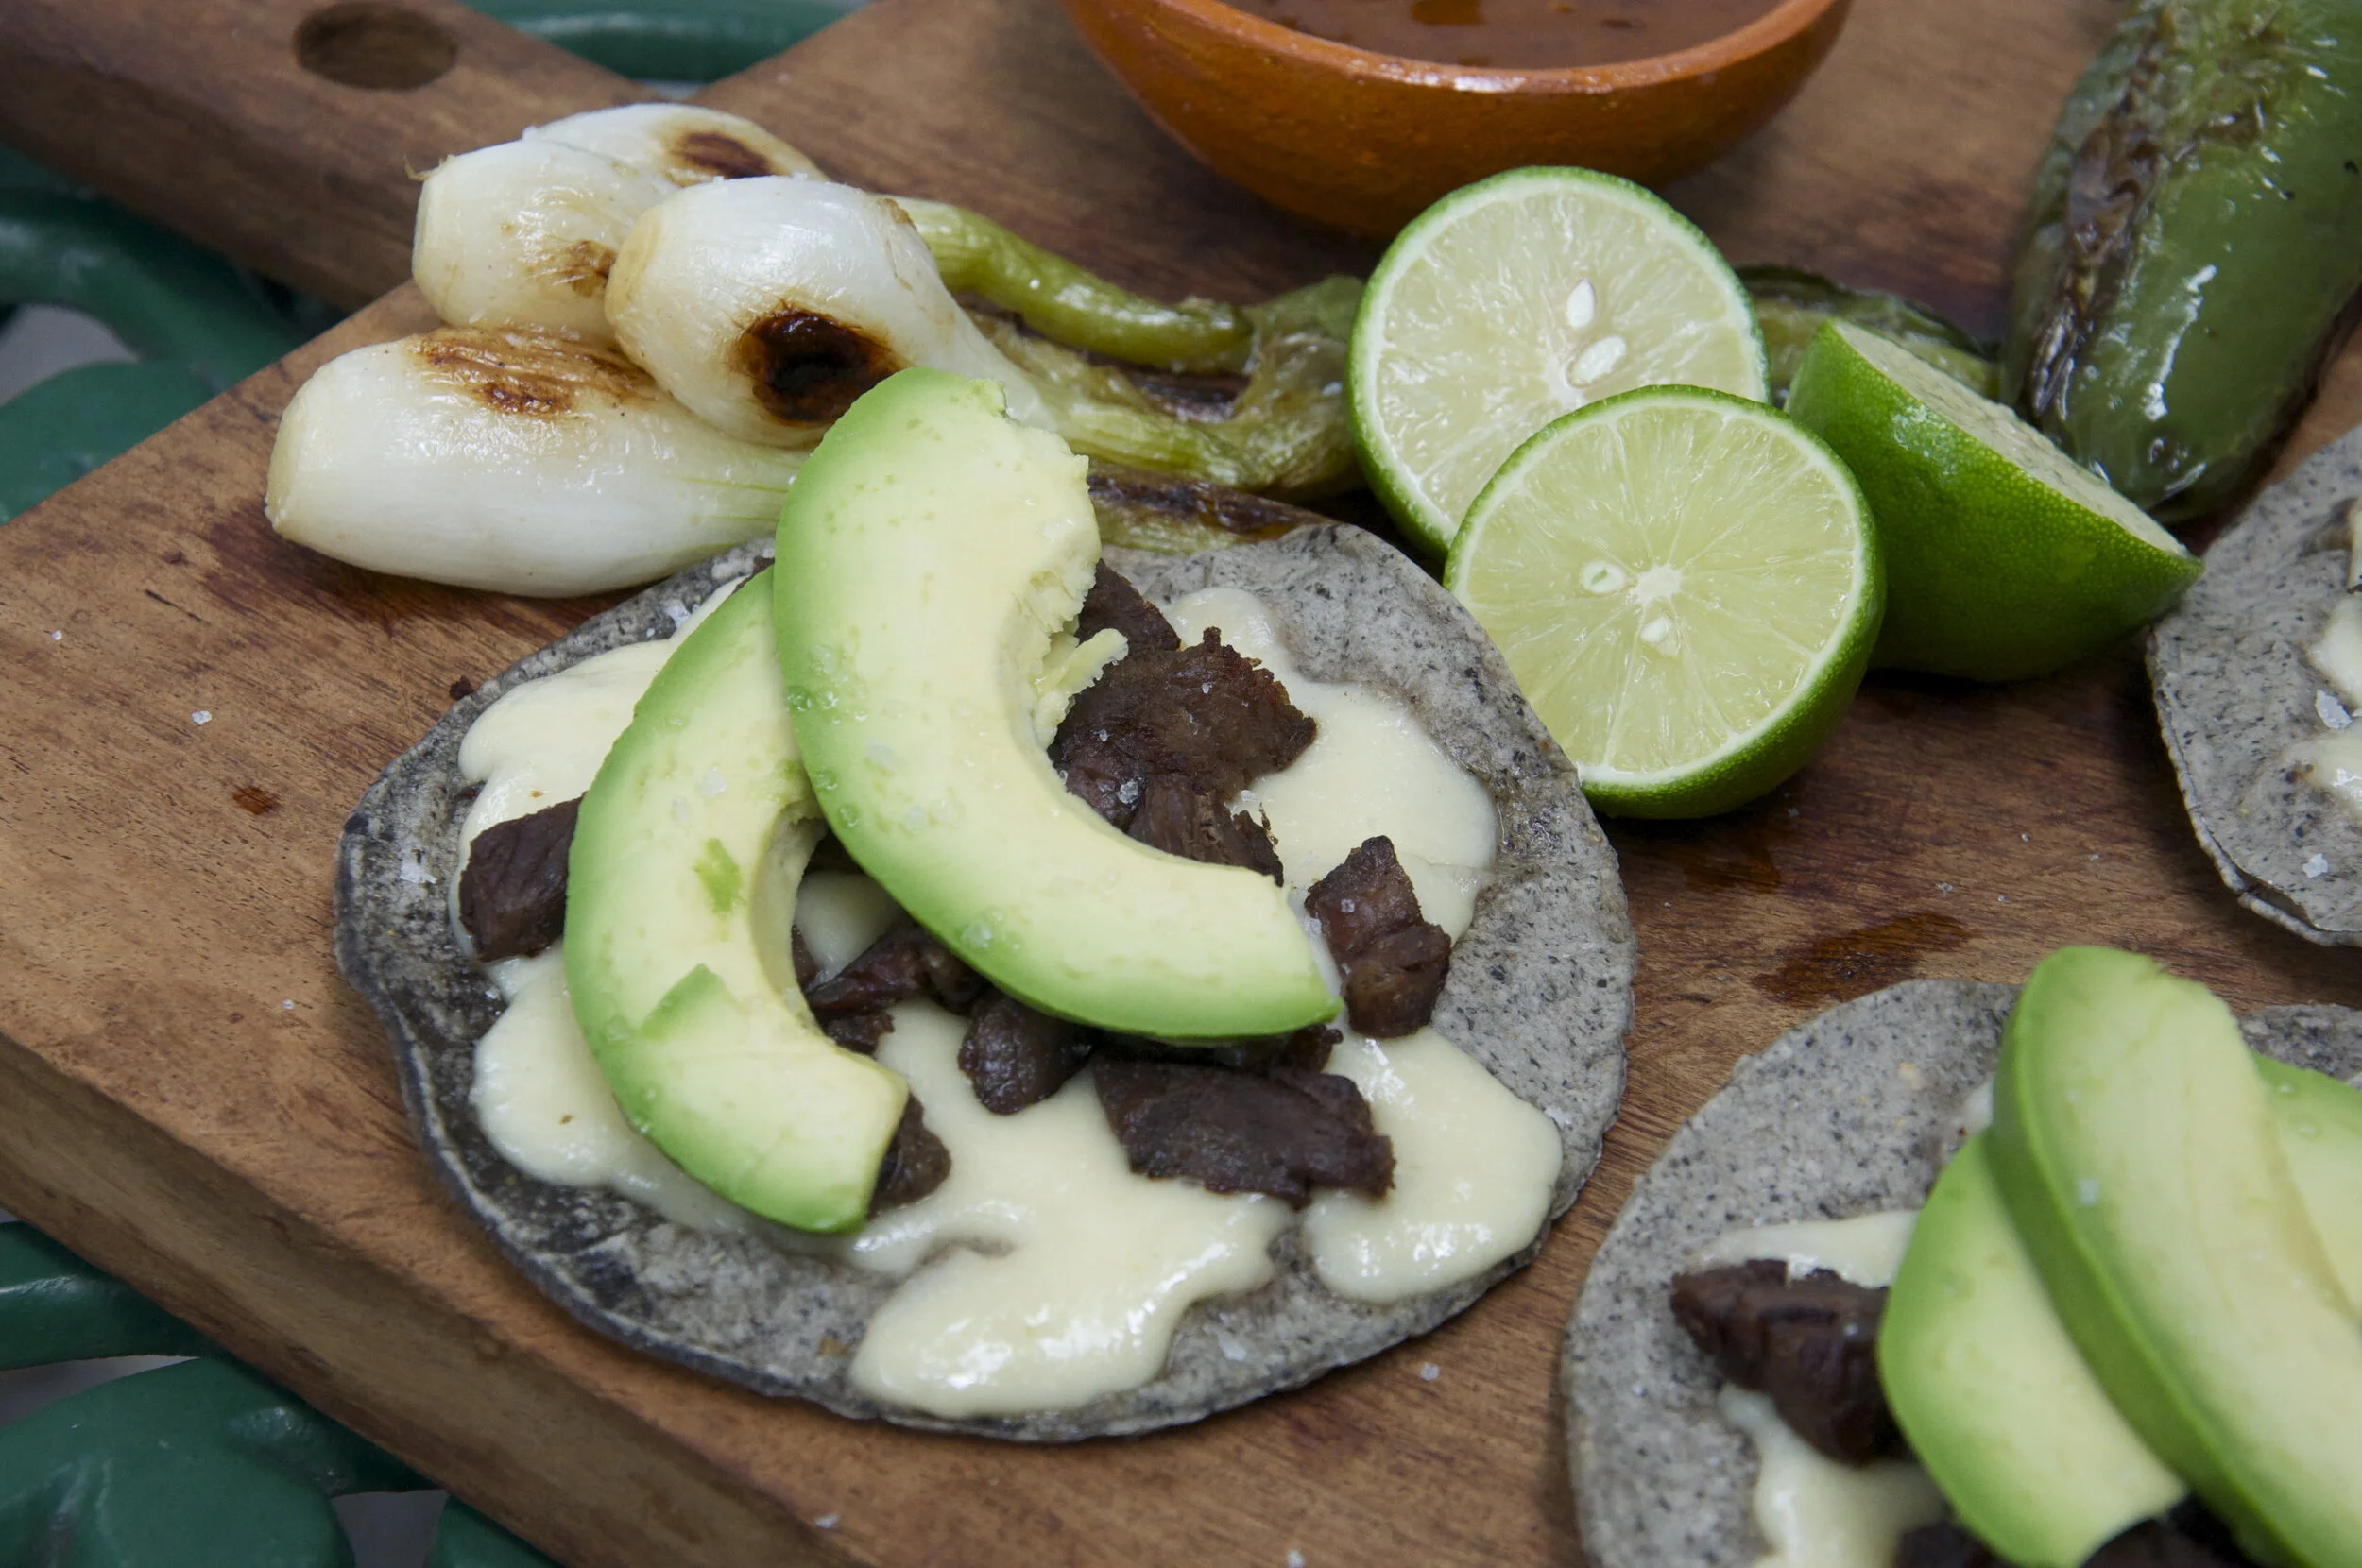
I like to make mine with a rich beef broth to deepen the flavour of the meat, combined with a salsa made with tomatillos and tomatoes to add a touch of acidity. This balances the flavours and the end result is a perfect marriage of beans, meat and broth. Typical garnishes are chopped onion and cilantro, which is a favourite of all Mexicans, as well as avocado slices, grilled or pan-fried spring onions and tortillas. If you can, serve this dish in a clay bowl. Just like in Jalisco.

Carne en su Jugo
Beef in its own Juices

375g bacon, cut into ¼” slices crosswise
1 kg sirloin tip roast, cut into ¼” slices and then cut into thin 1” strips 
1 cup beef broth
6 small tomatillos, quartered
1 hothouse tomato, cut into chunks
1 small onion, cut into chunks
2 cloves garlic, peeled 
½ cup cilantro, chopped
1 tsp kosher salt, or to taste
6 cups cooked whole pinto beans in their broth

Garnish:
1 lime, cut into wedges
2 avocados, cut into slices
12 grilled or pan fried green onions
1 small onion, minced
1 cup salsa of your choice
½ cup chopped cilantro
Cooked bacon (see above)
Tortillas

In large Dutch oven, over medium heat, cook bacon, stirring until almost crispy, about 8 minutes. Remove with a slotted spoon to paper towels and reserve for garnish. Remove all but 2 Tbsp bacon fat from pot and add meat all at once. Stir to coat in fat, reduce heat to medium low and cover pot for 5 minutes. This will make the meat release its juices. 

While meat is simmering, Place beef broth, tomatillos, tomato, onion, garlic, cilantro and salt in blender. Process until very smooth. Add this sauce to the meat and stir well. Let meat simmer, partially covered, for about 20 minutes, or until meat is tender. Correct seasonings.

In another saucepan, warm up the beans and broth. To serve, ladle 1 cup of beans and broth into a bowl. Add a ladle of meat and sauce to the same bowl. At the table, let your guests garnish with the reserved bacon, avocado, onion, cilantro, and salsa. Serve grilled onions and tortillas on the side. 

Serves 4-6.

Comment

Re-creating the food of my memories is always fun!

October 24, 2020 Maria Garza

I grew up in Monterrey, Mexico, and one of my favourite regional specialties is called Carne Seca, which is a special kind of dried beef.  This is used to make several delicious dishes like Machacado con Huevo, a popular breakfast dish, or Caldillo de Res, a delicious meaty soup.

Why am I talking about beef if this recipe is about pork? Well, this recipe was born out of my craving for that caldillo that I ate many times in my hometown. I live in Canada, and unfortunately, our Customs department won't let any type of beef come into the country without special permits, and the couple of times I tried to bring back some carne seca - after declaring it - it was promptly confiscated. Imagine my frustration!

When a craving hits, nothing will do until it gets satisfied and this is where the pork comes in. 

The caldillos of my memories are made with finely shredded dried beef cooked in a rich broth flavored with tomatoes and chiles. A very simple dish, but full of flavor thanks to that dried beef. I decided to try and re-create that dish using fresh pork instead, and let me tell you, it turned out delicious!

Get your hands on a nice chunk of pork shoulder and cook that until the meat is very tender. Then shred it and use that as if it were carne seca. Then simmer that shredded pork in a salsa made of tomatillos, tomatoes, aromatics and chiles. The result is a very well rounded dish that will be homey and comforting on a cool Autumn evening.

As with many Mexican dishes, the garnishes form a very important part of the recipe, and in this case, the crema and avocado, along with the fiery piquín chiles just take the dish over the top.

Make a big batch of Caldillo de Puerco and get ready for a Mexican fiesta!

CALDILLO DE PUERCO
Pork Stew, Monterrey Style

Pork:
1.5 kg bone-in pork shoulder roast
8 cups cold water
1 large onion, cut in chunks
2 garlic cloves, peeled
1 tsp black peppercorns
2 bay leaves

Sauce:
1 ancho chile, seeded and de-veined
2-4 serrano or Jalapeño chiles
2 large tomatoes
8 tomatillos, husked and washed well
1 tsp kosher salt

To finish the dish:
1 Tbsp vegetable oil or lard
1 kg shredded pork (from roast)
2 medium onions, diced
3 garlic cloves, minced
1 tsp kosher salt, or to taste
½ tsp ground cumin
1 tsp Mexican oregano

Garnish:
Toasted piquín chiles
Avocado wedges
Crema
Lime wedges

In large stock pot, place pork roast, water, onion chunks, garlic cloves, black peppercorns and bay leaves. Turn heat to medium high and bring to a slow boil. Turn temperature down to simmer and cook, partially covered and skimming off foam periodically, for 2-3 hours, or until meat is very tender (this can be done in a slow cooker on low for 8 hours, or in a pressure cooker at high pressure, for 45 minutes).

Remove meat from broth and when it’s cooled down a bit, shred into small pieces, removing all fat. Strain broth, remove the fat and reserve 2 ½ cups for recipe (any leftover broth makes a great base for a soup).

Meanwhile, place seeded and de-veined ancho chile in a small bowl. Cover with boiling water and let sit for 15 minutes, or until it’s soft and pliable. Drain off soaking water and reserve.

On comal or foil-covered tray, place tomatoes, tomatillos and chiles. Broil for 10 minutes and turn vegetables over. Broil for another 5 minutes or until all vegetables are nicely charred.

In blender container, place rehydrated ancho chile and roasted tomatillos, tomatoes and chiles. Blend until smooth.

In Dutch oven heat vegetable oil or lard and cook onions over medium high heat for 5 minutes, or until translucent. Add garlic and cook another two minutes. Add sauce and bring to a boil. Turn temperature down to simmer and cook for 5 minutes. Add shredded pork, ground cumin, Mexican oregano and 2 ½ cups of pork broth. Simmer, stirring every so often, for 30-45 minutes. Adjust seasoning and add more salt if needed.

Serve hot with tortillas, toasted piquín chiles, avocado wedges and a drizzle of crema and a splash of lime juice.

Serves 6.

Comment

Clever use of leftovers make a delicious lazy dinner.

October 17, 2020 Maria Garza

It is Friday night and I have had a long and crazy week. As a cook, the last thing I want is to come home and have to cook dinner. Some days I am just as happy to eat toast for dinner, I kid you not. That is the real life of a cook. I am pretty lucky that my kids have flown the coop and I live alone, so if I want to eat toast, I can do it without guilt.

Most of my life I have been one of those people that dislikes leftovers, but in the last few months of pandemic craziness I have come to appreciate the beauty of having food in the fridge, and food that I can just reheat rather than cook to feed myself a fairly decent - if not glamorous dinner.

So let me tell you about last night… I had little bits of leftover food - a bit of steak, a few spoonfuls of refried beans (I cannot bear to throw out food, even if it’s less than half a serving for anyone), that salsa I always have on hand, corn tortillas and some cheese.

In Mexico, when we make Carne Asada (our version of barbecue), the pit masters always place corn tortillas on the grill to crisp them up. Then they mound cheese on them and once it melts, they top them with chopped steak - these are called volcanes, and they make them for people that do not want to eat a whole steak, or let’s be real, they just taste delicious!

I made a version of those Volcanes last night with my little bits of leftovers. I am partial to corn tortillas, but I have to say, in Monterrey, where flour tortillas are beloved, some people use them instead for these. So go ahead and use what you have. After all, in pandemic times, we just roll with the punches and get creative with what we have on hand.

Next time you find yourself with leftover steak and beans, why don’t you make Volcanes! I am pretty sure you will love them as much as I do. Buen provecho!

Volcanes de Bistec
Grilled Steak Tostadas

Leftover steak (about 1 1/4 cup, minced)
1 tsp vegetable oil
3 corn tortillas
Leftover refried beans (about 1/3 cup)
Shredded Monterey Jack, Havarti, Mozzarella or Oaxaca cheese (about 2/3 cup)
Salsa of your choice
Thinly sliced onion for garnish (about 1/4 cup)
Cilantro leaves for garnish
Sliced avocado or guacamole for garnish (optional)

Place tortillas on griddle over medium low heat and let them crisp up as you flip them every few minutes. They should be completely crispy.

Meanwhile, in medium frying pan, heat oil and cook steak, only to reheat it, no need to get it crispy.
When tortillas are crispy, divide the refried beans among them.
Top with warm steak and then place shredded cheese over steak. Cover griddle (I use the same frying pan, upside down) to melt the cheese.

Once cheese is melted, top with your favourite salsa (or two kinds, as I often do) and garnish with onions and cilantro leaves. If you have avocado, or a bit of guacamole, it makes a great and delicious garnish as well.
Serve and enjoy immediately.

Makes 3 tostadas.

Comment

Enfrijoladas, those delicious bean bathed tortillas.

October 10, 2020 Maria Garza
IMG_0641.jpeg

Have you ever tried Enfrijoladas? Maybe not as common north of the border, but they are absolutely delicious! I grew up eating them and they were always a treat when my Nana made them for us.

Enfrijoladas embody the three most iconic Mexican foods: corn tortillas, beans and salsa. Those three ingredients have been the food of all Mexicans for EVER, and we never get tired of eating them! Clever Mexican cooks have been spinning these three ingredients to create new dishes for a long time, and this is one example of a delicious combination.

We could easily group Enfrijoladas with the Enchilada bunch. After all, Enchiladas is a “group” of dishes that mean tortillas are covered in some sort of sauce and filled with an assortment of fillings. The most famous Enchiladas are Enchiladas Rojas, covered in red chile sauce, or the green Enchiladas Suizas, covered in tomatillo sauce. But then there are Papadzules, which boast a delicious pumpkin seed sauce, Enmoladas, covered in dark mole sauce and of course Enfrijoladas, covered in bean sauce (black or pinto). So you get the picture… it’s a corn tortilla (never wheat flour please!), covered in some sort of sauce, usually filled, but sometimes not, as with our Enfrijoladas.

Now… let’s get to the nitty gritty. When I went to Oaxaca, I ate some VERY GOOD enfrijoladas… and those were made with black turtle beans. Many people consider the real authentic enfrijoladas to be made with black beans, but I can argue that it all depends on the region you are in. In Northern Mexico, where I’m from, it was more traditional to make these with pinto or bayo beans, so let’s just say you can make these with any beans you have available where you are. The method will be the same and the outcome will be just as delicious. One thing to note: the traditional flavouring of these Enfrijoladas is dried avocado leaf. If you have never tried them, they give the dish a mild aniseed tone, like a very mild liquorice. It is not absolutely necessary that you have it, but if you can find the ingredient, please try it. It goes especially well with black beans but works with other beans as well. Just crumble the leaf into the blender and it will flavour your beans beautifully.

The bean sauce should be perfectly smooth - we don’t want any texture here, so a blender is absolutely necessary for this dish. Then you will cook the sauce in lard (or vegetable oil if you don’t have lard). I know, 1/4 cup seems like a ton of fat, but trust me, it makes the sauce so much more flavourful! If you must skimp on it, go ahead, your sauce will still be good. Simmer it gently stirring often, as you don't want it to stick to the bottom of the pan. The sauce should be thick enough to coat the back of a spoon (what in chef’s lingo is called “nappé”). Once you’re there, keep it warm while you prep your tortillas. If your sauce thickens too much while you’re doing this, just thin it out with a bit of water.

To make the tortillas, heat a bit of oil in a saucepan or comal and soft-fry the tortillas one by one - you are just looking to make them soft and pliable, not crispy, so be careful with this. Remove them to a paper lined plate as you finish all the tortillas.

Once the tortillas are fried, proceed to the bean part. I have given you two methods - one is the easy one and one is the traditional one. Sometimes, when I’m short on time I will do it the easy way, but I do prefer the traditional way as it gives you way more sauce!

As with many Mexican dishes, garnishes are a big part of the deal, and these Enfrijoladas are no exception. As if the flavourful beans are not enough, these get crowned with crumbled chorizo, cotija (or feta) cheese, crema, salsa and cilantro leaves. I like to serve them with some avocado. 
A work of art indeed! I hope you make these and Buen Provecho!

ENFRIJOLADAS
Tortillas bathed in bean sauce

3 cups cooked or canned pinto or black turtle beans plus 2-3 cups bean broth or water
1-2 dried avocado leaves (optional)
Salt to taste
¼ cup lard or vegetable oil
12 Corn tortillas 

Garnish:
2/3 cup raw Mexican chorizo, cooked (optional but delicious)
1 small onion, cut into thin julienne
Cotija or Feta cheese (crumbled)
Mexican Crema (or sour cream thinned out with a bit of milk)
Cilantro leaves for garnish
Salsa of your choice

Place beans with bean broth or water and avocado leaves in blender container and process until very smooth. If necessary, add more broth or water to make the mixture blend easy. The sauce should be thick, but easily pourable. 

In large saucepan, heat lard. Pour in bean puree and simmer over medium low heat until bubbly. Add salt if needed. Sauce should be thick enough so that it coats the back of a spoon – if it thickens too much, thin with a bit of  water.

In shallow frying pan or griddle, heat up 2 Tbsp vegetable oil. Soft fry tortillas on both sides until they are coated with oil and heated through, but not crispy, about 1 minute. If you need more oil, add as you need it. Place tortillas on a plate lined with paper towels. Repeat until all tortillas are fried and keep warm.

To plate the Enfrijoladas, there is a couple of ways to do this:

Method 1: (the fastest way) fold 2-3 soft-fried tortillas onto a plate. Once you have them on the plate, cover them completely with bean sauce. Garnish. 

Method 2: (the traditional way) dip the soft-fried tortillas, one by one, into the bean sauce and then place them on a plate – you can place them flat, folded in half or in quarters.

Top with cooked chorizo, onion, cheese and crema. Garnish with cilantro leaves and serve with your favourite salsa.

Serves 4-6.


Comment

Corn... that amazing food.

October 3, 2020 Maria Garza
IMG_0609.jpeg

Mexico’s most iconic food is maize, or corn. It is the ONE food that is part of our identity - We Are the People of the Corn. It may be hard to understand this concept, but think of this: corn comes from Teocintle, a type of wild grass native to Mexico and Central America. Our native ancestors domesticated this plant and over time, it evolved into what we now know as corn. It is pretty amazing if you stop and think of that.

Ancient Mexicans also discovered nixtamalization, which is the process of cooking dried corn with calcium oxide (lime), letting it sit for 24 hours, then rinsing and grinding it to make Masa. This process makes it easy for the tough outer skin of the kernels to be removed, but most importantly, it changes the amino acids of the corn to make it nutritious. Without this process, the nutritional value of corn is very low, so at the base level, this is of huge importance when you are talking about a food that is a staple (when you eat tortillas and beans, you make a complete protein, and that has been the basis of the Mexican diet for centuries). Nixtamalization also makes it possible to make a smooth pliable dough that can be formed into tortillas, which is the Mexican’s daily and very beloved bread.

By now you are getting the idea that in Mexico we love all things corn. Tortillas and all the things you make with masa are at the centre of every day meals. Masa is used to make nutritious and hearty drinks like champurrado and atoles, and tamales would not exist without masa. So many things made with corn!

But not everything is made with masa…

We also LOVE corn in its fresh form! Corn in Mexico is not the same as corn in Canada or the USA. Our corn is starchy and not sweet at all, it is sturdier and a fabulous vehicle to savoury toppings. It is one of the most popular street snacks there is. You can find it on the cob, boiled or grilled, smeared with mayo and crema, then topped with cotija cheese and sprinkled with chile and lime. Or, if eating on the cob is not your thing, then it is cut off the cob and served in small glasses and topped the same way. This particular snack is one of the first things I eat when I land in Mexico every time I go back. It is so good you can’t even imagine it, and today I’m sharing with you our favourite way to eat it.

This is not really a recipe, but a way to prepare the cobs. Now is the best time of year to eat this as the farmer’s markets are still offering the freshest corn. You can make these with boiled corn or grilled corn, your choice. Both are equally delicious and I hope you try it. Buen provecho!

Elotes a la Mexicana
Corn, Mexican Style

Boiled or grilled corn cobs
Mayonnaise
Crema or sour cream
Crumbled cotija or feta cheese
Tajín, chile powder or Salsa! Chile Blend from Spicetionary
Sea salt to taste
Lime wedges

Brush warm cobs liberally with mayonnaise and crema. Place cotija or feta cheese on a plate and roll corn onto the cheese to make it adhere.
Sprinkle with chile and sea salt and drizzle with lime juice.

Comment

Salsa Negra, take two.

September 26, 2020 Maria Garza
IMG_0442.jpeg

Almost two years ago, I met Rafa Rangel from Spicetionary. A chef friend had asked me if I could chat with him, as he was fairly new to Ottawa, was just getting started in his new business, and wanted to meet more people in the industry. 

We met for coffee and we immediately hit it off. Maybe it’s that Latino kinship (Rafa is from Venezuela), or the fact we speak the same language, but we became friends instantly and started talking about all things food and flavours. We were just about to start collaborating in cooking classes and events when Covid-19 hit. As everyone in the industry, we all had to think of different ways of working, reaching clients and doing business. 

I have been so fortunate that my day job is at a place that is considered an essential service, so I was never out of work, but my second line of business is doing something I really love - teaching cooking - and that, with covid, came to a grinding halt. I have to admit, with work being so busy I have not had much time to figure out the next steps for my classes, so when Rafa approached me and asked if we could do an online class together, I jumped at the opportunity! He is very hands on and technology savvy, so I have learned a lot from him as I prepare myself for online teaching. So, stay tuned on that front! The Cultural Kitchen will be teaching online soon!

But back to Rafa… in one of our many conversations, we talked about dried chiles, so Rafa made a spectacular chile blend that I have used in this Salsa recipe. That blend was loosely based in the mix of chiles I use for one of my favourite salsas - Salsa Negra, a complex, deeply flavoured salsa from Oaxaca, made by roasting tomatillos, onions, garlic and dried chiles (you can find that recipe here, in the blog). But the blend is not only for salsas, it can be used in any dish where you want to add that deep, smoky, spicy flavour (and colour!). Think tortilla soup, beef stew, chili con carne, BBQ ribs and chicken, etc, etc, etc!!

Now, if you have taken any of my classes, you have heard me say you can make salsa in a thousand different ways, and that is so true! This recipe, is as easy as it gets. Blend vegetables, cook with a bit of oil, add chile blend and season and that’s it! Easy and quick! If you cannot find tomatillos, make the salsa using only tomatoes, but instead of two, use 3 tomatoes.

Rafa and I did our first online class last week and we made Steak Tacos with this Salsa Negra. Our students said they were the best tacos they ever had! Nothing makes me happier than that. I will post the recipe for the tacos soon, but in the meantime, here is the salsa so you can give it a try! You can find Rafa’s Salsa! chile blend at www.spicetionary.com.

Salsa Negra al estilo Spicetionary
Black Salsa, Spicetionary Style

2 vine tomatoes, chopped
8 small tomatillos, chopped (about 1 cup)
1 small piece onion, chopped (about 1/4 cup)
1 garlic clove, peeled and roughly chopped
1/2 tsp sea salt, or more to taste
1 tsp vegetable oil
1 Tbsp Spicetionary Salsa! chile blend

Place tomatoes, tomatillos, onion, garlic and salt in blender container. Blend until fairly smooth but with a bit of texture.
In medium saucepan, heat oil and add blended vegetables. Bring to a slow boil and cook for about 5 minutes, until you see the salsa change colour and become a deeper red.
Add spice blend and cook for another 5 minutes, or until salsa has thickened.
Correct seasoning and enjoy!

Makes about 1 1/2 cups.

Comment

Every day is Taco Day!

September 20, 2020 Maria Garza
Tacos de Jamaica Maria Garza 1.jpg

Tacos are a centuries-old tradition in Mexico. They are part of every meal, every day - be it breakfast, lunch or dinner. Tacos are a way to eat our meals, filling in for bread in most households.

Tacos can be made of myriad fillings, for the meat lovers to the vegetarians. Depending on the filling, you can happily make a whole day’s meals out of tacos. Eggs and beans for breakfast, meat for lunch and cheese for dinner. And don’t forget the salsa.

Jamaica, or hibiscus, is a very popular drink in Mexico, tangy and full of antioxidants, the pretty purple agua fresca is not only easy to make, but good for you.  When you make Jamaica agua fresca, you have leftover hibiscus flowers, and that’s when this recipe comes into play. Tacos de Jamaica are not very common overall, but they are so with vegetarians.

This is the ultimate frugal recipe! Make a pitcher of Agua de Jamaica and then use the leftover flowers to make tacos. This indeed talks to my Mexican soul - and the philosophy of never wasting anything, as my Nana always says.

These unusual tacos are delicious and indescribably satisfying. So much so that you will not even remember your meal has no meat. The texture of the hibiscus flowers in the mixture is oddly reminiscent of meaty fibre and has a chewy texture that tricks your mind into thinking your are eating something more substantial than flowers.

Tacos de Jamaica are made with what I call the Mexican trinity - a sauté of tomatoes, onions and chiles. Add some garlic and cilantro and you will have a perfectly flavorful mixture for your tacos. Add some cheese to your tortilla first, and you have a Jamaica Quesadilla.

Either way, serve your tacos with mashed avocado or guacamole and your favorite salsa. Vegetarian dinner never tasted this good!

TACOS DE FLOR DE JAMAICA
Hibiscus Flower Tacos

2 cups hibiscus flowers
1 Tbsp olive oil or vegetable oil
1 clove garlic, minced
1 small onion, chopped
1 small Jalapeño or Serrano chile, minced
1 plum tomato, diced
¼ cup cilantro leaves, chopped
Salt to taste
Tortillas to make tacos
Salsa of your choice
Guacamole

In a 2 litre saucepan bring 1 litre water to a boil. Place hibiscus flowers in water and simmer for 10 minutes. Strain and reserve hibiscus flowers. Use liquid to make Hibiscus Tea, sweetened to taste.

In a medium frying pan, heat 2 Tbsp olive oil. Add onion and sauté until translucent, about 2 minutes. Add garlic and chiles and cook 1 minute. Add chopped tomato and cook another 5 minutes, until tomato breaks down.

Add hibiscus and continue cooking until hibiscus starts to get crispy and golden. Season to taste with salt.
Serve with hot tortillas, your favorite salsa and guacamole.

* If desired, the cooked mixture can be put in a quesadilla.

Serves 4.

Comment

Simple everyday meal good enough for Sunday!

September 13, 2020 Maria Garza
Cortadillo Norteño 1 Maria Garza.jpg

Cortadillo is a dish that you will find all over the northern State of Nuevo León. It is a humble dish, but very delicious.  When I go home to Monterrey, I like to visit neighboring towns. Day-tripping on a Saturday morning, we ended up in a small town called Sabinas Hidalgo, where we sampled the local gastronomy. The Cortadillo in this town is made with a peculiar ingredient: poblano chile. Everywhere you go, you will find Cortadillo, and everyone makes it slightly different, but finding poblanos in my Cortadillo was a delicious surprise.

What can one say about a dish that is such an integral part of one’s memories? I grew up in a family of 4 kids, and more often than not, we all had friends drop in for lunch after school. My Nana, who was - and still is - a whiz in the kitchen, would make great meals that were perfect for sharing. That is the case of Cortadillo, a pot of this delicious stewed beef, some rice, beans and tortillas, and everyone was happy indeed.

Now, as I sample different versions of the same dish, I can see how a recipe can be part of an individual’s tastes. Each cook takes experiences or traditions and transmits that onto his or her cooking. That is the beauty of food - part tradition, part anthropology, part regional ingredient availability, part creativity and part taste, coming together beautifully. 

Yes, I love to travel and experience and taste. I made this recipe based on what I saw in Sabinas Hidalgo, with a touch of what my Nana puts in her recipe. I like to serve my Cortadillo alongside pan-fried oregano potatoes, chiles toreados (look for these recipes here in the blog too) and tortillas. This is my version of an authentic and very satisfying every day Mexican meal that’s good enough for a Sunday! 

Cortadillo Norteño
Northern style beef stew

2 Tbsp lard (or vegetable oil)
900g beef top sirloin, cut into 1/2" dice
1 large onion, diced
2 cloves garlic, minced
2 poblano chiles, seeded and chopped
3-4 serrano chiles, stemmed but left whole
6 plum tomatoes, diced
1 tsp kosher salt, or to taste
½ tsp ground black pepper
1 tsp ground cumin
Corn or flour tortillas, to serve

In large saucepan or Dutch oven, heat lard or vegetable oil over high heat. Add meat and cook until browned, about 5 minutes. Add onions, garlic, poblano and Serrano chiles and cook until onion is translucent, about 5 minutes. 

Add tomatoes, salt, pepper and cumin and cover the pan while simmering mixture over low heat for 30-40 minutes, making sure it does not dry out. If it does, add a bit of water to maintain a saucy consistency. Taste and adjust seasonings and serve hot with tortillas.

Serves 6.

Comment

Harvest time is the best time to make Sopa de Milpa.

September 6, 2020 Maria Garza
Sopa de Milpa 2.jpg

Milpas are traditional Mexican vegetable parcels. The word “milpa” comes from the Nahuatl tongue, and it refers to a piece of land that is planted with specific types of vegetables. In these parcels, you will always find native ingredients like corn, squash, beans, tomatoes, chiles and wild greens. These plants not only grow perfectly well together, they also nurture each other, making milpas a self-sufficient type of farming, much like the Three Sisters concept in native North America. Milpas are the basis of the Mexican diet and this is my version of a type of vegetable soup that is named after our traditional vegetable growing practice.

There are as many versions of Sopa de Milpa as there are cooks, since each person can make his or her interpretation of the recipe. One thing for sure: the soup must have corn, tomatoes and some kind of squash or beans. After that, let your imagination fly.

I love soups, especially when the weather starts to get a bit chilly. There is something comforting and special about a soup that always reminds me of my Nana and being home. You may think I’m always homesick, but that is not so. I just treasure the memories I have from when I was growing up and the ones I continue to make when I visit my family in Mexico.

My Nana taught me that you must know how to make a good stock. Chicken stock is the easiest to make and the one I like best, that’s why I always have some in my freezer, ready for when the mood strikes to make a soup like this one. If you don’t have some at the ready, go ahead and use a good quality commercial stock. You will still love this soup.

A perfect starter to any meal, don’t forget to pass around the lime wedges and chipotle chiles, they make the soup shine. Buen Provecho!

Sopa de Milpa
Mexican Vegetable Soup

2 litres chicken stock
2 carrots, peeled and cut into ¼” slices
10 baby potatoes, halved or quartered if large
1 ear of corn, cut crosswise into 1 ½” rounds
1 small onion, cut into julienne
1 small zucchini, cut into ¼” slices
1 handful green beans, trimmed and cut into 1” pieces (about 1 cup)
2 roma tomatoes, diced
½ cup chopped cilantro or parsley
2 tsp kosher salt, or to taste

Garnish:
Chipotle chiles
1 lime, cut into wedges

In large saucepan, heat chicken stock for about 5 minutes. Add carrots, potatoes, corn and onions. Cover partially and simmer for 10 minutes. Season with salt and add zucchini, green beans and tomatoes, and cook for another 6 minutes. Correct seasoning and just before serving add cilantro. Serve with chipotle chiles and lime wedges.

Makes about 4 litres, serving 8-10.

Comment

Stuffed Poblanos on a bed of rice, what can be better?

August 29, 2020 Maria Garza
Chiles Rellenos con Arroz 1.jpg

The last time I was in Mexico, my friend Alma made this dish for me. I had tried it once before, but this time it made me really curious about the origin of the dish. I asked everyone I know if they knew where it came from and no one could answer me.

I have a sizable collection of cookbooks, and the older the books are, the more they intrigue me. I found a reference to a dish like this in an old book from my hometown, which leads me to believe this is a regional dish. Still, nothing that concrete, but the truth is that it is a clever way to make two dishes in one. I am not surprised a practical Mexican cook came up with this idea.

Many, if not most, Mexican meals are served with rice on the side. In this recipe, the rice and poblano chiles cook together in the same pan. How nifty is that? This recipe appeals to my practical self, and though I never shy away from making the most complicated dishes, sometimes I want to cook something that does not take 10 hours to make. This recipe is perfect for that. 

This dish will please your vegetarian friends, but if you want a heartier meal, you could stuff the peppers with picadillo. That would make a really nice variation. This recipe comes with its own salsa recipe, but you can use any salsa you want, it doesn’t have to be this one. 

When you serve this dish, all you need is a soup or salad as a starter and a delicious dessert to make a memorable meal for your family and friends. Think you are making a meal that was served in 1930’s Monterrey. That is something special indeed. Enjoy!

Chiles Poblanos Rellenos de Queso con Arroz
Rice Casserole with Cheese Stuffed Poblanos

Rustic Grape Tomato Salsa:
2 Tbsp olive oil
1 small onion, diced
2 cloves garlic, sliced thinly across
1 jalapeño chile, diced
4 cups grape or cherry tomatoes, halved
Salt to taste

Poblano chiles:
1 Tbsp olive oil
6 poblano chiles
1 cup onion, diced
1 1/2 cups zucchini, cubed
1 1/2 cups corn kernels (from one large ear of corn)
1 rounded tsp Mexican oregano
1 cup feta cheese, crumbled
3/4 cup brick cheese, shredded
3/4 cup Monterey Jack cheese, shredded
Salt and pepper to taste

Rice:
2 Tbsp. olive oil
1/2 cup minced onion
3 cloves garlic, minced
2 cups jasmine rice
4 Tbsp tomato paste
4 cups low sodium chicken broth or water
1 tsp kosher salt, or to taste

To serve:
Cilantro or parsley leaves for garnish
Rustic Grape Tomato salsa (or any salsa of your choice)

To make Salsa:
In medium saucepan, heat olive oil for 2 minutes. Add onions, garlic and jalapeños and cook over medium heat until softened, about 5 minutes. Add tomatoes and cook, stirring every couple of minutes, until tomatoes break down, about 7 minutes. Season to taste with salt and set aside.

To make Peppers:
Over gas flame or under the broiler, char poblano chiles all over until skins are well blistered. Place in a large bowl and cover with a plate. Let steam for 7-10 minutes. Peel peppers and cut a small slit down one side. Carefully pull all seeds and veins out. Reserve while you prepare the stuffing.

In medium frying pan, heat 1 Tbsp olive oil. Add onions and cook over medium high heat for 2 minutes, or until softened. Add zucchini, corn kernels and Mexican oregano and cook for another 4 minutes. Cool completely.

In medium bowl, combine zucchini mixture with feta, brick and Monterey Jack cheeses. Mix well and add salt and pepper to taste. Stuff poblano peppers with cheese mixture and reserve.

To make Rice:
Meanwhile, heat olive oil in large saucepan, at least 4 inches deep. Add onion and garlic, and sauté for 2 minutes.  Add rice and stir 2 minutes.  Add tomato paste and cook for 2 minutes, making sure tomato paste is well distributed.  Add chicken broth and salt to taste.  Bring to a boil, cover and cook on low heat for about 10 minutes.  Add the stuffed poblano chiles, arranging them radially on top of the rice, cut side up. Continue to cook another 7-10 minutes, until all liquid is absorbed and rice is tender.

To serve, place some rice on a plate and top with a poblano chile. Garnish with cilantro leaves and a spoonful of tomato salsa.

 Serves 6.

2 Comments

The most gorgeous Aguachile is a pink one.

August 23, 2020 Maria Garza
IMG_0029.jpeg

I’ve had a very interesting week! It started when I messaged Stone Soup Farms on Instagram asking how much their organic garlic cost. The owner, Ross’ response was totally unexpected and the next thing I knew I had one kilo of garlic on my doorstep. All he wanted was for me to try it and spread the word on how amazing it was. And it is!! So… after I chatted with him on the phone I wanted to go meet him in person to learn more about garlic, and that’s how I ended up at Carp Farmers Market, which brings me to these pink oyster mushrooms (blog post to come on a recipe using that amazing Stone Purple Organic Garlic, so stay tuned!).

As I was walking the market looking for Ross’s booth, the beautiful mushrooms in the Forest Floor Mushroom stall stopped me on my tracks. I mean, they are BEAUTIFUL!! There’s something so sexy about the curves of oyster mushrooms to begin with, but the coral pink hue on these beauties is just out of this world. I just HAD to get some.

So… all the way home I was thinking of what I could make with them… it needed to be something super special that would let me showcase their beauty. Cooking them would be delicious, but the pink colour would get lost, so I decided to make an Aguachile. Aguachiles are Ceviches’ cousins… and usually they are made with raw, very fresh seafood. But you can make aguachiles with vegetables too (they’re popular with vegans for obvious reasons) as they are delicious! Oyster mushrooms are meaty, so it is usually recommended to cook them rather than eating them raw. The process of marinating them in aguachile does the same job, but they are still essentially raw.

Making an aguachile could be as simple as mixing citrus juice (usually lime) with chile and a bit of water and salt - the word itself means chile water. But I decided to go a bit greener and add cucumber, tomatillo and cilantro to my mixture. It is sooo good! A bit spicy from the jalapeño, tangy from the citrus and tomatillo, herby from the cilantro and of course, salt to balance it all. That in essence is what the Mexican palate likes. It really does make my mouth water just thinking about it. Sour, salty, spicy… it’s so GOOD!!

But getting back to the recipe - and this is full disclosure. I shot the styled plate you see here because I wanted to showcase those mushrooms, but after that, you need to really let the mushrooms sit in the aguachile for at least 30 minutes, so they get nice and soft. After that, they won’t look as pink, but they will taste amazing. To serve, add sliced cucumbers, paper thin slices of red onion, radish, tomatillo and avocado, along with a few cilantro leaves and a drizzle of your best olive oil. Serve with tortilla chips or tostadas and you will be in heaven. And it’s OK if you don’t want to share. You can thank me later.

Aguachile de Setas Rosas
Pink Oyster Mushroom Aguachile

To make Aguachile:
1/3 cup freshly squeezed lime juice
2 Tbsp freshly squeezed lemon juice
1 Lebanese cucumber, peeled and chopped
1 large tomatillo, chopped (about 1/3 cup)
1 wedge white onion (about 1 1/2 Tbsp), chopped
1 small Jalapeño or Serrano chile, chopped
1/4 cup chopped cilantro
1/2-1 tsp sea salt (or to taste)
200g pink oyster mushrooms (or any mushrooms you have), pulled apart

To finish the plate:
1/4 cup thinly sliced red onion
1 Lebanese cucumber, sliced thinly
1 avocado, peeled and sliced thinly
2 radishes, thinly sliced
1 small tomatillo, thinly sliced
A drizzle of your best extra virgin olive oil
Corn chips or Tostadas

To make aguachile, place lime and lemon juices, cucumber, tomatillo, white onion, jalapeño, cilantro and salt in blender container. Blend until completely smooth.
Place mushrooms in shallow bowl and add aguachile. Mix to combine. Cover and refrigerate for at least 30 minutes, but up to two hours.
When you’re ready to serve, place mushrooms along with the aguachile on large plate. Garnish with red onion, cucumber, radish, tomatillo and avocado. Finish with a drizzle of olive oil.
Serve with corn chips or tostadas.

Serves 4.

Comment

The pride and joy of the North.

August 16, 2020 Maria Garza
IMG_9912.jpeg

I was going through my blog posts today and realized I have never shared the recipe for flour tortillas, so I needed to remedy that post haste!

When we think about tortillas, we know that is that one food item that is part of the Mexican identity. It is our daily bread, and tortillas make an appearance at every meal on the Mexican table, be it breakfast, lunch or dinner - and even as a little snack between meals, slathered with butter and salt or smashed avocado. Tortillas are the vessel for many different meals, starting with the obvious tacos, but also enchiladas, tostadas, flautas and burritos.

All over Mexico we eat corn masa tortillas, but all along the North, our pride and joy are wheat flour tortillas. Depending on which State you visit, you can find varying sizes of tortillas - the ones called “Sobaqueras” from Sonora, measure anywhere from 40-60cm in diameter! Moving East through Chihuahua, you will find large ones specially made for making Burritos, and as you move further East, the tortillas get a bit smaller. Nowadays you find the regular 15 cm size, along with the “taqueras”, which are special small tortillas made specifically for tacos, as they are about 12cm in diameter and you can eat 3 or 4 or 6 at a time!

When I was a young child, my Nana used to make tortillas every day. Corn tortillas would appear at the table for every meal, but the special days were when she made flour tortillas. They are indescribably good! Tender, rich, soft and pliable. It’s like eating a fluffy cloud. I would stand beside her waiting for the first one to come off the comal, so I could snatch it and eat it slathered with butter and a pinch of salt. Pure bliss.

I have spent my life trying to make tortillas as good as hers. She would NEVER measure anything and I have to admit I am not there yet. I think I would need to make tortillas every day for one year to get to be as good as her! Regardless, making flour tortillas is pretty easy. All you need is wheat flour (I like to use all purpose), salt, lard and water.

Place the flour in a large bowl and work the lard until it’s in very small bits. Add warm water (always warm water please) and work it in until you have a fairly smooth dough. You don’t need to knead it as much as you knead bread, but you want it fully incorporated with the lard fully worked in. It is important to let the dough rest - this is crucial - at least half an hour but up to two hours if you can. If your dough rests, it will fully hydrate, the gluten will relax and your tortillas will puff up beautifully.

The hardest part about making tortillas is that they must be rolled individually with a rolling pin. Don’t be discouraged if the first ones are not perfectly round. Practice makes perfect, and the trick is to turn your dough by quarter turns as you roll them out. That will help keep them round.

Flour tortillas, like their corn counterpart, cook best on a comal, so if you have a cast iron griddle, please use that. If not, find the heaviest frying pan you own and use it. After they’re cooked, put a clean tea towel over a cooling wire rack and stack your cooked tortillas as they come off the comal. Cover them with the tea towel - this will steam and soften them as they cool.

Now, the best fillings for these are cheese (think quesadillas), scrambled eggs with or without chorizo, and queso flameado (find this recipe in the blog). If you have leftovers (and I doubt you will), you can keep them in a bag in the fridge for about a week, but you can also freeze them. Make some flour tortillas soon - they are delicious!

Tortillas de Harina
Wheat Flour Tortillas

4 cups all purpose flour
1 tsp kosher salt
2/3 cups lard or vegetable shortening
1 - 1 1/2 cups warm water

Place flour in large bowl and mix in salt. Add cold shortening and start breaking it up with your hands. Work the mixture until lard is in tiny bits.
Start adding water - first add about 3/4 cup and then only use what you need to get the dough to come together as you mix. You should have a fairly smooth, pliable dough that is not too sticky anymore.
Give it a few turns on the counter and then portion into balls about the size of golf balls. Place the dough balls in the bowl, cover them and let them rest 30 minutes up to 2 hours.

When ready to cook preheat griddle over medium heat. Place some flour on board and start rolling tortillas with floured rolling pin, turning the dough by quarter turns as you roll and extend dough. Get the dough as thin as you can. Transfer the tortillas to the hot griddle and cook on the first side for about 20-30 seconds, it will start to puff up pretty soon after it touches the hot pan. Turn when the bottom is starting to get colour. Cook on the second side for about 20-30 seconds. Turn one more time to finish the cooking process.

Transfer cooked tortilla to a towel set over a cooling wire rack. Continue until you’ve used up all the dough balls. Enjoy tortillas right away or cool and store.

Makes 28-30 tortillas.

Comment

Memories of Istanbul

July 19, 2020 Maria Garza
IMG_9535 (1).jpeg

I first came across a version of this salad at a Turkish restaurant in Ottawa and I fell immediately in love with it. I think that was the precise moment when what would become a bit of an obsession with Turkey and its food started. That one dish was the one that fuelled my intense interest and years later I finally was able to travel and spend some time in Istanbul.

I cannot say enough about Istanbul. My daughter Julia and I spent only 6 days there as part of a longer European trip, but we both agreed that we could have easily spent a month there. Such a thrilling metropolis! It is huge! With a population of 17 million plus, it is a busy and exciting place. The confluence of cultures is exhilarating, it is the only country in the world that sits on the edge of Europe and Asia, and it is the most interesting place to explore. It is an ancient city that has had many names throughout history, from Byzantium to Constantinople to Istanbul. The architecture is just as fascinating as its history and the food is out of this world. The only thing I know is that I need to go back. One day, when the world settles down after Covid-19, I will go back and spend more time there, and travel around the country. All I want is to go there, explore, photograph, cook and eat!

Being at the edge of the Mediterranean, the food available in Turkey is bountiful and beautiful, and it shows up at the table as the most delicious mezes, kebabs, pilafs and pastries. Our favourite meals while there were the breakfasts, composed of LOTS of small plates, everything from fruit and conserves and the most delicious yogurt and cheese to eggs, tomatoes, peppers, cucumbers and olives. And the same happens at dinner time, when they present you with all these small plates ranging from the most delicious white anchovies called Hamsi to potato salads, stuffed vine leaves, burek and a great variety of eggplant dishes like this salad. Foodie paradise indeed!

I could go on and on and on, as Turkey is one of the most fascinating places I have visited. But for now, let’s get to the recipe. This is my version of the Patlican Salatasi (eggplant salad). As with many recipes, it can vary to your taste. The most important thing - if you can do this - is to char the eggplant, either on the stovetop (if you have a gas stove) or on the barbecue - to give it that smoky taste. Of course, if you don’t have this available, roasting the eggplant in a hot oven until it’s soft is perfectly acceptable. Then you add the freshest tomatoes, cucumbers, red onions and bell peppers and douse it with lemon juice and lots of olive oil. Salt to taste, add some fresh herbs and voilá! You have the most delicious eggplant salad!

Afiyet olsun, as they say in Turkey - Enjoy!

Patlican Salatasi
Charred Eggplant Salad

2 medium-large eggplants
1 large vine tomato, diced
1 red bell pepper, diced
1/3 cup diced red onion
1-2 Lebanese cucumbers, diced
Juice of 1 lemon (or more to taste)
1/2 cup extra virgin olive oil (or more to taste)
1/4 cup chopped mint
1/4 cup chopped flat leaf parsley
Sea salt to taste
Pita bread to serve

To char eggplant, place a rack over the flame on the stove and turn constantly until completely soft and charred, about 20 minutes. You can do this on the barbecue over medium high heat, and turn often, until soft and charred. If you’re doing this in the oven, puncture eggplants and place on tray and bake at 400°F for about 45 minutes, until completely soft.

Once eggplant is cooked, let it cool briefly and open it up. Scrape flesh off the skin and place on colander. Let it drain completely before proceeding with the recipe.

In a small bowl, place the diced onion. Add lemon juice and a pinch of salt and let sit for 10 minutes while you prep everything else. Chop the drained eggplant and place in a large bowl. Add diced tomatoes, bell peppers, cucumbers and herbs. Add red onion in its lemon juice and salt. Adjust seasonings and let salad rest for an hour before serving.
Enjoy with plenty of pita bread!

Makes about 4 cups.

Comment

Tostadas are delicious and fun!

July 11, 2020 Maria Garza
Tostadas Piratas 1.jpg

Northeastern Mexico is the land of “beef”. Barbecues are a weekend ritual in many homes, geared towards spending time with family and friends. Mexican carnes asadas - as barbecues are known - are long, drawn-out affairs that start early in the afternoon and end well after midnight. Why do they last so long? And what could keep people entertained for 8 hours around the table?

Well, it is all part of the ritual: first of all, a carne asada is almost exclusively led by men. I’m not sure why, but men rule when it comes to Mexican barbecue. It will start with the guys lighting the charcoal, and taking care of it until it becomes white coals. During this time, the snacks will come out - guacamole, salsas, nopalitos (cactus paddles), fruits and vegetables spiked with chile and lime are the usual things, along with beer and tequila. 

Next, come the vegetables prepared on the grill… every family will have their own favorites - in my family’s case, there is always broccoli, stuffed chiles güeros  with cheese, corn and grilled whole onions. All those appear on the table next.

After that, comes the meat: a mixture of arrachera (skirt steak), chorizos, costillas (ribs) and rib-eye. They all come to the table as soon as they are ready, providing a pleasurable, leisurely afternoon eating. And let’s not forget the tortillas, warmed on the grill and served piping hot, so you can make your own tacos.

After the meat is served, the pit master will cut up some of the steak and start making tostadas piratas. If corn tortillas are left on the grill a bit longer, they get crunchy, making perfect tostadas. Topped with cheese and chunks of meat, they make the perfect serving for the guests that do not want to eat a lot of steak. At the table they are topped with avocado and salsa, and some people like a few drops of lime juice.

With the leftovers, you can make more tostadas piratas for lunch the next day. And you can sit and remember that awesome afternoon you spent with family and friends at the carne asada, and hoping the next one comes very soon.

Tostadas Piratas
Grilled Beef, Cheese and Avocado Tostadas

8 corn tortillas
1 grilled steak, cut into chunks (about 2 cups)
3 cups shredded Monterey Jack cheese
1 avocado, cut into thin slices
Salsa of your choice

Heat tortillas on a griddle over medium low heat. Place a mound of shredded cheese on each tortilla. Once it starts to melt, top with chunks of steak. Continue to cook until cheese is completely melted and tortilla starts to get crunchy.

Serve hot garnished with avocado slices and topped with salsa.

Serves 4.

Comment

The most refreshing sorbet of the summer!

June 27, 2020 Maria Garza
Sorbete Sandia 2.jpg

Watermelon has the power of taking me back to my childhood on the family ranch. On lazy, hot summer days my cousins would come visit and one of our favorite treats was the large platters of chilled, sweet watermelon my Nana would bring out after lunch.  

What can be more refreshing than cold, sweet, juicy watermelon on a hot summer day? I can think of a few things, but this watermelon and tequila sorbet tastes like summer in a bowl, and even better, since it boasts a very adult spike of silver tequila. 

Many people find it intimidating to make ice cream or sorbets. I have to tell you, it is one of the easiest things you can do! I tend to prefer making very simple, clean fruit flavors, and all you need is a blender and an ice cream maker, but that is optional. 

If you have an ice cream maker, then this recipe will be a breeze, but if you don’t, you can still make a very good sorbet. You only need a deep tray, and you will freeze the mixture in stages, bringing it out and scraping it at intervals to achieve a frozen texture. It is not as smooth as churned sorbets if you make it this way, but it will be just as delicious.

When I worked at the restaurant, this sorbet was a popular item on the menu. Since the restaurant was Italian, there was no question of flavouring it with tequila. Instead, I used Sambuca - and even though that is not Italian either, at least the flavor was more akin to Italian flavors. The anise liquor complemented the watermelon beautifully and it was a huge hit. 

If you are serving this to little ones, just omit the booze. It will be just as delicious without it. Just sit back and watch them, it will disappear in a flash!

SORBETE DE SANDÍA AL TEQUILA
Watermelon and Tequila Sorbet

5 cups cubed watermelon
1/2 cup sugar
2 Tbsp silver Tequila
Mint springs for garnish

Place watermelon cubes and sugar in a blender jar. Process until completely smooth. Add Tequila and mix again. 

Pour into frozen cylinder of your ice cream maker and churn for 15-20 minutes, or until your machine freezes mixture.

If you do not have an ice cream maker, you can pour the mixture onto a rectangular mold and place in freezer. Let freeze partially (about 30 minutes) and then scrape up the mixture. Place back in freezer to freeze a bit more and scrape it up again. Repeat until mixture is all frozen. This process will give you more of a granita, but it will still be delicious.

Place mixture in a plastic container and freeze until firm. When you’re ready to serve, let mixture temper for 10 minutes in refrigerator so it is easier to scoop. 

Serve in small bowls, garnished with mint leaves. 

Makes 1 litre.

Comment

A chunky and delicious salsa!

June 12, 2020 Maria Garza
_DSC2236.jpeg

In the world of Salsas, there are a few camps - red, green, cooked, raw, roasted, smooth and chunky, to name a few. I can’t say I belong to any one of those camps, instead, I favour any of those depending on my mood. Sometimes, I want a punchy and bright Pico de Gallo (fresh), and others I want a mysterious and deep Salsa Negra (roasted), and yet other times I want a salsa that reminds me of home, like my Nana’s Salsa Casera (cooked). It all depends on the day and also what I’m going to use them for.

Today, I was in the mood for something rustic, something easy to make and delicious. Rustic is made with old tools, like my Mom’s molcajete: that volcanic rock mortar and pestle that’s traditional in Mexico. This particular beauty, as I said, was given to my Mom when she got married, so it is older than me! I was so lucky to inherit it and it is one of my most valued treasures. It is heavy and smooth on the inside, a real beauty. And the best part is that it makes the BEST salsa.

When we talk about salsas, we can really go on for hours - there are so many ways to make them! I really don’t use recipes, I only see what I have in the fridge, and then I just throw stuff together. Granted, I have been making salsas for over 30 years and you may not have that same experience. But this is where I come in, to help you make the most awesome salsa you can make.

So this salsa starts out as any cooked salsa, and it’s super easy to make - no chopping required. Just wash some Roma tomatoes and husk and wash some tomatillos, peel one garlic clove and a small cooking onion, and throw everything in a saucepan along with some jalapeños. Cover everything with water and place on the stovetop. Bring to a boil and then simmer for about 10 minutes, only until the tomatillos change colour - you don’t want to cook it so long that they break. Once that is done, it will go into the molcajete to become one of the best salsas you have ever tasted. Just know you’re in for a bit of an arm workout, but be patient. It will be worth it. If you don’t have a molcajete, you can just throw it all in the blender and your salsa will be just as good, only with a different texture.

Season your salsa liberally with salt, throw in some chopped cilantro and that’s IT! OK, OK, maybe I can’t leave things alone and I like to add another type of chile into the mix, like a bit of powdered pasilla, chipotle, guajillo or ancho, just for a bit more mystery. But really, if you don’t have any, your salsa will still be perfectly delicious. Use it for tacos, for dipping, for your morning Huevos Rancheros or whatever you like! If you make it, please let me know and show me your pictures! Buen provecho!

Salsa Molcajeteada
Chunky Salsa made in the Molcajete

2 ripe Roma tomatoes, whole
5 smallish Tomatillos, husked, left whole
1 garlic clove, peeled
1 small cooking onion, peeled and halved
2 Jalapeño chiles, whole
1/2 tsp powdered ancho, guajillo, chipotle or pasilla chile (optional)
1/3 cup chopped cilantro, or to taste
Salt to taste

Place tomatoes, tomatillos, garlic, onion and jalapeños in medium saucepan and cover with water by about an inch. Bring up to a boil and then turn down to simmer and cook for about 5-10 minutes, only until the tomatillos turn an olive green colour. Don’t cook it longer because they will break.

Once vegetables are cooked, place jalapeños and garlic in the molcajete (it helps if you slice the jalapeños first). Start pressing on the vegetables and work until you have a paste. Add the tomatillos and continue working the salsa with the pestle. Once the tomatillos are smooth, add the tomatoes and continue working the salsa until you reach your desired texture.

Season generously with salt, add the chopped cilantro and your powdered chile of choice and stir until it’s all incorporated. Serve right out of the molcajete.

Makes about 2 cups.

Comment

Avocados and Seafood are a perfect match.

May 31, 2020 Maria Garza
Aguacates Rellenos Camaron 1 Maria Garza.jpg

The other day, I looked at my vegetable bowl and noticed I had a lot of tomatoes and avocados. I also knew I had shrimp in the freezer. What to do with that abundance?

I decided to make a roasted tomato vinaigrette spiked with chile de árbol - kind of like a cross between a salsa and a salad dressing. If you like spicy tomatoes, you will love this. You can also use it as a sandwich or hamburger spread, for fish cakes, etc. 

The shrimp is marinated in lime juice, fresh chiles and garlic, and then quickly sautéed, so this recipe comes together quickly. Get your hands on the most beautifully ripe avocados and hollow them out a bit so you can fit more shrimp on each half. Top with your garlicky shrimp and then drizzle the roasted tomato vinaigrette on top.  Decorate with sliced green onions and cilantro leaves. We are talking delicious.

Were you looking for something impressive, yet easy to make? These shrimp-stuffed avocados are it! They are the perfect starter for your next al fresco dinner, paired with a crisp sauvignon blanc or a cold beer. Your guests will be very happy indeed.

AGUACATE RELLENO DE CAMARON CON VINAGRETA DE TOMATE ASADO con CHILE DE ARBOL
Shrimp Stuffed Avocado with Roasted Tomato and Arbol Chile Vinaigrette


2 large ripe avocados, halved, seeded and hollowed out slightly

Tomato vinaigrette:
2 vine tomatoes, halved
½ small onion, peeled and chopped roughly
2-3 chiles de arbol, cut into small pieces
2-3 Tbsp red wine vinegar
½ cup extra virgin olive oil
1 tsp kosher salt, or to taste
½ tsp freshly ground black pepper

Shrimp:
1 lb 31-40 shrimp, peeled and de-veined
2 garlic cloves, minced
1 Jalapeño chile, minced
Juice of 1 lime
2 Tbsp olive oil
Salt to taste

Garnish:
1 green onion, sliced thinly on the bias
a handful cilantro leaves

Preheat oven to 450°F. Place tomatoes, cut side down, on parchment covered baking tray. Add chopped onion. Bake until skins start to blacken quite a bit, about 15 minutes. Remove from oven and let cool.

In food processor, place roasted tomatoes and onion. Add chiles de arbol, ½ tsp kosher salt and black pepper. Process until smooth. Add red wine vinegar and while motor is running, start drizzling olive oil through the tube. Let mixture emulsify and taste for salt and pepper. Correct seasonings and reserve.

In medium glass or ceramic bowl, place shrimp, garlic, jalapeño chile and lime juice. Marinate for 10-15 minutes. Heat medium saucepan and add olive oil. Add shrimp and cook just until they turn pink, 2-3 minutes. Season with salt to taste.

When you’re ready to serve, cut the avocados in half, pit and remove a bit of the flesh to make more room for the shrimp. Mound the shrimp over the avocado halves and drizzle with tomato vinaigrette. Garnish with green onions and cilantro leaves. Serve immediately.

Serves 4.

Comment

Hearts of Palm anyone?

May 18, 2020 Maria Garza
Ensalada Palmitos Maria Garza 1.jpg

As summer comes around and it gets hot, we start thinking of serving and eating dishes that are not only easy to make, but that don’t heat up the kitchen. Salads are an obvious choice, but they can become pretty boring if we keep using the usual ingredients.

When you are looking for a colourful dish that’s full of flavour, look no further. This recipe has a touch of the exotic from the hearts of palm and a super flavourful vinaigrette that dresses it perfectly. 

When I make a salad, I tend to keep some of the ingredients the usual standbys, like leaf lettuce, bell peppers, some sort of onion - either red or green - fresh herbs and a delicious home made vinaigrette. But then, I like to make my salads way different by using some non-traditional ingredients, like delicious hearts of palm and grapefruit segments. 

Hearts of palm usually come from Costa Rica, Brazil or Ecuador, and are truly enjoyed by foodies around the world. They are, as their name implies, the hearts of the stems of certain palm trees. Their flavor is reminiscent of artichokes and besides flavour, they add a nice visual touch to the dish, as when they are sliced, they break up into pretty rings.

I love using fresh herbs in my recipes, and in this case, I’m using chives as part of the dressing. After segmenting the grapefruit, I used the juice left in the core of the fruit (which is usually plenty) as part of the acidic element in the vinaigrette. Because grapefruit juice is not too strong, I added a bit of white wine vinegar to give me the acidity I was looking for. A bit of garlic, Dijon, extra virgin olive oil, salt and pepper, a quick whiz in the blender y listo! Ready to dress a beautiful salad. Looking so forward to summer!

ENSALADA DE PALMITOS CON ADEREZO DE CEBOLLIN Y TORONJA
Hearts of Palm Salad with Chive Grapefruit Vinaigrette


1 can hearts of palm
1 small head red leaf lettuce
1 small red bell pepper, thinly sliced
2 red grapefruits, segmented
¼ small red onion, thinly sliced
¼ cup grapefruit juice
2 Tbsp white wine vinegar
1 tsp Dijon mustard
½ cup extra virgin olive oil
1 small garlic clove
1/3 of a bunch of chives (about ½ cup, chopped)
1 ½ tsp kosher salt
¼ tsp black pepper
¼ cup cilantro leaves

Drain hearts of palm and cut crosswise into ½” slices. Segment grapefruits over a bowl and reserve ¼ cup of the juice you obtain from squeezing the grapefruit core after segmenting.

Arrange lettuce, red bell pepper slices, hearts of palm slices and grapefruit segments on a platter. 

In blender container, combine grapefruit juice, white wine vinegar, garlic clove, olive oil, chives, Dijon mustard, salt and pepper. Process until very smooth. Adjust seasonings.

Drizzle dressing over salad. Garnish with cilantro leaves. Serve immediately.

Serves 4.

Comment

Quirky name for an iconic Mexican breakfast.

May 9, 2020 Maria Garza
Huevos Divorciados 3.jpg

Growing up in Mexico, there was never a shortage of salsa in my house. We had at least one type of salsa on the table at all times, but more often than not, we had two (or more). There was usually a red one and a green one. I have to say, I’m one of those people who are not happy with only one salsa. I like to have two. I think two is better than one, and my taste buds agree.

This is a delicious breakfast or brunch recipe, hearty enough to keep you going on a busy day. The name of this dish is a play on words. “Divorced” refers to the two types of salsa on the plate - one red and one green, though really, it could be any two different types, not necessarily red and green. 

In many restaurants, they serve this dish with a row of refried beans down the middle, alluding to the “divorce” even further. I like to keep things simple, but if you like an even heartier breakfast, by all means go ahead and add beans and cheese or even avocado to your plate.

As with all simple dishes, the quality of the ingredients is paramount, and in this case, the salsas should be superb. I have made one salsa smoky using chipotle chiles, and the other one is tangy due to the nature of the tomatillos. Though very simple, they are delicious, and together, they make a perfect contrast on your plate.

These salsas stand alone perfectly and can be used for other recipes, so any leftovers can be enjoyed in other dishes, or can be used as table salsas. So go ahead, double up on the ingredients for your salsas and you will come up ahead for other dinners during the week. 

Huevos Divorciados
Two-Salsa Eggs

Eggs: 
2-3 Tbsp vegetable oil
8 corn tortillas
8 slices ham
8 eggs
2 cups red salsa
2 cups green salsa

Red Salsa:
3 large tomatoes, roughly chopped
1 small onion, roughly chopped
1-2 chipotle chiles in adobo
1 tsp vegetable oil
½ tsp salt, or to taste

Green Salsa:
450g tomatillos, husked and washed
2 garlic cloves
1 small onion, quartered
3 serrano chiles
1 small bunch cilantro
¾ tsp salt, or to taste
¼ tsp sugar

To make Eggs: 
In medium frying pan, heat 2 Tbsp oil. Soft-fry tortillas only to warm and soften them. Remove to a paper towel lined plate and keep warm while you fry all tortillas. 

Fry ham slices briefly, only to warm up. Remove to a plate and keep warm. 

Before you prepare the eggs for each guest, have the plate ready to assemble. Place two tortillas on plate and top each tortilla with a slice of ham. Cook eggs, sunny side up (or over easy if you must) and place one egg over each tortilla. Spoon red salsa over one egg, and green salsa over the other egg. 

Prepare all plates in the same manner. Serve immediately.

To make Red Salsa:
Place tomatoes, onion and chipotle chile in blender container. Blend until fairly smooth. 

In medium saucepan, heat 1 Tbsp vegetable oil. Pour salsa from blender container into pan and cook, until salsa changes colour and flavours blend, about 12 minutes. Season with salt and keep warm.

To make Green Salsa:
Place tomatillos, onion, garlic and chiles in medium saucepan. Cover with water and bring to a boil. Cook vegetables until tomatillos soften, about 10 minutes. Remove vegetables to blender container, add cilantro and salt blend until smooth. 

Serves 4 (2 eggs per person).

2 Comments

For the Cilantro lovers out there....

May 3, 2020 Maria Garza

I remember tasting something like this when I was still living in Mexico. Recipes involving gelatine were popular in the 70’s and 80’s. Most of them were sweet - fruit and nut gelatines with or without milk or cream were very common. But a savoury recipe made with gelatine was not that common. That’s why this recipe stands out in my memory. 

Back then I did not pay much attention to recipes, but only enjoyed food and the occasion where it was served. That’s why this particular dish has been bugging me. I needed to re-create it so I could taste it again. 

Fast-forward to 30 years later. Based on the ingredients available and popular now, and working from my taste memory, I decided to make a go of this recipe. 

The main ingredient had to be goat cheese, instead of the cream cheese that would have been used then. Add to that a little bit of mayonnaise to help bind things combined with crema for a subtler taste, Serrano chile and lime juice to spice things up, and loads of cilantro (leaves and stems) make up the main body of the recipe. To round up the flavour profile, add a bit of chicken stock or bouillon and salt to taste. 

The mousse-like mixture is set with the help of unflavoured gelatine, then un-molded on to a platter, surrounded by your favourite crackers and you have a delicious appetizer for your next gathering. 

This original recipe is delicious as is, but since I have been trying my best to “healthify” my older recipes, so to make this one a bit higher in protein, I have also substituted the mayo and sour cream with plain Greek yogurt and I like it just as much.

I have served this Cilantro Mousse to many of my friends and family. You have to be a cilantro lover - and if you are, you’re in for a treat. Biting into a cracker topped with a slather of Cilantro Mousse is like having a party in your mouth. All you need is a glass of white wine to go with it and it is pure bliss.

Mousse de Cilantro
Cilantro Mousse


1 cup chopped cilantro, leaves and stems (packed) 
250 g goat cheese, softened
½ cup mayonnaise
½ cup Mexican crema or sour cream
2-3 jalapeño or Serrano chiles, chopped
Juice of 1 lime
1 tsp chicken bouillon (powder)
Salt to taste
1 envelope unflavoured gelatine 

Grease a 3-cup glass or ceramic mold lightly with vegetable oil. 

In microwaveable cup, measure 1/3 cup water and mix in the gelatine. Warm in the microwave for 10 seconds. Dissolve gelatine until liquid looks completely clear. Let cool.

Place cilantro, goat cheese, mayonnaise, crema, chiles, lime juice, chicken bouillon and salt to taste in blender container. Add gelatine liquid and blend until very smooth, 3-4 minutes.

Pour blended ingredients into prepared mold. Shake gently to remove any bubbles. Cover with plastic wrap and refrigerate until set, at least 6 hours, but preferably overnight.

To serve, run a thin knife all around the sides of mold. Invert mold onto a platter and shake gently until mousse releases from mold. Garnish with a cilantro leaf. Serve with crackers or bread.

* This recipe makes 3 cups of mixture. You can choose to pour it into whatever mold you have. One large one or small individual portions.

Comment
← Newer Posts Older Posts →

Copyright © 2025 The Cultural Kitchen
All Rights Reserved

1936 Ranchwood Way Orleans, Ontario K1C 7K7
613.762.0940