• Welcome
  • About
  • Workshops
  • FOOD FOR BLOG
  • Contact
Menu

The Cultural Kitchen

Street Address
City, State, Zip
Phone Number
COOKING CLASSES ON DEMAND

Your Custom Text Here

The Cultural Kitchen

  • Welcome
  • About
  • Workshops
  • FOOD FOR BLOG
  • Contact
Brushes Mercado-1.jpg

FOOD FOR BLOG

A bowl of comfort: Fideos Secos con Chorizo

June 27, 2021 Maria Garza
IMG_3659.jpeg

There is no question we have all been living the strangest times. This last year and a half has been one of the scariest, most stressful and challenging years I can recall, and though we have all been in this together, we have all lived a totally different experience, based on our individual circumstances.

Yesterday, I was fortunate to receive my second Covid-19 vaccine and based on many people’s reaction to it, I was wondering how it would affect me. Many I know have had a bad reaction to the vaccine and I’ve been hoping it would not be too bad for me. Nevertheless, my arm was very sore and I felt very fatigued, enough to take an afternoon nap.

Forcing myself to get up to cook, all I wanted was something comforting, something that would not take too long to cook and it would be delicious. Granted, this is not the easiest thing in the world to make compared to cooking pasta and adding some butter and Parmesan cheese, but it was what I was craving and since I had everything on hand to make it, I forged on.

I have written about “Sopas Secas” before (check out my blog post about yummy Tacos de Fideo), but I’m not sure they have got the recognition they deserve. Sopas Secas are the result of a true fusion in Mexico - using pasta, but cooking it with a tomato salsa instead - they’re like a cross between an Italian pasta dish and the Spanish Fideuà. I would say they resemble the Spanish version more because they are made exclusively with Fideos, that thin egg vermicelli pasta. Adding the tomato salsa to it is a very common way to flavour dishes in Mexico, and it is not surprising the dish evolved this way, as it is what Mexican cooks know and do every day, whether they are making eggs, stews or salsas!

So what are Sopas Secas, you ask? Well, the name literally translates to “dry soup”, which is misleading because this is not a soup at all, but in Mexico we say a wet soup is anything that’s liquid, and dry soup are “dry” rice dishes and fideos. You can attribute this to the quaintness of the language and just carry on. :-)

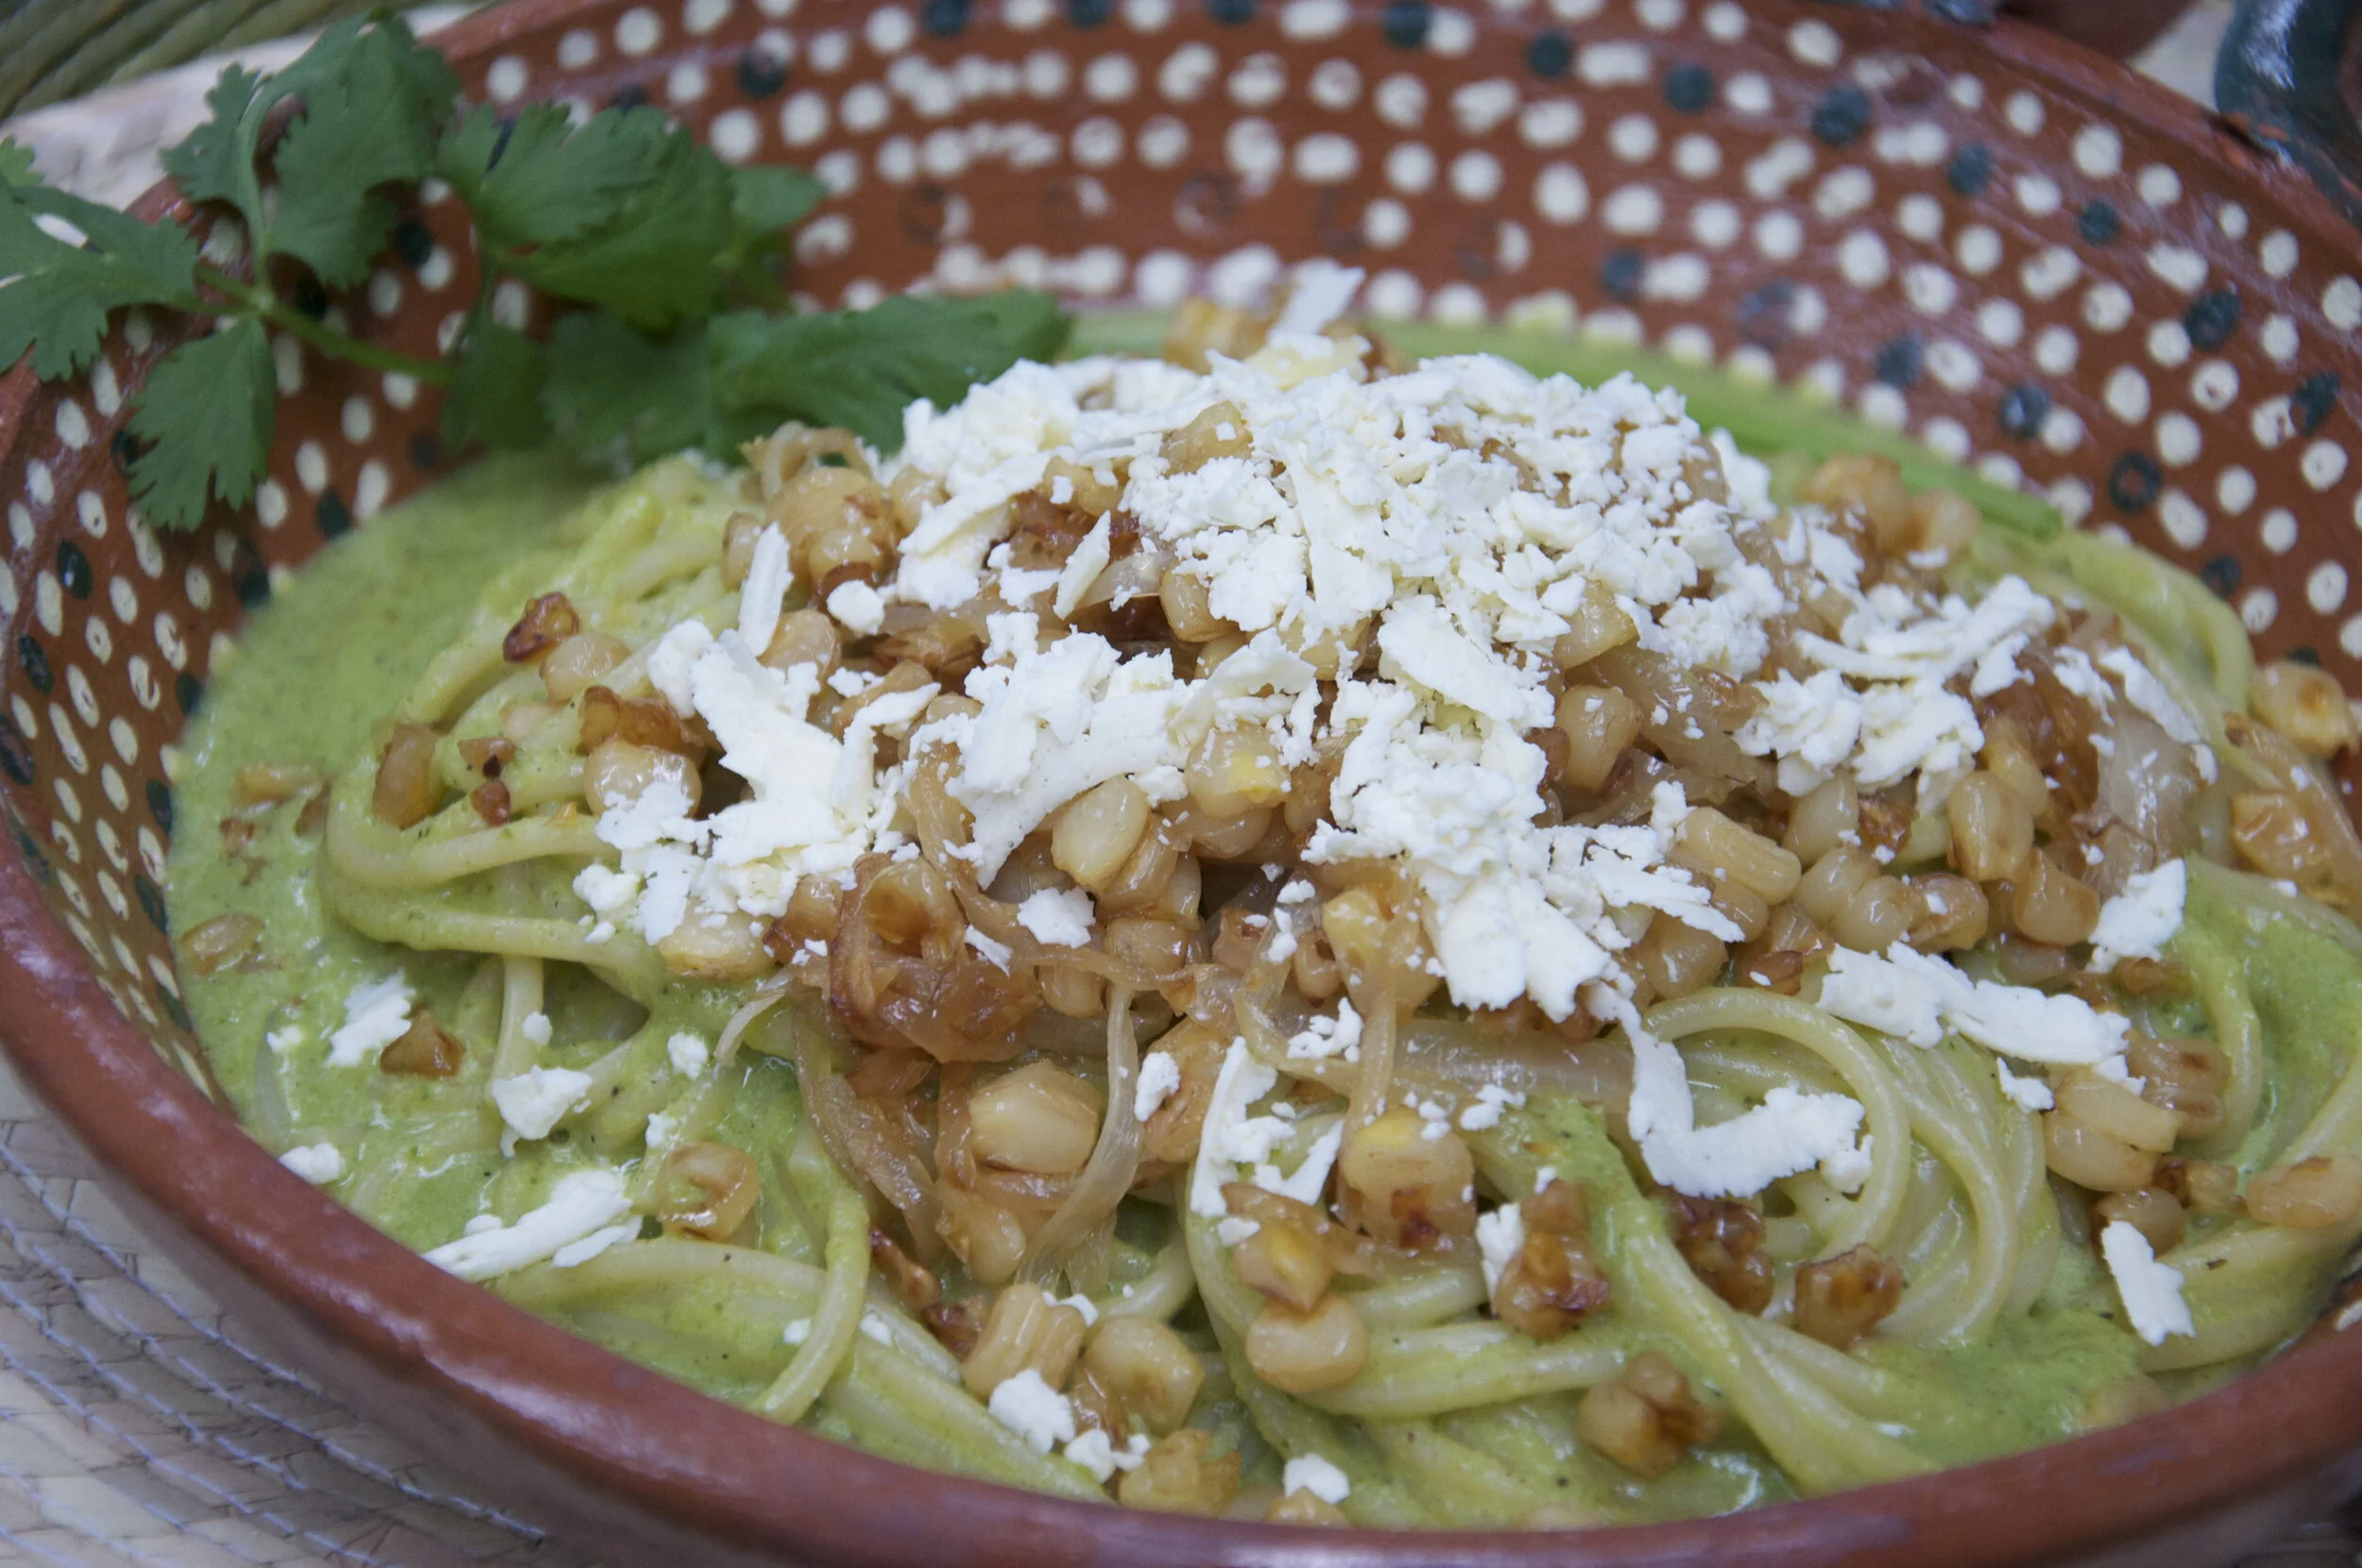
A sopa seca would be your grain component and would be a side dish to whatever you are eating, so it could be your rice or your fideos. Then you would have your main protein and a starch in the way of beans or other vegetables to complete your main dish. Fideos Secos will always be flavoured with tomato, and very often you will see them enhanced with chorizo - it’s just a match made in heaven. The little amount of chorizo enriches the dish without making it heavy. As usual, the garnishes crown the dish in the form of avocado, crumbled cotija (or feta) cheese, cilantro and a generous drizzle of crema. A splash or lime juice and extra chipotles in adobo take it over the top.

Dig in with a spoon or put this in a tortilla to make a spectacular taco. Either way, you will be in Mexican pasta heaven!

Fideos Secos con Chorizo
Vermicelli with Chorizo

1 guajillo chile, stemmed, seeded and deveined
2 small vine tomatoes, chopped (1 1/2 cups)
1/2 small onion, chopped (3/4 cup)
1 clove garlic, peeled and chopped
1/2 cup water
2 Tbsp vegetable oil
100g raw Mexican chorizo
2 cups (150g) fideos (thin egg vermicelli noodles)
3 cups chicken stock (or water)
Salt to taste
2 avocados, sliced
1/2 cup crumbled cotija or feta cheese
2 Tbsp chopped cilantro
1/4 cup Mexican crema or crème fraîche
Lime wedges
Chipotle chiles in adobo, optional

Heat up comal or frying pan over medium heat and toast guajillo chile just until fragrant, a few seconds per side - make sure it does not burn.

In blender jar, place toasted guajillo, tomatoes, onion, garlic and 1/2 cup water. Blend until completely smooth. You should have about 1 1/2 cups salsa.

Meanwhile, in large saucepan, heat 2 Tbsp oil over medium high heat and cook chorizo, crumbling as it cooks, until it’s golden brown and a bit crispy. Remove 2 Tbsp and reserve for garnish.

To the pan, add fideos and stir as you cook - you want to get the pasta nice and golden. This will take 5-10 minutes.

Add blended salsa and stir to cook until sauce is thick and dry - 5-10 minutes.

Add stock (or water) and salt to taste and bring up to a strong simmer.

Lower heat and simmer gently, uncovered, until pasta is tender and liquid is mostly absorbed -we want a semi-dry pasta. This will take 12-15 minutes, depending on your cooking temperature.

Serve garnished with reserved chorizo, avocado, cotija cheese, cilantro, and a drizzle of crema. 
Serve with lime wedges and chipotles in adobo.

Serves 4. 

Comment

Camarones Enchipotlados are creamy, spicy and totally delicious!

June 20, 2021 Maria Garza
IMG_3586.jpeg

In all these months of pandemic, and to avoid unnecessary trips to the grocery store, I’m sure many of us have learned to work with what we have. I think many of us have become better cooks, and have had time to experiment, whether out of necessity or just for fun.

Most of my recipes are born of a combination of factors: at the top of the list are cravings - my stomach rules for sure! If I’m craving something, then it will happen. Second: I cook with what I have - most of the time, I will look in my fridge and freezer and I will make something up using what’s available. I admit experience helps a lot here, but if you’re not at the point where you can make things up with ingredients you already have, be patient - it all comes with practice. Third, fourth and fifth: the desire to cook something delicious, that reminds me of home and will be done quickly make up for the rest.

That is how this recipe came about… I had a bag of raw wild Argentinian shrimp (the best!) in my freezer, and half a jar of crema that needed to be used, so I put them together and added a few ingredients and I had the most delicious tacos in 15 minutes flat. Yes, you have to think ahead to defrost the shrimp, but luckily if you put them in cold running water they thaw very quickly, just make sure you drain them thoroughly before you cook them. I always have chipotle chiles in adobo in the fridge and herbage in the form of chives and cilantro. And tequila? Well, yes, what kind of Mexican would I be if I didn’t have tequila in the house?

A couple of important tidbits: this dish comes together very quickly, so have all your ingredients ready and measured before you start cooking. Cook over medium high heat and whatever you do, don’t overcook the shrimp! One minute per side is all they need because then they will finish cooking once you add the tequila and crema. If you’re worried about the alcohol, or you don’t have any, you can omit the tequila. You can make them as spicy as you want - just add more chiles! I made tacos with these, but you can take this recipe more into the realm of a main course if you serve it with white rice and some roasted veg.

Either way, I hope you make these and let me know what you think! For a step by step, check out my Instagram highlights.

Camarones Enchipotlados
Creamy Chipotle Shrimp

340g raw wild Argentinian shrimp, thawed, peeled, deveined 
Salt and Pepper to taste
1 Tbsp butter
1 clove garlic, minced
3-4 Tbsp of your favourite tequila
1/2 cup Mexican crema, crème fraîche or sour cream
1-2 tsp chipotles in adobo, minced, or more to taste
Chopped cilantro and chives for garnish
Corn tortillas for serving

In medium bowl, toss shrimp with salt and pepper to taste.

In large frying pan, melt butter over medium high heat. Add garlic and cook for one minute, just until fragrant.

Add seasoned shrimp and cook for one minute per side - they should still be raw inside.

Add tequila and carefully ignite to flambé. Let flames subside as you shake the pan vigorously.

Immediately add crema and chipotles and quickly stir shrimp into sauce.

Add cilantro and chives and serve immediately with corn tortillas.

 Serves 2-3.

Comment

Another refreshing Agua Fresca: Horchata

June 13, 2021 Maria Garza
IMG_3520.jpeg

The origins of horchata go way back - in Spain, and more specifically in Valencia, a drink called Horchata de Chufa was made and still is popular today. That particular drink is made with tiger nuts, but in Mexico and many parts of Latin America, we make our horchata with rice and it is yet another one of our beloved aguas frescas.

Typically, horchata is a drink of soaked and blended rice mixed in with condensed and/or evaporated milks, then sweetened and flavoured with canela - Mexican cinnamon. I really like that kind of horchata, but I love coconut even more, so I make my horchata with rice, but instead of using milks, I go for a blend of coconut water and coconut milk, making this a vegan drink.

Any kind of rice works here, but it doesn’t have to be anything expensive - long grain works just fine, but the most important step for making horchata at home is to take the time to soak the rice. Soaking softens the grains and makes the mixture easier to blend. You can soak as little as three hours, but it is better to do it overnight. If you have a really powerful blender, it’s OK to soak less time, but if not, it’s best go overnight.

Once you blend, let the machine do its thing for at least one minute, or even more (you know your blender best), to make sure the grains are thoroughly ground. Pass the mixture through a very fine sieve (I like to use a nut milk bag), and then pour into a pitcher, sweeten to taste and that’s that!!

To serve, you can garnish with a few fun things as we do in Mexico. If you walk the markets and decide to buy a glass of horchata, it will likely come garnished with small pieces of cantaloupe and chopped pecans. Delicious! If you don’t want to go that route, a sprinkling of cinnamon will do the trick. Just make sure you serve over ice.

Another idea that is super delicious is to make an iced horchata latte - pour a shot of espresso in an ice filled glass and top with horchata. Trust me, it will become a favourite summer drink.

So go and make a pitcher of horchata and enjoy this gorgeous weather!

Horchata de Coco
Coconut Agua Fresca 

1/2 cup rice 
1 cup coconut milk
3 1/2 cups coconut water
1” piece canela or cinnamon
Sugar or sweetener of your choice to taste
Ice cubes

Soak rice and canela in cold water for three hours, but you can leave it overnight at room temperature.

Drain rice and canela and place in blender with coconut milk and 1 cup coconut water. 

Blend until completely smooth.

Pass the liquid through a fine strainer or nut milk bag and pour into a pitcher. Stir in remaining coconut water and add sweetener to taste.

Serve over ice, garnished with ground canela.

Makes 1 litre.

Comment

Cactus Pico de Gallo, different, healthy and delicious!

June 6, 2021 Maria Garza
IMG_3394.jpeg

This recipe came about because I recently bought a new (and gorgeous) MadeIn carbon steel comal from Masienda. This comal is a piece of art. It is very large and heavy duty, and for its maiden voyage I wanted to make something super delicious.

Of course, the first thing I cooked in it were corn tortillas, but immediately after I was on a mission to make the most delicious Tlacoyos (find a recipe for them here in the blog). So I made three fillings: requesón (ricotta, onion and cilantro), mashed potato and tomato and refried beans with chipotle chile. I made a beautifully hydrated masa and proceeded to cook my tlacoyos.

But, you see, a tlacoyo is not complete without its toppings, and one of the most traditional toppings is made with nopales. Nopales, or cactus paddles, are a beloved in Mexico, and their use goes back thousands of years, to the time of our natives. Nopales have long been used for their medicinal properties, as they are very good for you: full of fibre, high in calcium, they help to regulate blood sugar, and cholesterol levels, among many other things.

Aside from all the good stuff, nopales are delicious. I have to confess, if nopales are not prepared properly, I have a hard time eating them. You see, they have that slimy thing going, just like okra, and I am not a fan of the slime. But, if you prepare them this way, most of that slime goes away.

Nopalitos, as they’re fondly called in Mexico, appear at the supper table very often, and as I say, we love them! Whether grilled on the barbecue, roasted in the oven, stewed with other vegetables, with scrambled eggs, or in salads just like this one, you can make tacos out of all those versions and they’re really, really good.

This recipe is a popular one at the start of a long meal - a pico de gallo of sorts, very fresh and light. You can eat it with chips, mix it with guacamole, or use it as a topping for your tlacoyos. Either way, it’s delicious and easy to make.

Pico de Gallo de Nopalitos
Cactus Pico de Gallo

3 medium cactus paddles, cleaned and diced
1 tsp salt

1 ripe vine tomato, diced
1/4 cup Spanish onion, diced
1/2 serrano or Jalapeño chile, minced
1/4 cup chopped cilantro
Juice of 1 lime
Salt to taste

First you have to clean the cactus: very carefully, and using tongs, trim the outer edge of the cactus paddle, about 1/8” of the edge, to remove most of the thorns. Then, using your knife, scrape off the rest of the thorns off both sides of the paddles, making sure none remain. As if you were peeling a carrot, doing that horizontal motion, but using your knife instead. Once they’re clean on both sides, run your hands over the surface to make sure they’re perfectly smooth and no thorns remain.

Once the cactus is clean of thorns, cut them into strips and then across into small dice. Place them in a medium bowl and add 1 tsp salt. Mix it in and let them rest for 15-30 minutes. The longer they rest the more slime will come out.

Rinse under cold running water until no slime remains. Let them drain completely and place them back in the bowl. Add the tomato, onion, chile, cilantro, lime juice and salt only to taste. Remember, they were cured in salt, so you may not need much more. Serve right away.

*if you have leftovers, the next day they will be very slimy, so you may have to drain them and re-season.

Makes about 3 cups.

Comment

Eggplant is the star in this delicious Smoked Eggplant Dip

May 30, 2021 Maria Garza
IMG_3238.jpeg

My fascination with Turkey began about a decade ago, and not surprisingly, it began through its food. I discovered a quaint Turkish restaurant in my neighbourhood and my education on Turkey, its food and its culture began with a platter of meze. The fact that this recipe comes in on the 568th anniversary of the conquest of Istanbul is pure coincidence.

On that Turkish platter there was what you would expect: lamb kebabs, stuffed grapevine leaves (dolma), carrot and yogurt dip, marinated roasted bell peppers, cucumbers, tomatoes and olives, feta-like cheese and eggplant salad. Out of all those things, what made me fall in love was that eggplant salad (you can find that Charred Eggplant Salad recipe here on the blog).

In fact, eggplant features in Turkish recipes very often, from salads and dips, to stews and the famous Ottoman stuffed eggplant dish called Imam Bayildi (translating roughly to The Imam fainted, presumably because it is so delicious). There is no question that in the Middle East and the Mediterranean, eggplant is a beloved vegetable (but technically a fruit, in the family of nightshades, like tomatoes).

When I was in Istanbul, during one of my cooking classes, I learned that one of the favourite dolmas (stuffed vegetables) are made with small eggplants that are cut and hollowed out, then dried in the sun and strung up into long strands that are sold in markets for the purpose of making these delicious meze. The same happens with peppers, and then you only have to stuff them and braise them. Unfortunately, outside of Turkey these are hard to come by, but it only goes to illustrate the love affair they have with eggplants.

Today, I want to show you how to make a delicious smoked eggplant dip, it is similar to Baba ghanoush, but it is made with yogurt instead of tahini. It is outrageously good and light. It will make a perfect addition to your meze spread.

I really like the smoked taste of the eggplant when it is charred over an open flame, but this recipe can also be done by roasting the eggplant in the oven (that is also a less hands-on approach to making this recipe). The second key to the success of this recipe is that once the eggplant is cooked, it has to drain completely, so your spread is not watery. Roasting and draining the eggplant can be done a day ahead. Putting it together once this is done is super fast.

Serve your smoked eggplant dip with some veggies like cucumbers, mini bell peppers and tomatoes, along with some good pita bread or naan, and olives and some feta cheese. You will have a delicious and healthy platter to enjoy with your family.

Smoked Eggplant Dip

2 medium eggplants
3/4 cup pressed yogurt, or Greek yogurt
1 clove garlic, minced
Juice of 1 lemon
3-4 Tbsp extra virgin olive oil
Salt and pepper to taste
Pomegranate arils for garnish
Pita bread or veggies for dipping

Pierce eggplants with a knife a few times, then place directly over an open flame, either on the stovetop over a rack, or on the barbecue, turning every few minutes so they roast and char evenly, about 35-40 minutes. Alternatively, you can place eggplants on a baking tray and roast at 450°F for about 40-45 minutes, until completely tender and charred.

When they are done, let them cool enough to handle, and then cut them in half and scrape the flesh off the skin. Place flesh in colander set over a plate and let them drain completely, 1-2 hours. This can be done a day ahead.

When eggplant has drained completely, chop it very fine. Place in a medium bowl and add yogurt, garlic, lemon juice, olive oil and salt and pepper to taste. Mix until combined and serve in a small bowl, garnished with pomegranate arils and a drizzle of olive oil. Serve with pita bread and veggies.

Makes about 3 cups.

Comment

As the weather warms, it is time for Aguas Frescas!

May 23, 2021 Maria Garza
IMG_3209.jpeg

As soon as the weather starts to get nice and warm, I start craving Aguas Frescas. I have written about them before, but there is infinite variety in what you can make, and making aguas frescas is a great way to a) use up fruit (or vegetables) that may be getting a bit old in the fridge, b) getting more servings of said fruits and vegetables into your daily meal plan, and c) having a healthy, delicious and refreshing drink on hand! Spiking these drinks is optional, if you’re feeling like a party too!

I think for me, I associate these drinks with hot weather, not that you have to - you can make these year round, of course. An Agua Fresca can be as simple as a cool Limonada- no blender required, you can add chia seeds and limit the sweetener to make it super healthy and very traditional. But for a bit more pizzazz, make an agua fresca in the blender and let your imagination fly! I love making mango strawberry lime, papaya lime, guava chia, raspberry pineapple basil, blackberry mint, and so on… you get the picture, just put a few fruits together and throw them in the blender, add water, sweetener to taste (sugar, honey or agave syrup) and usually a bit of lime or lemon for more punch. Some of these require the mixture to be strained, like the berries, but otherwise, I leave the mix as is and you get the added benefit of the fruit’s fibre.

Next time you find yourself with an abundance of fruit or veggies and herbs, try making an agua fresca!
You will feel like summer is a party!

Agua Fresca de Piña, Pepino y Menta
Pineapple, Cucumber and Mint Cooler

1 cup pineapple chunks
1 Lebanese cucumber, chopped
1/4 cup fresh mint leaves
3 cups water
Sweetener of your choice to taste, optional
Ice cubes for serving

Place pineapple, cucumber, mint and water in blender container. Process until completely smooth.
If desired, you can pass the mixture through a strainer, but if your blender is powerful, you won’t need to do this.
Transfer the mixture to a pitcher and add sweetener to taste.
Serve over ice cubes.

Makes 1 litre.

Comment

The perfect Sunday brunch dish is a plate of Chilaquiles.

May 16, 2021 Maria Garza
IMG_2958.jpeg

Looking back through my blog posts, I am shocked that I have never shared the recipe for chilaquiles! This most delicious dish is nothing but a clever way to use up stale tortillas. Much like there are thousands of recipes to make use of stale bread, in Mexico there are recipes to make use of old tortillas, and many of them make their way to the breakfast table.

Migas con huevo and Chilaquiles are but two of the easiest and most delicious ways to use those corn tortillas that may have been living in your fridge for two or 7 days!

What I love about making migas (migas are softly fried pieces of corn tortillas that then get an egg and you make a scramble — and Boom! a five minute meal!) and chilaquiles is that they come together so quick with items I usually have in my fridge.

As they say, breakfast is the most important meal of the day, and with these chilaquiles, you will start your day right! You can dress up chilaquiles by adding shredded cooked chicken (leftover rotisserie chicken, anyone?) and a delicious crispy-edged sunny side up egg. The toppings are as they say, icing on the cake. A side of beans would make this meal very well rounded indeed!

Next time you find yourself with old tortillas, some salsa and perhaps some leftover chicken, why don’t you make chilaquiles? You can use red or green salsa - whatever you have in the fridge; the chicken and the egg are optional, but once you try them like this you won’t go back!

For a step by step, check out my stories on Instagram. Buen Provecho!

CHILAQUILES VERDES PARA DOS        
Fried tortilla wedges with green salsa for two

3 corn tortillas, each cut into 8 wedges 
2-3 Tbsp vegetable oil for frying the tortillas
2 eggs
2/3 cup warm Salsa Verde or Salsa Roja
1/2 cup warm shredded cooked chicken
2 Tbsp crumbled cheese (cotija or feta work well here)
1 radish, thinly sliced
Handrul cilantro leaves
2-3 Tbsp crema, crème fraîche or sour cream diluted with a bit of milk

In large frying pan, heat vegetable oil. When it’s hot, add the tortillas and fry until crisp. Remove and drain on paper towels. Reserve. 

Meanwhile, fry the eggs the way you like them, I like them sunny side up.

Transfer the fried tortilla wedges to two serving plates and pour the warm salsa over them. 

Top with the chicken, then the egg. Garnish with radish, cilantro and then drizzle with crema. Serve immediately, with more salsa on top.

Serves 2.

Comment

Huaraches are the biggest Antojitos, and really delicious!

May 9, 2021 Maria Garza
IMG_3037.jpeg

A while back, I posted a photo of the huaraches I learned to make from my Nana, in Monterrey, and at that time, a well known Mexican chef gave me grief telling me what I made was not a huarache as it was not a filled masa cake. 

You see, the huaraches in Mexico City (and other parts of Mexico) have a filling of beans, whereas in other parts of Mexico, the masa is cooked like a thick oblong tortilla and then topped with beans, salsa and the rest of the toppings. Same ingredients, different method, but all delicious.

It is very obvious that as Mexico is a huge country, there will be variations of methods from region to region, and this is a perfect example of that fact. 

Having said that, there is no question that these bean filled Huaraches are delicious, and when you visit a market in Mexico City, you will invariably see the ladies making the biggest antojitos you have ever seen.

The word huarache is derived from the Purépecha word kwarachi,  which means sandal, and it perfectly describes the shape and size of these treats! In the markets you will find the same bean fillings, made with different coloured masas, the toppings could be chorizo, shredded chicken, or thinly sliced steak, but always garnished with lettuce, salsa, cheese, crema and radishes.

This huarache in the photo is made with blue bolita Belatove maize I nixtamalized and ground into masa, but at home you can use the commonly found Maseca to make yours.

Whether you make the recipe with the beans inside the masa or on top like my Nana’s, you can be assured these will fly and will transport you to the markets of Mexico.

Huaraches de Frijoles con Chorizo
Bean Filled Masa Cakes with Chorizo

2 cups Maseca
1/2 tsp salt (optional)
1 Tbsp manteca (rendered lard) or shortening
2 - 2 1/2 cups warm water as needed for masa
200g Mexican chorizo
1 cup seasoned cooked pinto or black beans, drained
1/2 Tbsp chipotle chiles in adobo
1/4 cup manteca or vegetable oil
1 cup of your favourite salsa
3 cups shredded iceberg lettuce
1/2 cup grated cotija or feta cheese
2-3 radishes, thinly sliced
1/2 cup crema, or sour cream thinnned with a bit of milk
Cilantro leaves for garnish

In medium bowl, combine maseca, salt and lard. Slowly start adding warm water and knead until you have a smooth pliable dough. You may not need the full amount of water so start adding it slowly and only add what you need. Cover and reserve while you prepare the chorizo and beans.

In medium skillet, cook chorizo - you may not need any oil, depending on the chorizo you have. If you find it’s dry, add a tiny bit of vegetable oil to cook it, crumbling as you stir. It should be completely crumbled, and won’t take too long to cook, about 5 minutes. Reserve.

In blender or food processor, blend beans and chipotle chile. Mixture should be fairly dense, as they will be the filling for the huaraches. If they are too thick, add a bit of water, but make sure they are not runny.

Preheat comal, cast iron griddle or pan over medium heat. Divide masa into 8 portions. Line your board with a piece of plastic (a cut out resealable bag works great). Make an elongated shape with your masa and hold it in your hand. Make a dent in the centre and fill with about 2 tsp bean paste. Enclose the filling with the edges of the dough and gently roll into the cigar shape again. 

Place dough on plastic and gently start pressing it as you stretch it with the palm of your hand. Continue to pat it down and stretching until your huarache is about 1/4” thick. It should have an oval shape and it will be about 12cm long.

Gently flip huarache with the plastic onto your hand. Peel off the plastic and transfer to the hot comal, gently laying it down onto hot surface.

Cook for 2 minutes and using a spatula, flip to cook the other side, another two minutes or until lightly browned. Continue with the rest of your huaraches. Place them on a rack as they come off the griddle. This can be made in advance.

To finish your huaraches, heat lard or oil in skillet and pan fry for 2-3 minutes per side, making sure they are crisped and warmed through.

Remove to a plate lined with paper towels to absorb some of that oil, then transfer to plates and spread with salsa and garnish with lettuce, chorizo, cheese, radishes, crema and cilantro.

Makes 8.


Comment

Just like eating in a Mexican market.

April 17, 2021 Maria Garza
IMG_2810.jpeg

I don’t know anyone who says: I want enmoladas, so I have to make mole. Mole is an occasion in and of itself and when one makes it, it is for enjoying it the way it was meant to be enjoyed - as a celebration (find my recipe and  blog post about mole a couple of posts back). Invariably and fortuitously, though, when you take the time to make mole, there are leftovers and that is when this dish comes in. 

Enmoladas de Pollo are a type of enchilada and these are some of the most luxurious of all.  Of course, it all starts with the mole, but most moles work well in this recipe, all except perhaps the slightly sweeter Manchamanteles. So please, next time you find yourself with leftover mole, allow me to show you what you must make with it.

The makings of this dish are only a handful of ingredients: mole (if you don’t have time to make it, you can use commercial mole for these), corn tortillas, shredded chicken (leftover rotisserie chicken works great here), some cotija or feta cheese, crema, radishes and onions. Make it pretty with a garnish of cilantro and that’s that. 

Looking at the recipe, what you may think is an obscene amount of mole on your plate turns out to be just the right amount to complement the tortillas and filling. An artful drizzle of crema, grated cheese and some crunchy toppings and you have a dish that will transport you to the markets of Mexico in one second flat.

Really, it’s that good! Sophisticated and humble all at once, but so satisfying and delicious you will always make sure you have extra mole just so you can make them again and again.

Enmoladas de Pollo
Chicken Mole Enchiladas

2 1/2-3 cups mole sauce
2-3 Tbsp vegetable oil
6 corn tortillas
1 1/2 cups shredded cooked chicken
1/4 cup crema, crème fraîche or sour cream thinned with a bit of milk
2-3 Tbsp grated cotija or feta cheese
1 radish, very thinly sliced
2 Tbsp very thinly sliced white onion
A few cilantro leaves

In small saucepan, warm up mole sauce. If it’s too thick, add a bit of chicken stock or water to thin it out - it should be just thick enough to coat the back of a spoon. Keep it warm while you fill tortillas.

Heat oil in small frying pan. Soft fry tortillas one at a time, about 20 seconds per side. They should remain soft and pliable, so make sure you don’t fry them too long. Transfer to paper towels to drain. While still hot, place 1/4 cup chicken in each tortilla and roll up tightly. Place on tray seam side down and continue until all tortillas are fried and filled.

When you’re ready to serve, ladle some mole on the bottom of two plates. Place three filled tortillas (seam side down) over sauce and then cover with more mole. Garnish with cheese, radishes and cilantro leaves. Drizzle with crema and enjoy immediately!

Serves 2.


Comment

Aguachiles are perfect for sunny weather.

March 21, 2021 Maria Garza
IMG_2482.jpeg

The weather is starting to get nicer up here in Ottawa, and as the sun starts to stick around more, all I want to eat is fresh, tangy, spicy seafood. It must be the promise of summer and warmer weather that gives me the yearning for this kind of food.

Enter this light and flavourful aguachile. I have posted another recipe for a black aguachile made with steak (check it out, it’s delicious!), but I love this one because of the seafood. The literal translation for aguachile is chile water, and a runny spicy liquid it is. This one relies on the citrus and chiles, but adds the umami of soy sauce, Worcestershire and Maggi seasoning.

If I lived on the coast and I had fresh-out-of-the-water seafood, I would not marinate this aguachile for more than 5 minutes, but since all I have available is frozen/thawed shrimp and scallops, it is best to let them chill in the sauce for about 30 minutes before assembling the finished dish. Regardless, you will have a stunning and delicious plate of goodness that needs to be consumed posthaste.

Try it out for yourself and let me know what you think. It may become one of your go-to seafood appetizers. Serve with corn tostadas and a beer. Perfectly perfect.

Aguachile Negro de Camarón y Callo de Hacha
Black Shrimp and Scallop Aguachile

1 1/3 cups freshly squeezed lime juice
3 Tbsp low sodium soy sauce
3 Tbsp liquid Maggi seasoning
1 Tbsp Worcestershire sauce
1-2 Serrano or Jalapeño chiles, chopped 
1-2 arbol chiles, crumbled
A few piquín chiles 
A bit of water to tone down the acidity of the sauce, if needed
250g 31-40 shrimp, thawed, peeled, deveined and butterflied
250g sea scallops, thawed, muscle removed and sliced in thirds horizontally
1 large avocado, peeled and sliced thin
1/2 English cucumber, sliced thin
1/4 red onion, sliced very thin
2-3 radishes, sliced very thin
Cilantro leaves for garnish
Salsa macha for garnish (optional)
Corn tostadas for serving

Place lime juice, soy sauce, Maggi seasoning, Worcestershire sauce, Serrano, árbol and piquín chiles in blender container. Process until completely smooth, and season with salt to taste. It should taste good on its own. If it’s too tangy, add a bit of water to tone the citrus down.

Place butterflied shrimp and sliced scallops in glass or non-reactive dish. Pour black sauce over seafood, stir, cover and refrigerate for 30 minutes.

While seafood is marinating, slice cucumber, red onion, radishes and avocado.
When the half hour has passed, grab a pretty platter and arrange cucumbers and avocados overlapping around edges. Place seafood and juice in the centre and garnish with red onion, radishes and cilantro leaves. Drizzle with salsa macha, if using.

Serve with corn tostadas.

Serves 2-4.

Comment

Mexico's iconic and most famous sauce.

February 28, 2021 Maria Garza
Coloradito.jpeg

Mole is the crown jewel of Mexican sauces. It is refined, delicious and has a complexity of flavour that demonstrates the real fusion of two cultures in one dish. Mole was created by our prehispanic ancestors, they would mix pumpkin seeds, tomatoes and herbs to make a sauce simply called Molli. This sauce was served with “guajolote” - wild turkey. It was used as a ceremonial dish and was often offered to the Gods.

When the Spanish arrived, they brought all manner of new spices and ingredients, and the molli that existed was then re-created to include these new ingredients and it became the Mole as we know it today. The most famous recipe is attributed to Sor Andrea de la Asunción, a nun in the convent of Santa Rosa in the city of Puebla, circa 1681. As the story goes, she is the one that created this “new” recipe, including the original dried chiles, pumpkin seeds, tomatoes and herbs, but adding onions, garlic, sesame seeds, black pepper, cinnamon, nutmeg, cumin, peanuts, pecans, etc.

Mole recipes vary, as with everything, from household to household. In Mexico, there is great debate as well between States, as Oaxaca is called the Land of the 7 Moles. So which one is the best and most delicious Mole? I think they are all delicious, all of them are slightly different, but they all carry a long history with them.

When I say the word Mole, most people think of “that chocolate sauce”. Nothing could be further from the truth! Some of the moles do indeed have chocolate as an ingredient, as with Mole Poblano or this Mole Colorado, but the chocolate is only added at the end and is not meant to be noticeable, it is meant to be a finishing touch.

As with many Mexican dishes, when we are making a mole, we do not want to be able to pick out any one single ingredient or flavour - the sauce has to be a true blend that tastes heavenly, without giving out hints of specific ingredients. And the chocolate? Well, the chocolate adds a subtle sweetness that works wonderfully well with the heat or smoke of the chiles.

Mole is a work of art, and the longer it cooks, the better it gets. Making mole is a long process, but by no means difficult. If you feel like tackling this recipe, you will be rewarded with the most velvety, flavourful, complex sauce that can be used in many ways. The most typical, of course, is served with roast chicken or turkey, but it makes delicious Enmoladas or tamales.

This recipe is my version of Mole Colorado. Thanks to modern appliances, it can be made in less than two hours, so gather your ingredients, put some music on and make a pot of Mexican historical gastronomy.

MOLE COLORADITO
Red Mole

8 ancho chiles, stemmed, seeded and de-veined
6 guajillo chiles, stemmed, seeded and de-veined
3 large plum tomatoes
1 large onion, chopped into large chunks
8 garlic cloves, unpeeled
2 ½ Tbsp rendered lard or vegetable oil
1/3 cup raw pecans
1/3 cup raw peanuts
1/4 cup raw sesame seeds 
1 Tbsp Mexican oregano
8 whole black peppercorns
1” piece canela (Mexican cinnamon) 
4 whole cloves
4-5 cups chicken or vegetable stock
Salt to taste
Sugar to taste
60g Mexican chocolate, or more to taste
Protein or vegetable of your choice, poached or roasted

Toast chiles on a dry griddle or skillet, taking care not to burn them, and then soak them in very hot water for about 30 minutes, or until they’re completely soft.

On griddle, roast the tomatoes, onion and garlic, turning often, until soft and blackened.

Meanwhile, heat 1 tsp lard on a frying pan and sauté pecans and peanuts.  When they are golden, add the sesame seeds, oregano, peppercorns, cinnamon and cloves and sauté for another minute. Remove from pan and cool.

Place soft chiles and just enough soaking chile water in a blender to process until completely smooth. Pass mixture through a sieve or food mill if needed - there should not be any skins visible. Set aside. 

Blend the tomatoes, roasted and peeled garlic, onions, pecans, peanuts, sesame seeds, oregano, peppercorns, cinnamon and cloves. Pass mixture through a sieve or food mill if needed, mixture should be completely smooth.

In Dutch oven or heavy pot, heat 2 Tbsp lard and cook chile mixture for about 10 minutes, it should be thick. Add the tomato and spice blend after that. Let mixture simmer, uncovered, until slightly reduced (a splatter screen is helpful here to save your stove from a huge mess).

Add 2 cups stock and a bit of salt and sugar - you will re-season later on, so don’t salt heavily at first. Cook 60 minutes and up to 2 hours, stirring often to make sure it doesn’t stick, adding more stock as it gets thick. This process of reducing and adding more stock can go on as long as you want. The longer it cooks, the deeper the flavours will be.

Add chocolate and stir to dissolve. Adjust salt seasoning at this point. Cook another 15 minutes, until it’s thick enough to coat the back of a spoon.  Serve with protein of your choice and roasted vegetables.

Leftover Mole can be frozen.
Serves 12.

Comment

Something Sweet for Valentine's Day

February 14, 2021 Maria Garza
IMG_2203.jpeg

Let me start by saying I am not the sappy, romantic kind. Valentine’s Day is, for me, more of a marketing scheme than anything. If we do a bit of research, the legend of St. Valentine is not too clear. Whether it originated in ancient Rome with the celebration of Lupercalia, or in the Middle Ages England and France, where St. Valentine became the patron saint of the day, in the end, it became the date associated with romance and sweethearts, the day to exchange love notes and send flowers. For me, the marketing behind it is excessive, and I shy away from any commercial kind of gimmick, preferring instead, to show my love and appreciation every day of the year.

Having said that, let me say that I love chocolate, and I have no qualms in making something sweet to share with my loved ones. This is how this recipe came about. You know I am a traditionalist at heart, I love everything Mexican and I love making food using the most Mexican of ingredients.

Cacao originated in southern Mexico (or the general area, depending on who you ask!), and so did vanilla. Tequila is our most iconic spirit, and chiles are native to Mexico as well. Why not put all these ingredients together to make something sweet, seductive and delicious?

Of course you can make truffles using only chocolate and cream, but the addition of these ingredients make a truly special treat. It helps to know the flavour profile of chiles, and the taste of pasillas (or even anchos) complements this cacao in a spectacular way. Another ingredient you could add to this truffle is Mexican canela - you could omit the tequila and add the canela instead. As with everything, you can play around with the recipe and find the flavour combination you like.

In these pandemic times, it may be a bit difficult to procure all these special ingredients, so if you only have bittersweet chocolate, plain tequila, regular vanilla or cinnamon, go ahead and use that! Make it your own and most of all, I hope you enjoy the process and the result. Happy un-Valentine’s Day!

Trufas de Chocolate Mexicano
Mexican Chocolate Truffles

225g Cacao Barry 66% Single Origin Mexico chocolate (about 1 1/2 cups)
7 Tbsp whipping cream
1 Tbsp Patrón XO Café coffee liqueur 
Seeds scraped from ½ vanilla bean
1 tsp pure ground pasilla (or ancho) chile (optional)
Pinch sea salt
2-4 Tbsp cocoa powder

Place chocolate in a medium bowl.

In small saucepan, place cream, coffee liqueur, vanilla bean seeds and ground chile. Bring to a very gentle simmer and immediately pour into the chocolate bowl. Let mixture sit for 5-8 minutes, to allow the chocolate to soften.

Add salt and whisk to combine - make sure chocolate is completely melted and smooth. If lumps remain, put bowl over a pan of gently simmering water and stir until chocolate is melted completely.

Place bowl in fridge for about 40-60 minutes, to allow mixture to harden somewhat.

Using small ice cream scoop or spoon, portion into small balls. With gloved hands, smooth out chocolate balls - it’s ok for them to have some grooves.

Place cocoa powder in small bowl and toss chocolate balls in cocoa powder.

Refrigerate truffles until completely firm.

Makes about 24 truffles.

Comment

Beating the February blues with some green food!

February 7, 2021 Maria Garza
Tostada Verde.jpeg

I don’t know about you, but where I am in Canada, by the time February comes around, I am in real need of some fresh, green food. Though this winter has been relatively mild, it has been long enough and I yearn for warmer days that mean fresher, greener food. I know, I know, I can eat these things during winter, but when it’s cold outside, the body craves hearty, rich food, and that has been the norm for a few months. By the time February rolls in, it’s time to shake things up a bit!

What can be greener and fresher than an avocado? Mexicans have a deep love affair with the green, rich, buttery gems. There is no meal in Mexico that does not include at least 1/4 of an avocado, simply sliced and placed inside a fresh corn tortilla - pure bliss. And no party is complete without a green bowl of guacamole.

There are so many ways to make guacamole… the word itself derives from the Náhuatl “ahuacamolli”, from “ahuacatl” (avocado) and “molli” (sauce), so put them together and it simply means avocado sauce (the word “molli” is also the origin of the word mole). The traditional guacamole most people know is a combination of mashed avocado and a pico de gallo and that is super delicious, but sometimes I feel like changing things up a bit.

As it happens, I had some goat cheese and whipping cream in the fridge, so I put them together to make this fresh, tangy and delicious guac. If you would like it spicy, you can definitely add a bit of Jalapeño, but today I kept things mild. This comes together super fast, and if you have a stick blender, use it for this - it makes cleanup a snap! This is a thick guacamole, so stick a blender or food processor will work better than a regular blender.

It makes a great dip for crudités, you can spread it on your favourite sourdough bread and top with a poached egg for an awesome avocado toast, or you can make a super fresh veggie tostada as I have done here. Simply spread thickly on a corn tostada and top with shredded lettuce, sliced tomatoes, radishes and cilantro. A sprinkle of sea salt and a drizzle of extra virgin olive oil and you will be in heaven. Just what I need on this snowy February Sunday.

GUACAMOLE con QUESO DE CABRA
Goat Cheese Guacamole

3 medium ripe avocados
½ cup plain goat cheese
5 Tbsp whipping cream
½ cup chopped cilantro
Juice of 1 lime
Salt to taste

Dice avocados and place in blender container. Add goat cheese, cream, lime juice and salt.
Using a stick blender or food processor, process until smooth.
Add cilantro and process again.
Adjust seasoning and serve.

Makes about 3 cups.

Comment

La Candelaria, a great reason to make Tamales!

January 31, 2021 Maria Garza
IMG_2045.jpeg

Mexico is a deeply religious country, and we honour our traditions exceptionally. Such is the case of La Candelaria (Day of the Virgin of La Candelaria, on February 2, otherwise known as Candlemas in English). This celebration comes to us via the Día de Reyes, or Epiphany on January 6. On Día de Reyes, families get together to cut the Rosca de Reyes (3 Kings Cake), which has a figurine of a baby Jesus inside. The person that cuts the piece of the bread and gets the figurine is supposed to host a party on La Candelaria and make tamales. Yes, it's a great tradition, filled with symbolism, but it's also a perfect excuse to get your family (and friends) together again and celebrate with great food, don't you think?

In reality, the person who gets the figurine is torn between excitement (if you're deeply religious, getting the figurine means that Jesus is in your heart) and dread (if you're NOT deeply religious it means you have to make hundreds of tamales for a party less than a month away!).

In my small family, my daughter Alexa seems to always get the baby figurine, except this time I was the lucky one. That means I will be the one making tamales. I don't mind at all, because we LOVE tamales, so much so that even when Alexa gets the baby I’m the one making the tamales. Here in Ottawa tamales are a rare foodstuff, since they are not readily available to purchase as in Mexico or the United States. Over here, we need to make our own. And make our own we do!

Tamales are a bit of a production, and I recommend you tackle the job in phases. One day you can make the fillings, and the next day you make the tamales. I also recommend you make a double or triple batch so you can freeze leftovers - you will be happy to have them weeks later, trust me. This is a perfect weekend project, one that you can enlist your family to participate in. It will be fun and you will spend some quality time together. Unfortunately this year with the pandemic, I will be alone making them, so I won’t be making hundreds, just enough for us to enjoy on February 2.

When you are ready to eat your tamales, serve them with a couple of spectacular salsas, some refried beans and have some crema for drizzling over the top. It is also customary to serve them with some sort of atole, and I favour the chocolate atole called Champurrado. You will be enjoying one of the best Mexican meals ever!

TAMALES De POLLO EN SALSA VERDE
Chicken in Green Salsa Tamales

For the dough:
1 kg fresh masa, or 3 ½ cups Maseca mixed with enough warm water to make a smooth dough
1 ¼ cups rendered lard, softened
1 ½ tsp baking powder
1 1/4 Tbsp Diamond Crystal Kosher salt, less if you use table salt or sea salt
1 cup chicken stock 

Filling:
Chicken in Salsa Verde (recipe below), about 4 cups, or any filling of your choice
Corn husks for wrapping

Soak corn husks in hot water for 90-120 minutes, weighed down with a plate and a couple of cans, keeping them submerged in the water, until soft and pliable. You can also soak them overnight. Drain just before filling tamales.

In mixer bowl combine lard, baking powder and salt. Set speed to medium and beat until light and fluffy. Add the masa little by little, and then reduce the speed and add the stock. Beat for about 10 minutes and spoon about 1/2 tsp dough and drop it into a glass of cold water. If it floats, the dough is ready, if not, beat a few more minutes. Taste dough for salt and add more if needed. Dough should be heavily seasoned because as the tamales steam, some of that salt will dissolve into the cooking water.

Spread some dough in the bottom half of each husk (away from the pointy end), no thicker than a generous 1/8”. Spoon 2-3 Tbsp filling in the centre of the dough and then fold both sides over the filling. To finish, fold in the pointy end. Secure tamales with string of corn husk. 

Place tamales open sides up in steamer basket lined with corn husk scraps .  Do not stack tamales.  Cover tamales with more corn husk scraps and then place the lid on the steamer.  Bring the water to a gentle boil and steam for 1 to 1 1/4 hours, or until the corn husk comes away from the dough easily and the dough is firm. To be able to check this, remove one tamal from the steamer and let it cool for 1-2 minutes before you open it to check. Start checking around the 60 minute mark, but they could need another 15 minutes, depending on the size of your tamales. When they are ready, they will release from the husk easily.

Serve with Salsa of your choice, and if you want, you can drizzle them with crema.
Tamales can be frozen and reheated by steaming or toasting on the comal.

POLLO EN SALSA VERDE
Chicken in Salsa Verde for Tamales

10-15 medium tomatillos, husked
1 small onion
1 clove garlic
1/2 bunch cilantro
1 tsp vegetable oil 
Salt to taste
3 cups cooked shredded chicken

Wash tomatillos and place in a saucepan with onion and garlic. Add enough water to cover and cook 10 minutes (if using canned tomatillos, omit this step), or until vegetables are soft.  

Place softened tomatillos, onion, garlic and cilantro in blender and process until completely smooth.  Heat oil in saucepan and add salsa and salt (if using canned tomatillos, you may not need to add salt). Cook for 10 minutes, or until seasoned well.

Mix chicken with enough salsa to moisten, but the filling should not be too moist.
Cool down filling before using it for tamales.

 Makes about 24-30 tamales, depending on how large you make them.

Comment

Pumpkin Empanadas are delicious!

January 23, 2021 Maria Garza
Empanadas de Calabaza 1 Maria Garza.jpg

As days, months and years go by with this pandemic I get more and more homesick. I dream of the day when I will be able to go back home to visit my family, but also so I can go and enjoy all those things I cannot get over here. Every time I go back to my hometown of Monterrey, I have a great time eating everything and anything my little heart desires. All this time being away has given me huge cravings, but more of a longing to enjoy all those delicious treats.

Every time I go home, I must visit my favorite panadería, where the best sweet bread and pastries are found. I have to buy a variety including conchas and orejas, but I absolutely have to have Empanadas de Calabaza.

A specialty of North-eastern Mexico, let me tell you - these little empanadas are addictive! Not too sweet and deliciously flaky, an empanada or two makes for a very enjoyable treat - morning, noon or night.

Every town has their way of making these empanadas, starting with cooking the pumpkin with piloncillo, the raw sugar that has that sweet molasses taste. Most cooks flavour their pumpkin with canela and aniseed, but some use cloves as well. There are also versions of the dough that have yeast, but the most traditional do not have it.

You can make these Empanadas with canned pumpkin, if you don't have the inclination of cooking the pumpkin first, and butternut squash puree makes a really good substitute. If you use either of these, your empanadas will still be absolutely delicious and the perfect accompaniment of an afternoon cup of coffee or tea.

Empanadas de Calabaza
Pumpkin Empanadas

Pastry:
3 1/4 cups flour

2 tsp baking powder

½ tsp salt

½  cup butter, chilled well and cut into 1/2 inch pieces

½ cup vegetable shortening

2/3 cup (or more) ice cold water

Filling:
2 ½ cup cooked pumpkin puree (canned is acceptable)
¾ - 1 cup chopped piloncillo or dark brown sugar
1 Tbsp ground Mexican canela
¼ cup ground cloves or ground aniseed

In small saucepan, mix pumpkin puree, piloncillo, canela and cloves and heat over medium heat. Cook until pumpkin is very dry, about 5 minutes. Spread out on a plate and let cool completely before filling empanadas.

For pastry, mix flour, baking powder and salt in a bowl. Cut in shortening and butter until mixture resembles coarse meal. Add just enough cold water for the dough to come together and form a ball. Knead until smooth. Let rest 10-15 minutes.

Preheat oven to 350°F. On a lightly floured board roll pastry to 1/8-inch thickness. Using a 5 to 6 inch cutter, cut out rounds. Spoon about 2 Tbsp of the filling in centre of each round. Fold pastry in half and seal edges, crimping with a fork. Bake on ungreased baking sheet for 18-25 minutes, or until golden brown on the bottom. Let cool on rack.

 Makes about 36 empanadas.

Comment

Snacking Salsa..... what is that?

January 17, 2021 Maria Garza
Botanera.jpeg

As many of you know, I live in Canada. In normal times, I would travel back home at least once a year, and if I was lucky, twice a year. With this pandemic, travel has unfortunately come to a grinding halt, and I have not been back home for almost two years now! Obviously, I am extremely homesick and miss my family terribly, but almost on par with that, I miss the food supplies I bring back with me every time I go back home.

Amongst those supplies, is a brand of salsa called Botanera. Salsa Botanera is made right in Monterrey, and it is by far my most favourite brand of bottled salsa in the whole wide world. That is not a statement I make lightly! Everyone that knows me will tell you I am “exigente”, or what you would know as demanding, picky or exacting. Now, that does not mean that I don’t like all kinds of stuff, and if you put food in front of me I will gladly eat it, but in terms of what I REALLY like, I admit I am a bit particular. This salsa is one of those things. No other bottled salsa is like Botanera for me. The taste is spicy, sour, salty… all those things I love. I can say the Mexican palate craves that - hot, sour and salty. And when it comes to snacking, those are the flavours we want.

To understand this concept, you have to know that Mexicans as a culture love snacking. Anything that will tide you over until the big meal is a welcome thing. These afternoon snacks are for the most part healthy, like munching on mango, carrot and jícama sprinkled with powdered chile and lime juice, or sliced oranges with the same topping. But… there is another kind of snacking that we absolutely love, that is more on the less healthy side - tostadas, chips or peanuts doused in salsa, lime juice and salt. You cannot possibly understand this, but the thought of those ingredients make our mouths water. There is nothing like it! We grow up with these flavours and they are imbedded in our DNA, I swear!

So….  all this to say that since I have not been able to go home in so long, my supply of Salsa Botanera is almost gone, so in an act of utter desperation, I have created this recipe. I made it a few times to get it to where I want it to be and it is pretty darn close to the commercial kind. I am very pleased with the results and the best thing is I know exactly what’s in it.

I have added a couple of notes after the recipe if you wish to make this less spicy or to allow for substitutions. In any case, this salsa is not for the faint hearted, as it is spicy, but give it a try and I hope you enjoy it. Then grab some tostadas, rub with lime juice and top with some salsa and a sprinkle of salt. You will feel like a Mexican after one bite!

Salsa Botanera

30g chile de árbol - approx. 50 chiles
1 chile guajillo
2 Tbsp whole chile piquín 
1 1/2 Tbsp kosher salt, or more to taste
3 cups water, divided
3/4 cup white vinegar
1/4 cup freshly squeezed lime juice
1 tsp onion powder
1 tsp garlic powder
4 tsp cornstarch 

Remove stems and seeds from half the arbol chiles (unless you want a very spicy salsa). Remove the stem and seeds from the guajillo chile. Place chiles de arbol, guajillo and piquín in medium saucepan with 2 cups of water and bring to a boil. Once it boils, turn the heat down to simmer and cook, covered, for 10 minutes. Allow to cool to lukewarm.

Remove chiles from water and place in blender jar. Measure your soaking liquid and add some more water to make 3 cups. Place in blender with rehydrated chiles. Add vinegar, lime juice, garlic powder and onion powder along with salt to the mixture. Blend until completely smooth.

Wash out the saucepan and place a sieve over it. Pour salsa through sieve and press on solids to strain salsa. Turn on the heat and bring the mixture to a boil. Make a slurry with ¼ cup water and the cornstarch and add to the boiling salsa. Whisk briskly and cook until salsa thickens somewhat. It will not be too thick, it will just not be runny. Taste for salt and adjust if necessary. Let cool completely and then pour into bottles.
Keep refrigerated.

* If you only have powdered piquín chile, then just add it to the mixture in the blender, do not cook it in the water.
* If you want to tame the spice even more, discard soaking liquid and add 3 cups fresh water to the blend, instead of using the chile soaking liquid.

Makes 1 litre.

Comment

Rosca de Reyes is a very special bread.

January 10, 2021 Maria Garza
IMG_1783.jpeg

I am sharing with you today one of my favourite breads that is an essential part of one of my favourite traditions. The Epiphany is celebrated on January 6th, and with it comes this bread. There is a lot of symbolism associated with it, but without making this too long, I will abbreviate its meaning.

As the story goes, the Wise Men met baby Jesus on January 6th, so we celebrate the fact by sharing this bread. The round shape symbolizes God’s infinite love - with no beginning and no end. The dried fruit decorating the bread, symbolizes the jewels on the crowns of the Wise men (we call them the three kings), and the little doll hidden inside it, symbolizes the baby Jesus hiding from King Herod.

In Mexico, the tradition is that each guest chooses their piece of the bread and whomever gets the figurine, must host a tamal party for the Day of the Virgin of La Candelaria, on February 2nd. All around, it is a great food event!!

This recipe is not mine. It is Maestro Yuri de Gortari’s recipe and I share it with a lot of respect. Maestro Yuri passed away recently, and it is a great loss for us Mexicans. He was a great advocate for respecting our traditions and he was a generous teacher that loved sharing his knowledge with everyone. I always meant to go to Mexico City to take one of his courses, but I never got around to it. Though I know his school is still going, for me it would not be the same without him. Still, every time I make this recipe I think of him.

I have not altered the recipe at all, except for adapting it to making the bread in a mixer, not completely by hand as the Maestro liked to make it. I have also increased the amount of orange blossom water, because I really like it. The recipe makes one huge rosca, but I like to make 3 or 4 smaller ones instead, and share them with friends. It is a lot of fun to make, and if you want to see a step by step, you can find the process in my Instagram highlights.

Even though this recipe comes to you after January 6, you can be ready for next year! Traditionally we dunk the slices in a steaming mug of Mexican hot chocolate. Enjoy!

Rosca de Reyes
Three Kings Bread

Sponge:
15g dry yeast
½ tsp sugar
2 Tbsp flour (24g)
½ cup warm milk (75g)

Dough:
500g all purpose flour
125g granulated sugar
Pinch of salt
200g unsalted butter, at room temperature
3 large eggs (160g)
Zest of one large navel orange (6g)
1 tsp orange blossom water (5g)
7 egg yolks (120g)
Plastic dolls

Icing:
100g unsalted butter, softened
100g icing sugar
100g all purpose flour

Decoration: your choice of:
Quince paste strips
Candied red and green cherries
Crystalized figs
Chopped nuts
Granulated sugar
Nutella

1 egg, for egg wash 

For the Sponge: In small bowl, whisk yeast, sugar and flour. Add warm milk and mix until completely smooth. Set aside to proof, 10-15 minutes.

Start the Dough while sponge proofs: In the bowl of a stand mixer, combine flour, sugar, salt, butter, 3 eggs, orange zest, and orange blossom water. Using the dough hook, start mixing until the mixture comes together.

Add egg yolks and sponge and continue to mix until the dough no longer sticks to the sides of the bowl, 10-15 minutes.

Grease a large bowl and place dough in bowl, turning to grease all over. Cover with plastic wrap and let proof until triple in size - depending on the temperature of your kitchen it may take over 2 hours.

Make the icing while dough rests: In medium bowl, combine butter, icing sugar and flour. Work with your hands until the mixture comes together. Leave in a cool place until you need it (does not need to be refrigerated).

When dough is ready, punch it down and portion it into one, two, three or 4 pieces, as you wish. If you use the whole dough for one rosca, it will be very large. I like to make 4 smaller ones, they turn out as you see in the photo - enough for 4-6 people.

Using your hands, shape the dough into a large rope, then join ends by pinching dough together. Make a small incision underneath to insert the doll, pinching dough closed under doll. If you make one large rosca, insert two dolls. Place dough on parchment-covered sheet pans, if making 4 roscas, two will fit in a half sheet pan. I like to place something in the middle so the centres don’t close as they bake, you can use a small bowl or ramekin for this purpose. Let dough rise for 30 minutes.

When dough is ready, start decorating. Roll out icing into 1/8” thickness, cut into strips and place over roscas. Whatever space is left exposed without icing, brush with egg wash and sprinkle nuts or place strips of quince paste or dried fruits to decorate.

Bake at 345°F for 27-29 minutes, until golden brown and the bottoms sound hollow when tapped. If you have a thermometer, internal temperature should be around 210°F.

Remove roscas from oven and cool completely on racks before slicing. If you want, you can drizzle with Nutella before serving.

Serve with hot chocolate and enjoy!!


Comment

Champurrado is the coziest post-Christmas drink!

December 26, 2020 Maria Garza
Champurrado.jpg

Mexicans have been drinking “atoles” for centuries. As you’ve heard me say many times, Corn is King, and atoles are yet another way to enjoy our most venerated food item.

Atoles are always warm drinks that are enriched (and by that I mean thickened) with corn masa. There are myriad flavours for atoles, from strawberry and vanilla to the chocolate version that becomes a Champurrado. Since atoles are warm drinks, they are more often prepared in the winter months, starting with the huge celebration of the Day of the Dead, leading up to Christmas and the coldest months of the year.

Regardless of the time of the year, atoles are nutritious, filling and comforting drinks, and when you add chocolate, well, it just goes to the next level of goodness. Very easy to make, you can make a large batch and keep it in the fridge for a few days and warm up a mug as you please.

Since it’s Christmas time, the most perfect accompaniment for a mug of Champurrado is a perfectly sweet and crispy buñuelo (recipe here in the blog as well).

The next time you have a craving for hot chocolate, why don’t you make some Champurrado? You will love it!
Happy Post-Holiday time!

CHAMPURRADO
Warm Corn Chocolate Atole

1/3 cup Maseca mixed in with enough warm water to make a soft dough (or 1/2 cup fresh masa)
90g Mexican chocolate, chopped or grated into small bits
1 3/4 cups milk
1-2 Tbsp sugar, or more to taste

In blender jar, combine masa with the chocolate and 3 cups water. Blend until smooth.

Strain into a medium saucepan, add the milk and sugar and set over medium heat. Stir or whisk constantly as the mixture thickens and comes to a slow simmer. Cook until it comes to the right consistency.
Atole should be the consistency of heavy cream. If it gets too thick, thin it with a bit more milk or water.
Enjoy with some Buñuelos!

Serves 4-6.

Comment

A comforting dish for a cold December day.

December 19, 2020 Maria Garza
Pasta Poblana 3.jpg

I have to say, one of my favorite foods in the world is corn. In my mind, Corn is King. When I travel in Mexico, corn is present in so many dishes that I feel comfort and satisfaction after every meal. My brain is always working, thinking of new ways to use the same ingredients that are part of our everyday foods, and that’s how this recipe came about. 

One of the commonly used sauces in Mexico is made with one of our most beloved chiles - poblanos are often paired with crema to make a very delicious and versatile sauce that can be served with pasta or chicken. In this recipe, we make linguine with an unusual topping of caramelized onions and fresh corn kernels, called esquites in Mexico.

This recipe can be made in steps, if you so wish. You can make the caramelized onions and esquites ahead of time, and then this dish can come together very fast on a busy weeknight. 

When we talk about “caramelizing” onions, we really have to take the time to do it properly, and it can take at the very least 30 minutes, but often closer to one hour or more, depending on the amount of onions you are cooking, and also how much attention you are putting on them. If you are constantly stirring and watching they don’t burn, you can do this a bit faster and on a higher flame, but if you leave them alone, you must cook them at a very low heat, and stir every few minutes to make sure they cook evenly and don’t burn. I like to add a pinch of sugar to help move the process along and help with browning, which is very desirable in this preparation. When the onions are starting to brown, remove some for the sauce and set aside. Add the corn kernels to the frying pan and cook together with the onions. This gives them a delicious flavor. When this mixture is done, it can be set aside until you are ready to make your sauce and finish your pasta.

The pasta sauce is very easy - blend roasted poblanos, the reserved caramelized onions, crema, jalapeños and cilantro. Heat this sauce in a saucepan and season to taste. When pasta is cooked to al dente, toss everything together. To serve, place a mound of pasta on your plate, and top with some of those delicious caramelized onions and esquites. Garnish with cotija cheese and cilantro and enjoy!

Pasta Poblana con Esquites
Poblano Pasta with Corn and Caramelized Onions

2 large white onions, thinly sliced
2 Tbsp vegetable oil or butter
½ tsp kosher salt
Pinch sugar

2 ears of corn, kernels shaved off
1 Tbsp vegetable oil
 
3 poblano chiles
½ cup caramelized onion
1 cup crema or crème fraîche
2 jalapeño or Serrano chiles, stemmed and roughly chopped
½ cup chopped cilantro
½ tsp kosher salt, or to taste
1 tsp canola or vegetable oil
400g linguine or linguini fini pasta 

Garnish:
½ cup cotija cheese (or mild feta)
Handful cilantro leaves

In large frying pan, heat 2 Tbsp oil. Add sliced onions and ½ tsp kosher salt and a pinch of sugar. Cook, over medium low heat, stirring often, until onions start to brown and are very soft, about 45 minutes. Remove ½ cup onions and reserve.

Add corn kernels to frying pan with onions and continue to cook until corn is starting to brown, about 10 minutes. Season with more salt if needed and reserve.

While onions are caramelizing, place whole poblano chiles on a tray under the broiler and cook, turning often, until well charred. Remove from oven and place in a bowl. Cover with a plate and steam for 8 minutes. When they are cool enough to handle, peel charred skin off, stem, seed and chop roughly.

In blender container place roasted poblano chunks, the reserved ½ cup caramelized onions, 1 cup crema, jalapeño or Serrano chiles and cilantro. If you have trouble blending, you may add 2-3 Tbsp milk. Blend until very smooth. 

In large frying pan (where you cooked the onions), heat 1 Tbsp oil. Pour poblano cream sauce and cook just until heated through. Season with salt if needed. Keep warm.

Meanwhile, bring 3 litres of water to a boil. Add a tsp of salt and cook pasta until al dente, following manufacturer’s instructions. Drain pasta and pour into the pan with the sauce. Toss until well coated and taste for a final seasoning.

Serve right away in bowls topped with some of the corn and onion mixture. Garnish with cotija cheese and cilantro. 

Serves 4.

Comment

The perfect dish for a mild winter day.

December 5, 2020 Maria Garza
Cortadillo Res con Repollo 2 Maria Garza.jpg

One of my favourite activities is to chat about food because I always learn something new. During one of my visits back home, I was talking with a friend who grew up in a small town just outside Monterrey. His family has lived there for generations.

As he reminisced about meals his Grandmother made at home, he told me about his favorite food and said he still makes some of those recipes today. One of them was this unusual beef and cabbage dish that he shared with me. It was so delicious that when I came back home I wanted to make it right away. I tried to follow his instructions and I have to say it turned out very, very good!

In the oral tradition of sharing recipes in Mexico, many times only ingredients and techniques are discussed, so it’s up to the listener to figure any given recipe out. After playing with this recipe a little bit, I came up with this version, and I love it because it is not only delicious and very easy to make, but most importantly, it is pretty darn close to my friend’s dish. The fact that this is an old recipe is also very appealing to me, as I like to think I’m helping preserve something precious. 

This recipe represents a common technique in Mexican cooking, where braising in salsa achieves a spectacular result. First we sauté the salsa ingredients, then we blend them to make a sauce. That sauce is then added to the browned meat and then everything cooks gently together. The end result is worthy of a weekend meal, but easy enough to make on a weeknight. You can serve this on crispy tostadas, or make a more substantial meal by adding rice and beans to the plate. Either way, your family will approve!

Cortadillo de Res con Repollo
Beef Stew with cabbage braised in tomato sauce

450g top sirloin, cut to ½” pieces
1 small onion, roughly chopped
3 Jalapeño chiles, stemmed and roughly chopped
3 roma tomatoes, roughly chopped
2/3 cup beef broth
4 cups very thinly sliced green cabbage
3 Tbsp vegetable oil, divided
1 tsp kosher salt, or to taste
¼ tsp freshly ground black pepper
¼ cup cilantro leaves, for garnish
Tostadas for serving

In large sauté pan heat 1 Tbsp oil over medium high heat. Cook onions and jalapeños for 2 minutes, or until softened. Add tomatoes and 1/2 tsp kosher salt and cook for 5 minutes, stirring every so often. Remove mixture to blender container and process until smooth. Reserve.

In same sauté pan, heat the other 2 Tbsp oil. Brown meat over medium high heat. Make sure it has a nice golden brown colour, it may take 5-10 minutes. Pour sauce over beef and turn heat down to simmer. Add chopped cabbage and bring to a boil. Cover pan and simmer for 25-30 minutes, or until meat and cabbage are tender, adding a bit of water if mixture becomes dry.

Correct seasoning and serve hot with corn tostadas. Garnish with fresh cilantro leaves.

Serves 4.

Comment
← Newer Posts Older Posts →

Copyright © 2025 The Cultural Kitchen
All Rights Reserved

1936 Ranchwood Way Orleans, Ontario K1C 7K7
613.762.0940