• Welcome
  • About
  • Workshops
  • FOOD FOR BLOG
  • Contact
Menu

The Cultural Kitchen

Street Address
City, State, Zip
Phone Number
COOKING CLASSES ON DEMAND

Your Custom Text Here

The Cultural Kitchen

  • Welcome
  • About
  • Workshops
  • FOOD FOR BLOG
  • Contact
Brushes Mercado-1.jpg

FOOD FOR BLOG

Molletes are a favourite meal, any time of day.

February 13, 2022 Maria Garza

Molletes, the Mexican kind, are one of the simplest things you can make, but they are absolutely delicious. Growing up, we had them pretty regularly, the same way as many of you probably had grilled cheese sandwiches as part of your weekly quick meals. We come back to the fact that we use our most common ingredients - in this case beans - in every way possible, whether in a tortilla or bread, as in the case of Molletes.

In one of my trips back home to Monterrey, my sister took me to a really great place, located across from one of the city’s most famous but now defunct factories - Fundidora de Fierro y Acero de Monterrey. This was a foundry that started operations in 1900 and employed hundreds of workers. This factory had the very first blast furnace in Latin America and for years produced hundreds of tons of steel, railway parts and steel columns among other things. Since this factory had hundreds of workers, restaurants popped up around it and one of those was Restaurant Rubio, fondly called “El Rubio”.

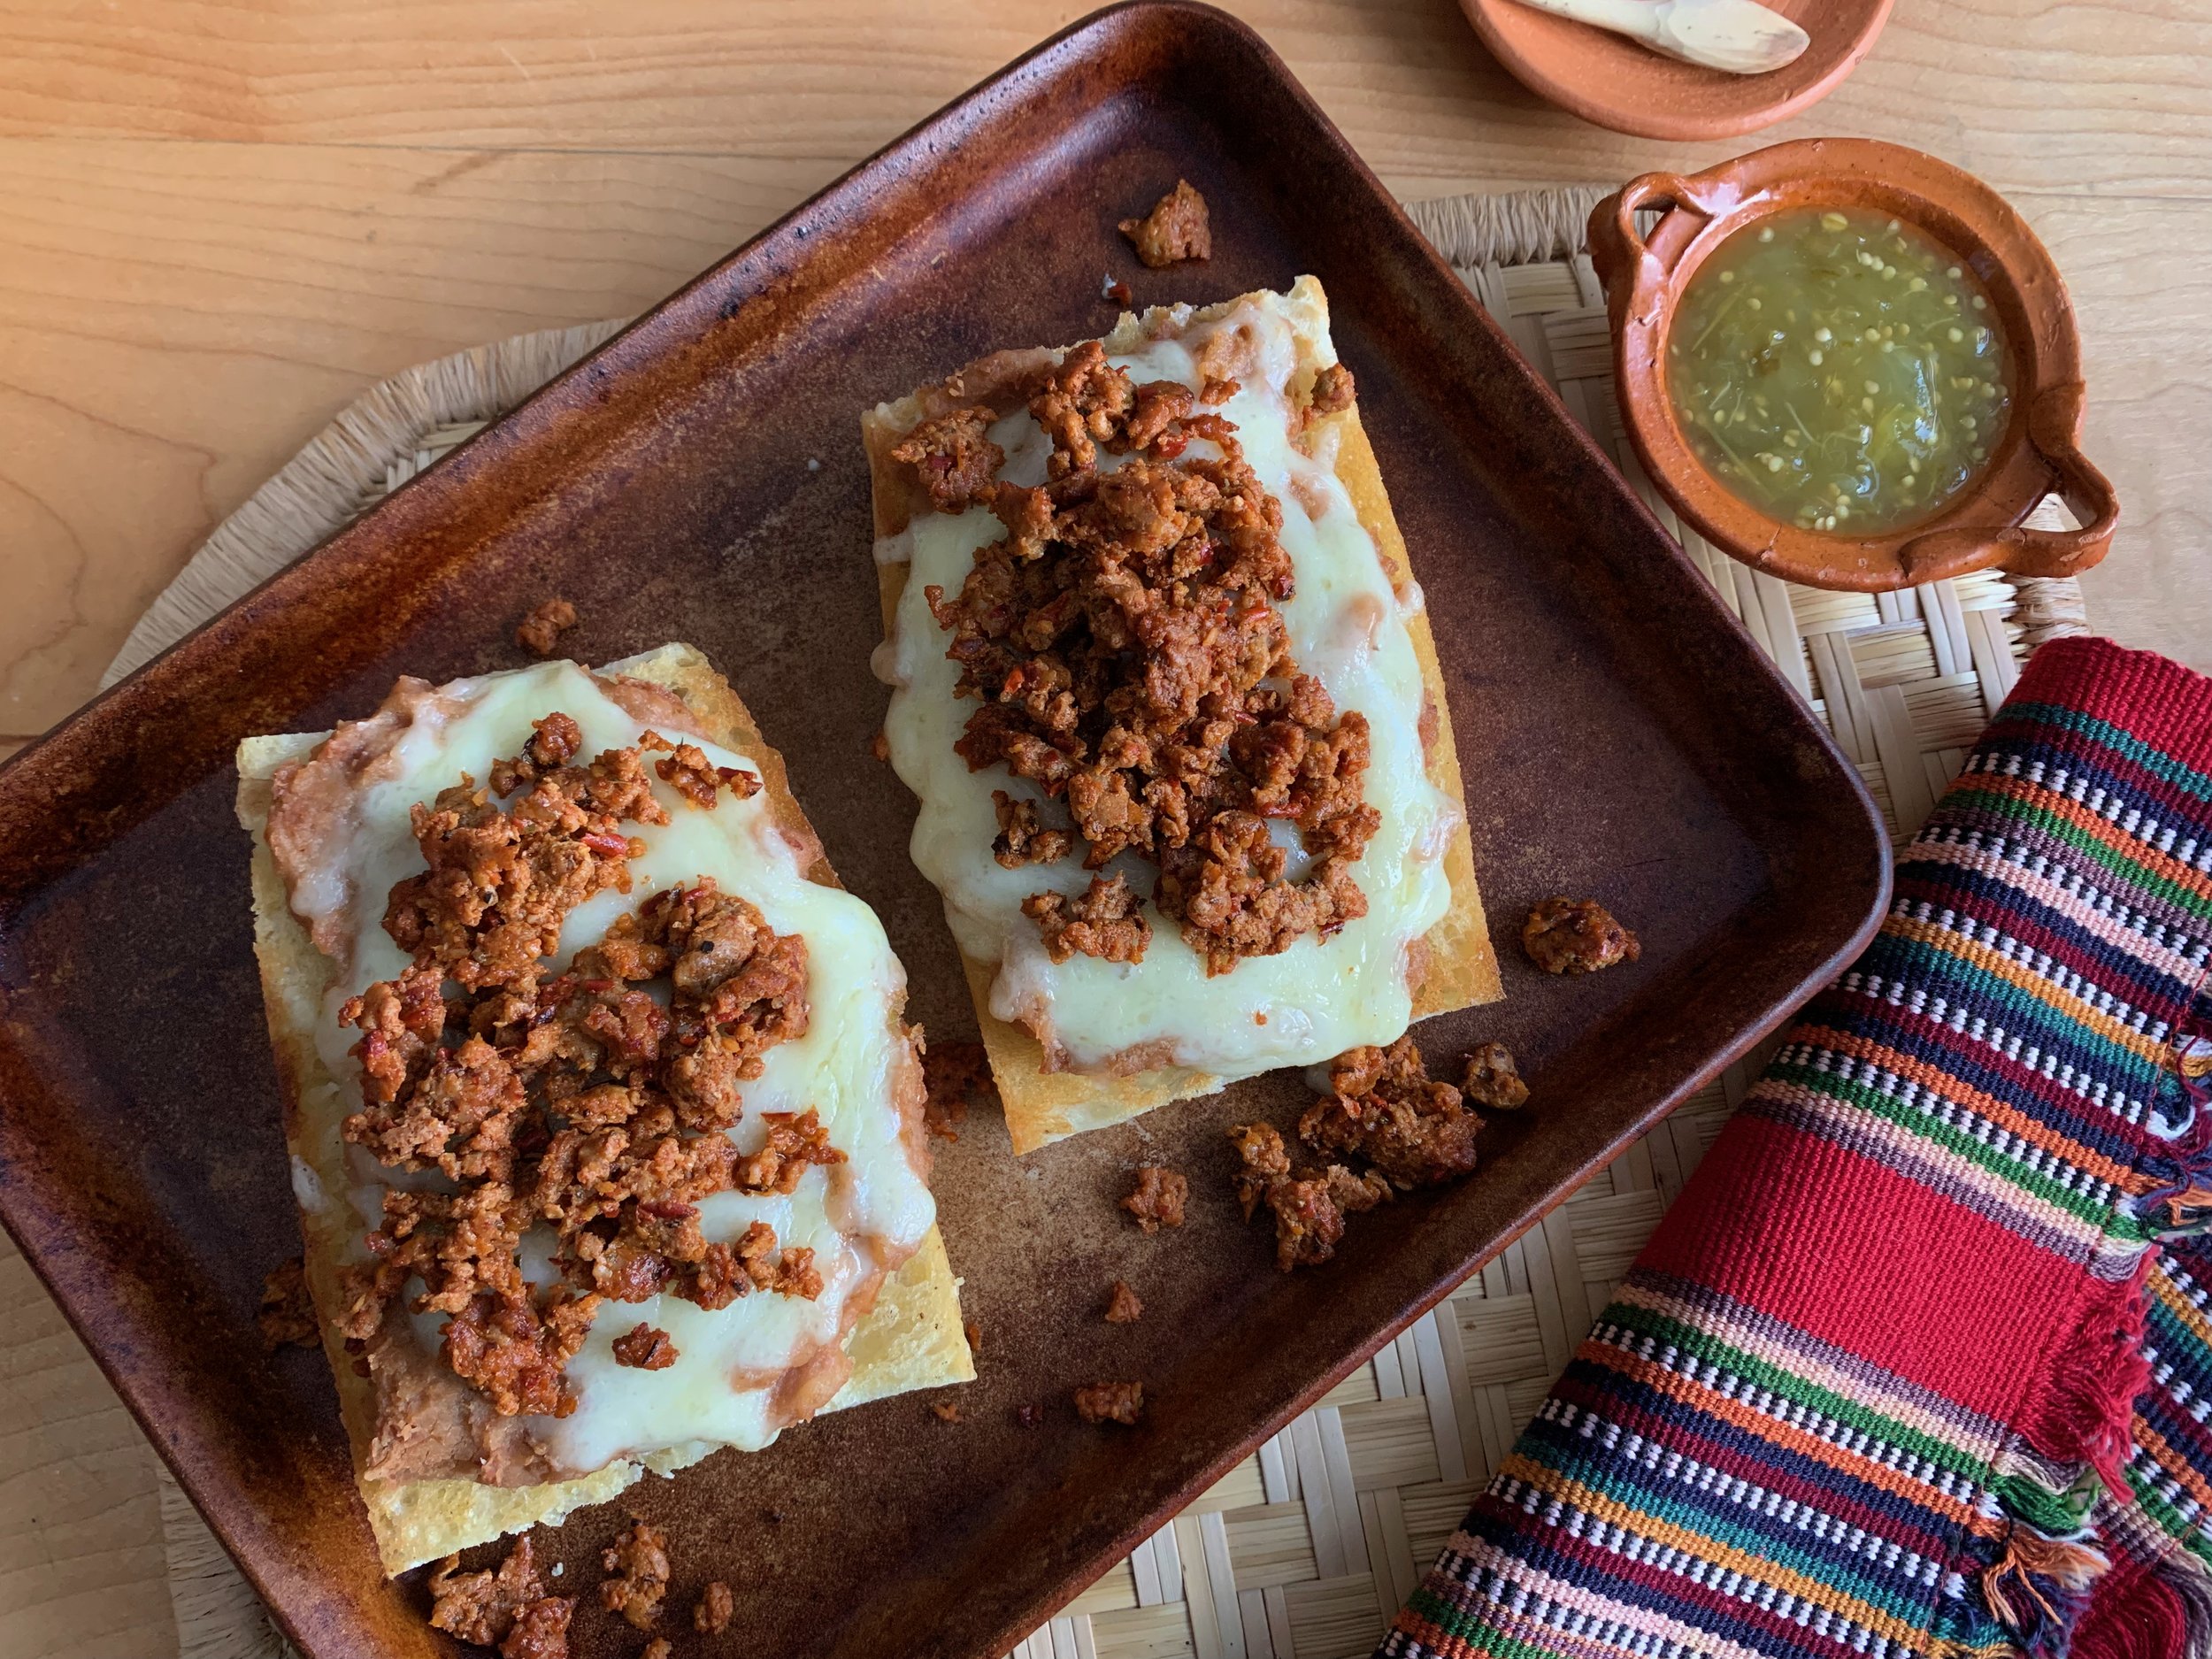
When we walked in, it was like stepping back in time. The place has not changed at all, and by that I mean that it looks and feels like we’re back in 1949, when it opened its doors. The food at El Rubio is old fashioned and simple, but that does not mean it’s not delicious! They are famous for their Liver and Onions, their Pan Dulce baked in house and their Molletes, which is what we were after. Traditional molletes are made using a type of bread called “bolillo”, a small bun with a semi-hard crust and soft crumb. It is what we make Tortas with and it is one of the most common breads in Mexico. At El Rubio, they slather the bread with butter, grill it, then spread with well seasoned pinto beans, then top with tons of melting cheese and broil. You can order them with or without a crown of chorizo and let me tell you, they are absolutely delicious. Very well worth the trip.

At home, we simply made molletes by spreading bread with the beans, topping with cheese and baking until cheese is bubbly, but I have to say, if you have 5 more minutes to spare, it is very well worth adding the grilling part first. The end result will be even more delicious!

Now, not everyone has access to bolillos, so use whatever bread you have on hand. I’m using baguette here, but Portuguese buns are delicious, if you can find them. Pinto beans, refried, are traditional, but these are equally delicious with refried black beans. For the cheese, in Mexico we would use Asadero, Chihuahua or Menonita, but elsewhere, use whatever white melting cheese you have available. I love using Havarti or Monterey Jack, which are similar to Mennonite. Cooked chorizo can be mixed in with the beans or used as a topping, and it is optional if you don’t eat pork (but it is really good!!). Last but not least, you need a good salsa to eat these with - typically they are served with Pico de Gallo, but top it with your favourite one and get ready to enjoy an iconic Mexican meal.

MOLLETES ESPECIALES
Baked bread with beans and cheese

1 tsp vegetable oil
1/2 cup chopped onion
1/2 cup raw Mexican chorizo
2 Bolillos, baguette or bread of your choice
2 Tbsp softened butter
1 1/2 cups refried pinto or black beans 
2 cups Havarti, Monterey Jack or Brick cheese, grated
Salsa of your choice

In medium frying pan heat oil and cook onion until translucent. Add chorizo and cook, breaking it up, for about 5-7 minutes or until pork is cooked through and it starts to get crispy. Reserve.

Split bolillos in half horizontally and spread butter on them. Heat frying pan or griddle over medium heat and place buns buttered side down. Cook until golden, 2-3 minutes.

Spread beans over grilled bread.  Sprinkle cheese on top.  Place on baking tray and bake in at 350°F until cheese is melted, 10-12 minutes.  Once cheese is melted, top with chorizo and place under the broiler for 1 or 1 1/2 minutes, only until cheese is starting to brown.

Serve warm with your favourite salsa.

Serves 2.

Comment

Straight from Yucatán, Cochinita Pibil is outrageously delicious.

February 6, 2022 Maria Garza

As I sit here writing this post, I am amazed that I have not yet shared the recipe for Cochinita Pibil! After Enchiladas Suizas, Cochinita is my second favourite food - not only because it is delicious, but also because it is another dish my Nanny made for us on a regular basis. Those food memories are special and whenever I make this pork in annatto seed sauce I am transported immediately to my childhood kitchen table. Nanny used to make the pork and serve it in the form of saucy tacos along with a mound of white rice and black beans. So, so good!

Cochinita Pibil comes from the Mayan world, in the Yucatán Peninsula, where it is their most famous and popular dish. The name Cochinita refers to the pig, and the word Pibil comes from the Mayan word Pib, that means cooked in the ground oven. The original and best cochinita is cooked in a pit, over wood embers, the vessel covered with banana trunk pieces, then banana leaves, and finally a thin metal sheet covered with dirt. The pork itself is bathed in a mixture made from achiote (annatto seeds), sour orange, salt, cinnamon, cloves and garlic, which colours it a bright orange thanks to the annatto. It is then wrapped in banana leaves, covered, and placed in the pib.

Depending on the size of the meat, it takes anywhere from 3-4 hours to cook. It is traditionally made in the wee hours of the morning, so it is ready to eat first thing, usually on Sundays and holidays. It is the best breakfast ever!

The one and only condiment cochinita needs is a crown of brightly coloured pickled red onions, macerated in the same sour orange, salt and a bit of Mexican oregano, spiked with tiny pieces of Habanero chile. A freshly made corn tortilla to wrap it all in and you will be transported to foodie heaven.

If you ever find yourself in the Yucatán, take a drive to the countryside… you will most certainly come across a roadside restaurant that serves freshly baked Cochinita. STOP - because you must - and TASTE. It will be one of the best experiences - there is nothing like it. Simple ingredients transform the pork into something rich, luxurious and decadent. Trust me when I say it is one of the best tacos you will ever have.

As amazing as that sounds, you may not be able to travel to Mexico anytime soon, but the good news is you can make this at home! You don’t need to have the Pib in your backyard to be able to enjoy Cochinita. It is pretty easy to make.

If you have the time, I recommend you marinate it, then bake it low and slow, to coax all those flavours out of the pork. But if you’re strapped for time, you can make this in the pressure cooker or Instant Pot. You can buy achiote paste in your local Latin grocer, and if you cannot find sour oranges (these are harder to find), combine orange and grapefruit or lime juice to give you an approximation of flavour (I tend to prefer orange and grapefruit, as I enjoy its slight bitterness). Banana leaves are also available at Latin or Asian grocers, usually found in the freezer, but if you cannot find them, don’t stress, you can still make this without them. Finally, epazote (fresh or dried) is optional, but it is really delicious here. You may want to double up on the pickled onions, as they are really good in sandwiches or tortas - I like to keep a jar in the fridge for those occasions. One last thing, make sure you have plenty of corn tortillas for this party. If you like, make a pot of rice and some black beans and you will have an amazing meal.

Buen provecho!

Cochinita Pibil
Pork in Annatto Seed and Bitter Orange Juice

1/2 banana leaf, cut into large pieces
1.5 kg pork shoulder (pork butt) roast, cut into large chunks (I like to use boneless)
5 Tbsp achiote paste 
6 cloves garlic, chopped
2-3 tsp salt, to taste
4 cups sour orange juice, or a combination of orange juice and grapefruit juice
1 sprig epazote, or 1 tsp dried epazote (optional)

Mix the achiote paste, garlic, salt and juice until well combined. Mixture should taste really well seasoned, if it needs more salt, add some more. This can be done in the blender if achiote paste is too hard. Let meat marinate in this mixture, refrigerated, for a minimum of 2 hours, preferably overnight. 

Line slow cooker bowl with banana leaf, if you’re using it. Place meat on banana leaf and pour marinade liquid over meat. Sprinkle with epazote. Cover with another piece of banana leaf, tucking ends in securely. 

Cook, covered, on Low setting for about 10 hours, until tender, then shred meat and leave in juices. Taste for salt and add more if needed. Continue to cook, covered, on Low setting for up to another 2 hours. Serve with pickled onions.

If you don’t have a slow cooker, this can be done in pressure cooker - cooked on high pressure for 40 minutes. In the oven, cover pan with foil over the banana leaves and braise at 300°F for 3-4 hours, until meat is very tender. 

Pickled Red Onions:

6 Tbsp white vinegar, or equal parts of orange and lime juice
Salt to taste
1 medium red onion, cut into thin julienne (about 1 1/2 cups)
1 Habanero chile, seeded and thinly sliced or minced
1/2 tsp Mexican oregano

In bowl combine vinegar or juices and salt to taste.
Mix in onions and oregano.
Marinate at least 1 hour, stirring every so often.

Serves 6-8.

2 Comments

Chicken Tostadas are fast, delicious and always a crowd pleaser.

January 30, 2022 Maria Garza

When I was a kid in Mexico, Tostadas would make an appearance at the lunch or supper table at least once a week. They were also a favourite item for birthday parties or get-togethers, because they are super easy to assemble, and everyone likes them. Best of all, your guests can build their own with their favourite toppings.

It is not a surprise that in my household, whenever there is leftover chicken, Tostadas end up on my plate (if you have leftover rotisserie chicken, then this is the perfect vehicle for that!). I usually have tortillas and beans in the fridge, and the toppings can be anything you like, from the customary fresh lettuce, tomato and avocado with the crumbly cotija and crema, but you can also make a warm tostada with melted cheese instead of cotija. If you don’t have chicken, you can use leftover steak (search for that recipe here in the blog) - you get the picture, Tostadas are a vehicle for delicious bits of (leftover or freshly prepared) food. One thing though, always serve them with salsa or pico de gallo and crema, whether you go for the fresh toppings or the gooey, melted cheese.

Now that we sorted out the toppings, let’s talk about the tostada itself. You can buy commercial tostadas, which are very convenient since they’re ready to go. But if you don’t happen to have those available, toasting your own tortillas is very easy. Simply put them on a comal over medium low heat and warm up, turning often, until completely crispy. If you prefer, you can fry them in hot oil, turning every few seconds, until crispy. The dry toasting yields a drier, crunchier tortilla, while the fried tortilla is moister. So you decide which method you like, they are both delicious!

Next time you find yourself wondering what to make for dinner, make some tostadas. Your family will love them!

TOSTADAS DE POLLO
Chicken Tostadas

2 chicken breasts, poached and shredded finely
2 cups refried beans
1 large tomato, diced
1 large avocado, diced
2 cups shredded lettuce
1 cup crumbled cotija or Feta cheese, or grated Monterey Jack cheese
1/2 cup crema, crème fraîche or sour cream
Salsa of your choice
8 commercial tostadas or tortillas that have been fried until crispy 

Warm tostadas in the oven for a couple of minutes.

Spread warm beans on each tostada. 

Top with chicken and garnish with tomato, avocado, lettuce, cheese, crema and salsa.

Serve immediately.

Serves 4.

Comment

Rajas in a Creamy Tomato Salsa makes for a very satisfying meal.

January 23, 2022 Maria Garza

It’s been bitterly cold here in Ottawa these last few days, so much so that on the weekends I feel like hibernating. My fridge is starting to look a little bare, but there is no way I’m going out in this cold!

I look in my crisper and I see two poblanos starting to get a little old, so I decide to make something with them. The obvious choice is Rajas con Crema, because poblanos and cream are a match made in heaven. The problem is, I don’t have a lot of crema, and no queso fresco… so I look around and see some tomatoes that are also getting pretty wrinkled, and an idea starts to take shape.

My creation process is often like this - look around, see what I have and think of the possibilities. I roast the poblanos, peel and devein and cut into strips. I want to use those tomatoes, and the way it has to be is in some sort of salsa, so I decide to cook the salsa ingredients first in a bit of oil, then blend. This process gives the salsa a creaminess, because the oil is emulsified into the sauce and it’s delicious!

After that it’s time to sauté the onion and poblanos until starting to get golden and then add the corn. The salsa goes in for a second cook and when it’s simmering, I add the cream. At first that was going to be the end of it, but once I added cream a light went on and I decided to add melty cheese.

Oh yes, that cheese at the end transformed this dish into something else altogether. Now it reminded me of another dish we often had at home - Queso con Tomate, which is salsa warmed up in a frying pan with cheese stirred in until melted, then eaten with tortillas (my sister Pilar’s favourite). As soon as I had a taste I knew this was a keeper.

This is perfect with tortillas for making tacos, but it is equally delicious as a dip. That is how I ate mine last night, but I suggest if you are going to make it to eat with chips, cut the poblanos and onions into smaller pieces, so it is easier to scoop. Either way, I hope you try this and let me know what you think!

Rajas con Crema en Salsa
Roasted Poblano Strips in Creamy Salsa

2 medium poblano chiles
2 Tbsp oil, divided
1 garlic clove, sliced
1/2 - 1 Jalapeño chile, chopped
2 Roma tomatoes, chopped
1/4 cup water
Salt to taste
1/4 white Spanish onion, julienned (about 2/3 cup)
1/2 cup corn kernels
1/3 cup crema or sour cream
1 cup Monterey Jack cheese, shredded
Cilantro leaves and crumbled cotija or feta cheese for garnish
Corn tortillas or tortilla chips

To roast poblano chiles: 

Place chiles on tray and place a few inches under the broiler and cook until nicely charred, turning as needed.

If you have a gas stove, you can place the chiles right on top of the burners and char, turning often, until blistered all over. This can also be done on the barbecue.

Once chiles are blistered and charred, place in a bowl and cover so they can steam. When they are cool enough to handle, peel them, open them and remove all the seeds and veins. Cut them into strips.

In medium saucepan, heat 1 Tbsp oil and sauté garlic and Jalapeños until golden, but make sure the garlic does not burn. 

Add tomatoes and cook for about 5 minutes, then add water and cook for another 5 minutes.

Place tomato mixture in blender jar and add a bit of salt to taste. Blend until completely smooth.

In same saucepan, heat remaining Tbsp oil and sauté onion and poblano strips until the onion is very soft and starting to brown. Add corn kernels and crema. Cook until simmering gently and add Monterey Jack cheese. Stir only until melted.

Serve, garnished with cotija or feta cheese and cilantro leaves.

You can make tacos or serve as a dip with tortilla chips.

 Serves 2-3.


Comment

Black Bean Soup has never been so comforting.

January 15, 2022 Maria Garza

You would never think a humble bowl of black beans would be one of the most amazing and comforting meals out there, but believe me, it is!

Mexicans have known this for centuries - beans and masa are a match made in heaven, so much so that when you eat these two things together, you are eating a complete protein - plant based protein for the win! These two ingredients have been the staple in Mexican households forever, and as humble as they are, they are nutritious and very delicious.

It all starts with a pot of home cooked beans. It is the easiest thing to do so please don’t be intimidated by it. I often say that when Mexicans get married, one of the first gifts they receive is a pressure cooker - you need it to cook your beans! But if you don’t have one, it’s OK - cooking beans the old-fashioned way, on top of the stove makes the most delicious and creamy beans ever! I like to add epazote leaves, garlic cloves and onion to my beans as they cook - this flavours them from the inside out. Another trick is to salt your beans towards the end of the cooking time - doing this will prevent your beans from having a tough skin.

Make a pot of beans and then make this black bean soup with chochoyotes. The beans will be absolutely delicious on their own, but if you go a step further and turn this into a soup and add the little masa dumplings, you will be doing a happy dance, trust me!

Chochoyotes could be called the Mexican dumplings. A mixture of corn masa, rendered lard, a bit of salt and cilantro, they are shaped into balls with a little dent - like a belly button. They cook happily in the soup and as they cook, they also thicken the liquid slightly. It is really an amazing combination than I invite you to try!

Chochoyotes can enhance in any brothy mixture - from chicken soup to mole! As long as there is enough broth to allow them to cook. If you are using them in a thicker mole, you may want to cook them separately (in chicken broth is the best!) and then add them to the final dish.

This black bean soup is filling, comforting and very delicious. As I write this in Ottawa, the temperatures outside are below -30°C, so eating a bowl tonight felt just perfect.

I hope I have inspired you to make beans at home and then use some to make this soup. If you prefer to make it with pinto beans, that would also be really good too!

FRIJOLES
Beans

2 cups pinto or black beans
8 cups water
Salt to taste

Pick through beans (sometimes they have little stones).  Place in a deep pot and add water.  Cook on medium heat, partially covered, for 2-3 hours, adding water as necessary.  After they are soft, salt to taste.
A pressure cooker can be used: cook on high pressure for about 45 minutes. A crock pot can be used as well: cook on “Low” for 8 hours.

SOPA DE FRIJOL NEGRO CON CHOCHOYOTES
Black Bean Soup with Masa Dumplings

For the Chochoyotes:
1/2 cup Maseca
1/2 cup warm water
1 Tbsp rendered lard or vegetable shortening
1/4 tsp kosher salt
1 Tbsp chopped cilantro

For the Soup:
1 Tbsp rendered lard, oil or butter
1 small onion, chopped (about 1/2 cup)
1 Tbsp ancho chile powder (optional but delicious)
1 small clove garlic, minced
2 cups cooked beans 
3 cups bean broth
Sliced avocado, crumbled cotija or feta cheese, cilantro leaves and salsa for garnish

To make the chochoyotes, in medium bowl combine Maseca and warm water. Bring together to make a soft dough and knead in lard, salt and cilantro. Make sure everything is evenly distributed and then divide masa into 12 or 13 pieces. Make round balls and then using your thumb, make small indentations in the centre, they will look like belly buttons. Reserve until soup is simmering.

To make the soup, heat lard in medium saucepan. Cook onion and ancho chile powder until fragrant and onion is soft. Add garlic and cook about 2 minutes. 

Add 1/2 cup of the beans and using a potato masher, mash to a semi-smooth consistency. Add the rest of the beans and the bean broth and add salt if needed. Bring mixture to a slow boil.

Add chochoyotes and simmer in the soup for 6-8 minutes, they will sink at first (just like gnocchi), but will rise to the surface when cooked.

Serve soup, garnished with avocado, crumbled cotija or feta cheese, cilantro and salsa. 
If you like, you can add crema as well. 

Serves 2-3.

Comment

When you feel like something green, this Salsa Aguacatada hits the spot.

January 9, 2022 Maria Garza

Every winter, about this time of year, I crave GREEN stuff. It could be a simple salad (I’m not sure why when the weather turns chillier my desire to eat salad goes down), or it could be some goodness in the form and shape of avocado - that amazing creamy, satisfying, buttery fruit. If you add some tomatillos, cilantro and jalapeños, well… we have all sorts of delicious green stuff.

This recipe comes from my sister Lucía - during a casual conversation a few years ago she told me about this way of making salsa. It is like a cross between a simple blended guacamole and a green tomatillo salsa. You can eat it with chips, on tacos or flautas, and it is absolutely addictive. It definitely falls into the “green” category and it is delicious and super easy to make.

Once you make it you will find yourself secretly snacking on it with corn chips (no one will fault you for that!). It keeps well in the fridge for at least 5 days (if it lasts that long), because the acidity in the tomatillos keeps the avocado from oxidizing. Next time you find yourself with a couple of lonely avocados languishing in the fridge and a few tomatillos, give this salsa a try, your corn chips will thank you!

SALSA AGUACATADA
Avocado Tomatillo Salsa

6 tomatillos, husked, cleaned and cut into quarters
2 small ripe avocados, peeled and cut into chunks
1/4 cup onion, chopped
1 small garlic clove, peeled
1 Jalapeño chile, stemmed and chopped (seeded if you want less heat)
1/2 cup chopped cilantro
1/4 cup water (as needed)
Juice of half a lime, or to taste
Salt to taste

Place tomatillos, avocado, onion, garlic, jalapeño and cilantro in the blender and process until very smooth. Add water as needed to make a smooth sauce. Season to taste with lime juice and salt. 

Makes about 2 1/2 cups.

Comment

Braised Beef Ribs are perfect New Year's Eve fare!

December 29, 2021 Maria Garza

As I write this we are heading into the new year. As unbelievable as it is to be on the last days of the year, I think back to last January on what would be our second year into this pandemic. The year loomed as interminable, and now it’s all but done; and still, it feels as if not a lot has changed in these 12 months. It may seem like we have not advanced much in terms of the state of affairs with Covid-19, but we have. In Canada, we have a high vaccination rate, and now we’re getting the third (booster) shot. I am one of the ones that got covid and the Delta variant hit me pretty hard. Omicron seems to be affecting people in a very mild way, which gives me hope - and I don’t know why I feel this, but I feel and really hope this will be the turning point, that as many more people get infected with Omicron, we will achieve herd immunity and slowly but surely we will be moving on through this.

I really hope that we start the new year with lots of hope for the future. But before we get there, let’s talk about food that you can and should make for new year’s eve! I know we will not be gathering in large groups, so this is a beautiful dish you can serve your small family. Best of all, you can make it ahead of time so the night of your dinner you can relax and have some bubbly as your meal warms up in the oven.

This recipe is very easy, but it looks and tastes like you spent hours preparing it. Let’s start with the meat - get yourself the biggest chunk of boneless beef ribs - mine were 2 1/2” thick. I cut the chunk into 4 pieces for a perfect serving size. After that, you need salsa ingredients, a bit of pure ancho chile powder, Mexican oregano and a lager beer - I like to use Dos Equis.

The hardest thing about this is being patient while browning the beef. Please make sure you give it a ton of colour, as that will give you lots of flavour. Blend the salsa ingredients with the ancho and oregano, and that goes in with the meat after it’s been browned. Cook that salsa for a few minutes and then add the beer. After that, it cooks long and slow… to give that meat the chance to get fall-apart tender while it’s permeated with the flavours in the sauce. I tell you, this is a thing of beauty.

Making this a day or two ahead has its benefits, first of all, you can have a hands-off dinner, but on the practical side, the beef is pretty fatty, and that fat will render out into the sauce. Chilling the sauce will make all that fat solidify at the top so you can easily remove it the next day, and eating it that way is nicer in the end.

All you have to decide is what to serve with this. You can go the traditional way and make some mashed potatoes, or roast some carrots and chayote squash. It can be a simple but elegant dinner.

I hope you have a wonderful intimate celebration with your family and most of all, I wish you a healthy, happy, successful 2022, full of adventures and much love!

Costillas de Res en Salsa de Chile Ancho a la Cerveza
Braised Beef Ribs with Ancho Chile Salsa and Beer

2 Tbsp vegetable oil
850g boneless beef rib, cut into 4 pieces
1 large tomato, chopped (2 1/2 cups)
1/4 white Spanish onion, chopped (2/3 cup)
2 large garlic cloves, peeled and chopped
2 Tbsp ground ancho chile powder
1 tsp Mexican oregano
Salt and pepper to taste
1 lager beer (I like Dos Equis)

Season meat with salt and pepper. In Dutch oven, over medium high heat, add oil and brown meat on all sides, make sure you give it enough time to get a nice brown colour all over.

Meanwhile, in blender jar place tomato, onion, garlic, ancho powder and Mexican oregano. Blend until completely smooth.

When meat is browned, add blended sauce and salt and pepper to taste.

Turn heat down and let sauce simmer for about 10 minutes. Add beer and stir it in. Bring sauce to a low boil and then simmer, covered, until meat is tender, 1 1/2 to 2 hours. Check meat every 15 minutes or so, making sure sauce is not sticking. If liquid evaporates too much, add water, 1/2 cup at a time, to keep the meat braising.

When meat is fall-off-the-bone tender, adjust seasoning on the sauce. If you prefer a thicker sauce, remove meat from pan and reduce sauce to your desired consistency.
Serve with your favourite vegetables.

* If you have a pressure cooker or a slow cooker, you can certainly make this dish in these. In the pressure cooker, it would take about 35 minutes at full pressure. In the slow cooker, it would take 8 hours on low.

Serves 4.

Comment

Caldo de Pollo is perfect when you're not feeling well.

December 5, 2021 Maria Garza

Hi everyone, I have been absent from all social media for a while. As you may know, I lost my beloved nephew Iñaki a few weeks ago and after that I lost all my desire to share anything. I had decided to take time “off” to allow myself to grieve. To add insult to injury, I contracted Covid-19 and if you’ve never had it, let me tell you, it takes everything out of you.

I am thankful that I am double vaccinated, so my symptoms were not that severe, but still, it is not easy to go through covid all by yourself. In essence, we are all alone and isolated when we go through this, but in my case, since I live alone, it was even worse. Physically, it knocks you out completely, but psychologically it is really hard because you worry about anyone that you could have passed it onto. It is stressful and horrible and I don’t wish it on anyone. I have always been careful and follow social distancing guidelines, but it goes to show you that even if you are, you can get it. The other thing I realized is that vaccines DO work, so if you’re still on the fence, I really recommend you go out and get the jab.

While I was sick, even though my appetite was nonexistent, I needed to force myself to to eat. They tell you to eat protein and stay hydrated, so I went through my fridge and managed to make myself a huge pot of chicken soup, and that’s pretty much what I ate for 7 days straight. Thankfully, I went through it as if I had a really bad flu, chills at night, congestion, dry cough, really bad headaches, extreme exhaustion and loss of sense of smell and diminished sense of taste (that is really scary but especially for a chef!).

Three weeks later, I am starting to feel more like myself, though I’m still tired. I was able to go back to work and my appetite is starting to come back. I am pushing myself to get back to my routines, and this weekend I made another pot of chicken soup. Something about the comfort it brings makes it really appealing especially since the snow has started to fall here in Ottawa.

This recipe is super easy to make, so much so you can even make it while you’re sick. It is very similar to Caldo Tlalpeño, but the ingredients are a bit different. You can add whatever veggies you have on hand. I love adding the usual items like carrots and potatoes, plus some chayote, green beans and zucchini. If you have corn on the cob, you can add small rounds of that as well.

To serve, I like to cook a pot of rice so I can add a spoonful to my bowl of soup (that is a very Mexican thing to do). The usual and best garnishes for this bowl of goodness are chipotle chiles and lime juice, but a few slices of avocado are amazing too.

I hope you make a big pot of chicken soup this winter. Please take care of yourself and stay safe out there, especially with this new Omicron variant.

Caldo de Pollo y Verduras
Chicken  and Vegetable Soup

2 litres good quality chicken stock
1 medium carrot, peeled and sliced thinly
1/4 white Spanish onion, sliced thinly
2 stalks celery, sliced thinly 
1 small chayote squash, peeled and diced
2 small white potatoes, peeled and diced
Salt to taste
1 medium zucchini, trimmed and sliced thinly
1 handful green beans, trimmed and cut into 1” lengths (about 1 cup)
2-3 cups pulled cooked chicken (from a rotisserie chicken works great)
1/4 cup chopped cilantro

Garnishes:
Lime wedges
Chipotle Chiles in adobo
Cooked Mexican rice

In 6 quart stock pot, place chicken stock and turn heat on medium high. Add carrots, onion, celery, chayote and potatoes, along with salt to taste.

Bring to a low boil, then turn heat down and simmer until vegetables are just cooked, 25-30 minutes.

Add zucchini, green beans and pulled chicken and simmer another 10 minutes, only until zucchini and beans are tender.

Add cilantro and serve bowls with a spoonful of rice, and chipotles and limes on the side.

Serves 6. 

Comment

Preparing for Day of the Dead: Calabaza en Tacha

October 23, 2021 Maria Garza

My favourite Mexican holiday is fast approaching and I am getting ready making a couple of things that are a must in my family. First and foremost, is making Pan de Muerto (see recipe here in the blog), which is fun to make, especially because my whole family is involved; and second, is making Calabaza en Tacha, this braised pumpkin in piloncillo syrup.

Calabaza en Tacha originated in colonial Mexico, in the sugar mills. In the process of boiling aguamiel (sugarcane juice) down, they would cook whole pumpkins in the syrup in huge cauldrons called “Tachos”, so this dessert acquired the name of Calabaza en Tacha, simply meaning pumpkin cooked in the tacho. Us Mexicans love our sweets, and this dessert has survived the test of time and is still very popular today. It is eagerly awaited this time of year, when pumpkins are harvested, and it has also a place of honour in the altars of the Day of the Dead.

In Mexico, this recipe is made using Calabaza de Castilla, a native, meaty pumpkin that acquired its current name after it was taken to Queen Isabel of Castilla who liked it so much she gave it that name. If you cannot find calabaza de Castilla where you are, you can use Jamaican or pie pumpkin. The recipe I’m sharing with you today is very simple, but I know people that add other fruits to the mix - like oranges or guavas, or even pieces of sugarcane. Oranges are delicious as they impart a bit of acidity to the syrup, and guavas add a floral note. If you choose to use them, add them about halfway through the cooking time, so they don’t completely fall apart.

In many parts of Mexico, this pumpkin is served in small bowls drizzled with milk or cream, but in my house in Monterrey we always had it just in syrup. Either way, it’s delicious!

I used a medium pumpkin, knowing it would make lots, but I usually use at least half to make empanadas: simply scrape off the flesh of the cooked pumpkin pieces, place in a frying pan and mash. Cook over medium low heat until completely dry. I then use this mashed mixture and sweeten to taste to make the most addictive pumpkin empanadas.

CALABAZA EN TACHA
Braised Pumpkin in Piloncillo Syrup

350g - 1000g piloncillo, demerara or dark brown sugar (*see note below)
3-4 3” pieces Mexican canela or 2 cinnamon sticks
2-3 pieces star anise
5 whole cloves
4 cups water
2200g pumpkin - de Castilla or Jamaican, but otherwise pie pumpkin is good too, seeded and cut into small wedges.

In large Dutch oven, place water and piloncillo. Bring water to a boil, turn the heat down and cover and cook for about 10 minutes, just until piloncillo is dissolved completely.  If using brown sugar, just mix it in and make sure it dissolves, it does not have to cook as long.

Add canela, star anise and cloves and then add the pumpkin, placing the bottom layer skin side down and the top layer skin side up. 

It may not look like a lot of liquid, but the pumpkin will release liquid as it cooks. Make sure the liquid is at a simmer, then cover the pot and cook, checking every 30 minutes, until the pumpkin is tender - it may take one hour or a bit longer, depending on the kind or pumpkin you’re using.

Once the pumpkin is tender, remove the pumpkin and leave the liquid in the pot. Turn up the heat and cook until reduced to a thick syrup. Be careful it does not scorch. 

When the syrup has thickened to your liking, turn off the heat and let it cool. 
Serve pumpkin, at room temperature, drizzled with syrup or milk.

* The original Calabaza en Tacha is extremely sweet and is truly candied. I don’t like things very sweet, that’s why I went with the lesser amount of piloncillo. If you want, you can increase the amount to the larger amount, and you will have a very sweet and syrupy pumpkin.

** This pumpkin is great to use as a filling for empanadas, if you remove it from the skin, mash it and cook it down in a frying pan to remove all of the moisture.

 Serves 8-10.

Comment

Chiles en Nogada, delicious and only available once a year.

September 19, 2021 Maria Garza
IMG_4901.jpeg

If Mole Poblano is Mexico’s most famous dish, then the Chile en Nogada is its equally famous, yet evanescent, partner.

While Mole is enjoyed year round, Chiles en Nogada make an appearance towards the end of August for two important reasons. First: to make them, we need specific ingredients that become only available at harvest time, and Second: we make them to commemorate the Mexican Independence and General Agustín de Iturbide, one of our war heroes. It is believed that the recipe was invented by the nuns of the Convent of Santa Mónica in Puebla in September 16, 1821, the year the war ended and Independence from Spain was achieved.

To make these stuffed poblano chiles, we need specific seasonal ingredients like apples, pears and peaches - the original and most traditional hail from the region of Calpan, in the State of Puebla. The apples are called Manzanas Panocheras, the pears are called Peras de San Juan, both very firm and sweet, and the peaches are called Duraznos Amarillos, these are firm, not soft like our northern peaches. The crowing glory of these chiles is the walnut cream sauce that covers them. Made with Nuez de Castilla, these walnuts are picked fresh and then blanched and peeled, and they make the creamiest, whitest sauce - simply delicious! Last, but not least, the poblano chile, named for the State of Puebla. These fruits are the special ingredients that are part of the meat mixture, along with almonds, raisins, tomatoes and canela. It is a slightly sweet and savoury filling for these special chiles.

Now, let’s talk about the Nogada, shall we? Nogada translates to “nut sauce”, or “full of nuts”. The original recipe is made with a fresh cheese that I don’t have available in Canada, so my recipe uses a mixture of goat cheese, cream and milk, along with walnuts, blanched almonds, a bit of sugar and salt. I also like to add a touch of Oloroso sherry to give it that sophisticated taste. The sauce is blended until completely smooth and that is that!

The traditional garnishes are pomegranate seeds and parsley, and those colours, along with the white walnut sauce, symbolize the colours of our flag.

This recipe, a real fusion of ingredients and flavours became the work of art that us Mexicans look forward to and enjoy every year. It is a masterpiece that encompasses the flavours and techniques of both the old world and the new world, something that the nuns of the time were very skillful at - making the most of what that was available to them seasonally, geographically and culturally.

Now, I have to confess that though I am a traditional cook, I am not a lover of sweet and savoury dishes, so if I’m making these chiles for myself only, I omit the fruit in the filling. However, if I’m making these for company, I go by-the-book traditional. For me, the sauce is the best part of these chiles, and whenever I make them, I feel like licking the plate!

It is important to note that there are hundreds of recipes out there for Chiles en Nogada. It boils down to families and their own recipes, like always. I am in Canada, so I will not only add my particular tastes, but I will also substitute ingredients from what’s available to me. The same thing applies in Mexico or anywhere else you may be. The original ingredients for this recipe are available locally in Puebla - where the dish originated, but those same ingredients may not be available in other parts of the country, and that’s why we see variations of recipes, and that’s OK too. I love to learn the true origins of recipes, and then I can adapt as needed.

So without further ado, here is my recipe for these Chiles en Nogada. I hope you try them and then make them to suit your own tastes. And whenever you eat them, think of Mexico and why these chiles are so special.

Chiles en Nogada
Poblano Chiles in Walnut Sauce

Nogada:
Makes 4 cups

200g plain goat cheese, softened
1 1/4 cups heavy cream
1 1/2 cups milk
1/2 cup slivered almonds
1 1/2 cups walnuts, soaked in milk for 1 hr, then drained
3 Tbsp Oloroso Dulce sherry, or to taste
4 tsp sugar or more to taste
1 tsp kosher salt, or more to taste

Filling:

2 Tbsp vegetable oil or lard
1 kg ground pork, beef or a mixture of both
1 cup diced onion
2-3 garlic cloves
2 Roma tomatoes, diced
1 small ripe but firm pear, diced
1 small Royal Gala apple, peeled and diced
1 small ripe but firm peach, diced
1 small stick canela or cinnamon, or 1/4 tsp ground
1/4 cup slivered almonds
1/4 cup golden raisins
1 1/2 tsp kosher salt, or to taste
1/4 tsp black pepper, or to taste
8 poblano chiles

Garnish:

1 cup pomegranate arils
8 sprigs flat leaf parsley, leaves only

To make the Nogada, place softened goat cheese, cream, milk, almonds, walnuts, sherry, sugar and salt in blender container. Process until completely smooth. Adjust seasonings and reserve.

To prepare the chiles, place over an open flame on the stove, barbecue or under the broiler, turning often, until skin is blistered on all sides. Place in a large bowl and cover with a plate or plastic and let them steam for about 10 minutes. Using paper towels, gently rub charred skins off. Cut a slit down the side of each chile and carefully remove all veins and seeds. 

To make the filling, in large pan, heat oil and cook meat, breaking it up as you go, until no longer pink. Add onions and cook until soft, then add garlic and tomato and cook until tomatoes are soft, about 5 minutes.

Add pears, apples and peaches and cinnamon and cook only until fruit softens a bit. We don’t want fruit to fall apart. Add almonds, raisins and salt and pepper to taste.

Fill each poblano chile with stuffing, but try not to over-stuff. Once full, it should retain its original shape and be able to close. 

These chiles are best served slightly warm or at room temperature.
To serve, place one chile per plate, cut side slightly to the side - not directly on top, so that the top of the chile appears smooth. Spoon walnut sauce over each chile and garnish with pomegranate and parsley leaves. 

Enjoy!

Makes 8. 

2 Comments

Two years later, I was finally able to make Turkish Börek.

September 1, 2021 Maria Garza
IMG_4242.jpeg

It’s been two years since my daughter Julia and I were in Istanbul on one of the most epic trips we’ve ever done. We both fell in love with the country - the people, history, architecture, culture, and of course the food!! We knew we had to cook with the locals so we searched and found a company called Cookistan (@cookistanbul). We booked a class and had one of the best experiences with our hostess Aysin and friends. 

The class was held at Aysin’s home in northern Istanbul, so the experience started with us making our way there. We met in front of the Ramada Inn Hotel in the Şişli district. While we waited for other participants, we observed the Simit seller across the street while Aysin explained how Turks eat these bagels on the go every day, either with pekmez and tahini (grape molasses and sesame seed paste, the Turkish version of peanut butter and jam) or cheese and olive tapenade. 

When our classmates arrived, we set out to explore the neighbourhood, as Aysin casually picked up ingredients needed for our class. As we walked and Aysin explained what was around us (one of the few Catholic churches and cemeteries in Istanbul, for example), we visited the local baker making bread in a tandoor-like oven; the artichoke vendor peeling artichokes so the customer could buy the cleaned hearts ready to cook; the pastry shop, where Aysin picked up the most delicious pastries; and the local grocer - I have never seen such variety of dairy products! So much yogurt, clotted cream and cheese; olives, nuts, dried fruit, tahini, cured meats, tomato and pepper pastes, spices, baklava and the most amazing and FRESH yufka dough that we used to make the most delicious meat filled pastries called Börek. It was a delightful tour around a neighbourhood that retains the small village feel, with mom and pop shops that provide everything needed to cook at home. It was nice to see that in a city as huge as Istanbul!

But back to the subject of this post. Börek is abundant in Istanbul, you can find shops dedicated to making them exclusively. Filled with meat, cheese or vegetables, they come in a variety of shapes. They can be small coils (or roses, as they call them there), large coils, rolls, or layered like lasagna. They are a popular street food and are totally delicious! Though today I’m writing about the Turkish pastry, börek is actually a family of pastries made with phyllo or yufka, enjoyed  in many countries from Central Asia, the Levant, the Balkans (we also made some in Bosnia!) and some Eastern European countries (Spanakopita anyone?).

Back to my story... when we got to Aysin’s place, we started the class by having tea and pastry (my favourite was the sweet tahini roll), and getting to know each other. Taking the class with us were two other ladies, journalists from the USA, so the conversation was very interesting!!. After a leisurely chat, we got to the work tables and started cooking. We made a delicious menu of Circassian Chicken (Turkish chicken and walnut salad), assorted dolmas (stuffed sundried eggplant, fresh zucchini and grape leaves), stuffed olive oil braised artichoke hearts, bulgur salad on lettuce leaves, the amazing meat-filled börek, and for a sweet ending, sugar syrup braised pumpkin with tahini and walnuts.

Why am I writing about this two years later you may ask? Well, let me tell you! During these two years I have been visiting every Middle-Eastern grocery store in Ottawa looking for Turkish yufka pastry (even though Ottawa is the capital city of Canada, it is still a relatively small city). Two weeks ago, I heard about a brand new (Turkish!) grocery store in Kanata, so I just had to go visit. As Julia and I walked the aisles, lo and behold, sitting right there in the freezer staring back at me was the much sought-after yufka! I almost did a little dance on the spot I was so excited! We found many other products like the sun-dried eggplants and peppers used for stuffing and the hard-to-find red pepper paste. Oh, and they make fresh simit every day! If you’re in Ottawa and you are interested in cooking Turkish food, please go visit the Istanbul Food Market on Katimavik Road. And FYI, they make a mean Turkish coffee that you can sip as you shop!

In honour of that epic search for yufka and to remember that fabulous experience we had with Aysin and Cookistan, here is the recipe for the Börek we made in class, published with Aysin’s permission. I have added a bit of spice (listed in Italics) that is my only deviation from the original recipe. Otherwise, it is just like the ones we made with Aysin. If you cannot find yulfka dough where you are, you can use phyllo (just a tip: yufka dough is round, whereas phyllo is rectangular, so the cutting of the dough will be a bit different. Also, you only use one layer of yufka to make these pastries, whereas with phyllo you would need at least two layers).

I hope you try this recipe - it is super easy to make and really delicious! Best of all, if you want, you can make double and freeze the rest for quick lunches or dinners.

Börek
Turkish Meat Stuffed Pastries - Cookistan

500g ground beef
1 large Spanish onion, grated and drained for 30 minutes (3/4 cup)
2 large garlic cloves, minced 
1 tsp Aleppo pepper, optional
1 tsp kosher salt
1/2 tsp ground black pepper
1/2 tsp ground cumin
2 sheets yufka dough, thawed
3 Tbsp olive oil
1/3 cup milk
1 egg 
2 Tbsp water

Topping:
250g plain yogurt
1 garlic clove, minced
Salt and pepper to taste
1/2 cup butter
1/4 tsp Aleppo pepper flakes or paprika
1 tsp crushed dried mint

Preheat oven to 390°F.

In large bowl, combine ground beef, grated onion, Aleppo pepper, salt, pepper and cumin.
Knead thoroughly with gloved hands until mixture is homogeneous.

Unfold yufka dough on counter and cut into 4 triangles. Mix olive oil with milk and brush dough.

Divide meat mixture into 8 portions. Spread meat at the widest edge of the dough, in the shape of a thin cylinder. Start rolling up dough from the widest edge towards the tip, keeping the roll very loose.

When you have a cylinder, then start rolling the pastry into a coil, making sure the coil is not too tight, or they may tear as they bake.

Make an egg wash by whisking egg with water. Place pastries on parchment lined baking trays and brush tops and end tips to make dough stick to coil.
Place on parchment lined baking trays and bake for 33-40 minutes, until pastries are golden brown.

To make topping, in medium bowl combine yogurt with 1 clove minced garlic. Season with salt and pepper. Reserve.

In small frying pan, melt butter and cook until foamy but not browned. Add Aleppo chili flakes or paprika.
Serve Börek warm, topped with yogurt and spiced butter and a sprinkle of dried mint.

Makes 8.

Comment

Meatballs for the win!

August 28, 2021 Maria Garza
IMG_4082.jpeg

Summer in Ottawa is sadly coming to an end, slowly but surely the days are getting shorter and the weather is starting to get cooler. That gives my body the internal cue to start making meals that are a bit more substantial, and I don’t mind spending a bit more time in the kitchen, creating delicious food.

In the spirit of cooking a bit more than in the lazy (and hot) days of summer, let me ask you... who doesn’t love a good meatball? I think meatballs are some of those super comforting and crave-worthy foods that everyone likes, and I am certainly a fan. In North America, usually meatballs are finished in a sweet, barbecue sauce-like mixture, but in Mexico, we braise our meatballs in sauce. Not quite like Italian meatballs, but just as delicious.

I have to say, I don’t make these often enough, but when I do, I fall in love with them all over again. Mexican meatballs have a secret ingredient inside: rice! Including raw rice in the mix makes it necessary to braise them in some sort of liquid, and the obvious choice is salsa. The meat is seasoned with grated onion and garlic, and I like to increase the flavour by adding some sort of pure ground chile powder, like ancho or guajillo (chipotle is you love spicy food). Some people add oats to the mixture to make it more substantial, but they are perfectly fine without.

After you shape the meatballs (not too big!), brown them nicely on all sides and then add the sauce. A very typical sauce would include chipotle chile (for albóndigas enchipotladas), but today I am using Epazote for a different and very delicious taste. If you cannot find fresh or dried epazote, go ahead and season your salsa with chipotle chile in adobo.

Make these in a large saucepan with a lid, as they will need to braise long enough for that rice to cook inside the meatballs. Simmer, covered for at least 25 minutes, until that rice is nice and soft, but be careful that the liquid does not dry out. If you find the sauce is getting really thick, add a bit more water to keep it going. When your meatballs are done, you will see the rice sticking out like porcupine needles, that’s a good indicator that your meatballs are done.

You will be adding seasoned salsa to the meatballs, but taste again and adjust seasoning at the end, if needed. Serve with your favourite veggies or rice on the side.

Albóndigas en Salsa Al Epazote
Meatballs in Tomato Sauce with Epazote

For the Salsa:
4 large Roma tomatoes, chopped
1 wedge red or white onion (about 1/2 cup)
1/4 tsp salt
3/4 cup water

For the Meatballs:
500g ground meat (turkey, chicken, pork, beef or a mixture)
3 cloves garlic, peeled and minced
1 tsp ground chile - ancho or guajillo (chipotle if you like things spicy)
1/4 cup raw rice (jasmine, long grain or basmati)
1/2 tsp salt
1/4 tsp ground black pepper

To put it all together:
1-2 Tbsp oil, butter or lard
5 leaves epazote (fresh if you have them, or 1/2 tsp dried)
1 jalapeño chile, whole, punctured with the tip of a knife
2-4 Tbsp chopped cilantro for garnish

In blender jar place tomatoes, onion, salt and water. Blend until completely smooth.
Reserve while you make the meatball mixture.

In medium bowl, combine ground meat, garlic, ground chile, rice, salt and pepper.

Using clean hands, mix everything until it holds together well. Make small meatballs, about 1”. 

In large saucepan (with lid), heat oil and start browning the meatballs, turning as they get nice and golden brown. Do not crowd the pan - you may have to do this in batches. When meatballs are browned, add reserved salsa. Bring up to a simmer and add epazote and jalapeño. 

Cover pan with lid and simmer for 25-30 minutes, checking from time to time to make sure the mixture is not drying out too much, it should be saucy enough for the rice to cook inside the meatballs.

Adjust seasoning after 25 minutes, adding more salt only if needed. 
Garnish with cilantro. Serve hot, with rice and your favourite vegetables. 

 Serves 4.

Comment

Setas a la Mexicana make a great taco, quesadilla or tetela!

August 22, 2021 Maria Garza
IMG_4180.jpeg

A few days ago, I was gifted with a large amount of wild mushrooms, so I have been eating mushroom everything for a few days! I have blended them into soup, cooked them with cream, and sautéed them in butter… but my favourite way to cook them (surprise, surprise!) is a la Mexicana.

I posted another recipe for Zucchini a la Mexicana a couple of weeks ago, and as I said then, anything can be made this way. Especially good when you have field ripe tomatoes and veggies from your garden, this recipe comes together in just a few minutes. 

Let’s talk about our mushrooms, as they are the stars of this show! I used those wonderfully firm and meaty Japanese Maitake mushrooms that look like a beautiful brown and white flower. Maitakes are a type of adaptogen, high in antioxidants, fiber, vitamins B and C and minerals. They have been used in Japanese culture for centuries for their medicinal properties and health benefits. They can be grilled, pan-fried, used in stir fries or salads, but best of all, they taste delicious!

If Maitakes are hard to find where you are, you can use oyster, fresh shiitakes (just remove the stem) or any other wild mushroom available. If you still can’t find wild mushrooms, you can use regular white or café mushooms, or even baby portobellos. Your local farmer’s market may have a vendor that would provide you with something delicious to cook. In Ottawa, I recommend Forest Floor Mushrooms, they have amazingly beautiful varieties, and they’re worth searching out for sure.

Whatever mushroom you decide to cook, they will all be delicious. Once you make this recipe, you can serve it as a side dish, but you can also make the most epic tostadas with them, or use them to make tacos or quesadillas. You can even use them for filling tetelas or making sopes. So you have a multipurpose dish that can work in many ways. In this case, you can have leftovers for days and not eat them the same way twice. That’s a win in my books!

I hope this inspires you to go out and find some wild mushrooms. Let me know if you do!

Setas a la Mexicana 
Wild Mushrooms, Mexican Style

3-4 Tbsp vegetable, avocado or light olive oil
1/2 medium white onion, diced (about 1 cup)
1 jalapeño or Serrano chile, minced (seeded if you want less heat)
1-2 cloves garlic, minced
1 tsp ancho chile powder (optional)
1 large ripe field tomato, diced (about 1 cup)
300g wild mushrooms, torn apart or chopped (4 cups), (oyster, maitake, shiitake or any mixture)
3/4 cup chicken broth
Salt and pepper to taste
1/4 cup chopped cilantro
Lime wedges for serving

In large 12” frying pan heat oil over medium high heat and cook onion and jalapeño until soft and translucent.
Add garlic and cook only until fragrant, about 1 minute. Add ancho chile powder (if using), and cook another minute.

Add tomatoes and cook for about 5 minutes, just until they start to break down. Add mushrooms, toss well in the sauce and then add chicken stock and a pinch of salt. 

Bring mixture to a boil, then turn heat down to a simmer. Place lid on pan and cook for 15 minutes. After 15 minutes, if you have a lot of liquid still left, you can remove the lid and reduce liquid to your liking. I like it to be moist but not runny.

Season to taste with salt and pepper and add cilantro just before serving.
These mushrooms are great as a side dish, but are great on tacos, tostadas, quesadillas, etc.

Serves 4.


Comment

Esquites, my favourite way of eating Corn.

August 14, 2021 Maria Garza
IMG_4120.jpeg

As you know by now, I simply adore corn. In my books - absolutely and unequivocally - Corn is King!

I have written about how corn came about and the story is nothing short of amazing (check out the story for Elotes a la Mexicana here in the blog), so I won’t repeat myself telling you the same tale. What I will tell you, though, is that us Mexicans love everything and anything made with corn - we eat it every day in the form of tortillas, tacos, sopes, tetelas and we even drink it in the form of pinole, tejuino, atole or champurrado. It is, in short, our sustenance and it is absolutely delicious in all its forms.

One of the most popular street foods in Mexico is corn, both on the cob and off the cob. Our Mexican corn is different than its Canadian or American counterparts: it is hearty, starchy and definitely not sweet. It lends itself very well to creamy, tangy and spicy concoctions and that is exactly how we love to eat it. 

If you walk the streets of Mexico, you will always come across at least one corn vendor. Some of them sell the cobs whole, either boiled or grilled, and there are the vendors that sell the corn off the cob. I tend to like it more this way, as it is easier to eat. And on the plus side, when it’s served in a glass off the cob, you can add more condiments and every bite is enveloped in that creamy, spicy, tangy goodness. Yum. It is soooo good!

In Monterrey, we call them “Elotes Desgranados”, which simply means corn kernels, but in southern Mexico, they are known as “Esquites”. The main difference is that for Esquites, the corn kernels are cooked with fresh epazote and chile de árbol, so the corn acquires a different flavour than its northern counterpart. Either way, they are both delicious and the finished product really is all about the quality of the toppings, so make sure you use good mayo (not Miracle Whip please) and crema, and quality dried chile powders and sauces. 

Today I am using the new Chillin spice blend from my friends at Spicetionary - it is really interesting because they have added amchoor (dried green mango powder), and it gives the spice blend a very nice fruity note that goes really well with this recipe. If you don’t have this particular spice, my next favourite thing to use is a good quality ground ancho or guajillo chile. In Mexico, when you buy esquites, after they add the mayo, crema, cheese and powdered chile, they give you plenty of limes to squeeze juice into your cup and a choice of many bottled salsas you can add. At home you could use Valentina, Cholula or your favourite brand. Today I am using my ultra-spicy Salsa Macha (it may be hard to find at the stores, so I will post my recipe soon!). Use what you have available, it will still be delicious!!

I have given you a guideline in the form of a recipe below, but really, it is all about you preparing your portion exactly the way you like it (like we do in Mexico!), so you decide how much of anything you want to use! You could even let everyone mix their own, exactly how everyone likes it.

I hope you go out and get some fresh, local corn so you can try this recipe. Enjoy!!

Esquites or Elotes Desgranados
aka Mexican Street Corn

3 large ears of corn, husked
1 tsp salt
10 epazote leaves (optional)
1 chile de árbol (optional)

3/4 cup mayonnaise
1/3 cup sour cream or crema
3/4 cup crumbled cotija or feta cheese, plus more for garnish
A bit of the corn cooking water, for consistency
2 tsp Spicetionary™ Chillin spice, or ground ancho chile, plus more for garnish
Juice of 1 lime, or more to taste
Salt only if needed, to taste
1 tsp Salsa Macha (optional), for garnish
2 tsp chopped cilantro for garnish

In large pot, place corn, salt, epazote and chile de árbol (if using). Cover with water and bring to a boil.
Simmer, partially covered, for 10-15 minutes, or until corn is tender.
Remove corn from pot but reserve the cooking water.
Let corn cool 5 minutes and using a knife, cut kernels off the cob.

Place kernels in medium bowl, you should have about 3 cups. Add mayonnaise, sour cream, 3/4 cup cotija or feta cheese, 2 tsp Spicetionary™ Chillin spice or ground chile, juice of 1 lime and 1- 2 Tbsp of the warm corn cooking water. The water is only needed to make the consistency a bit creamy, we don’t want it to be soupy, so you decide how much you use. Season to taste with salt only if you need it - it will depend on the type of cheese you’re using.

Divide mixture amongst 4 bowls or glasses. Garnish with more cheese, spice and a drizzle of salsa macha, if using. Top with a bit of cilantro and enjoy!

Serves 2-4.

Comment

Calabacitas a la Mexicana are the perfect summer side.

August 8, 2021 Maria Garza
IMG_4016.jpeg

August is finally here! I love this time of year because the market stalls are brimming with fresh produce, from the last of the strawberries to peaches, blueberries, apples, knob onions, garlic, beautiful green, purple and yellow beans, all kinds of peppers (did I tell you about my pepper garden yet?), beautiful plump tomatoes of all sizes, bright golden corn, cucumbers, zucchini, etc.  Walking through markets has always been one of my favourite activities!

If you go to any market stall this time of year, you will find everything you need to make the perfect salsa, the perfect fruit cobbler or the perfect Calabacitas a la Mexicana, which is our dish for today. Whenever you see anything called “a la Mexicana” it means it will have a sauté of onions, chiles and tomatoes, which incidentally are the colours of our Mexican flag, hence the name!

I love things cooked a la Mexicana, and very often you will see eggs cooked this way for breakfast (they’re delicious by the way!), but there are many other ingredients you can cook like this: beans, cactus paddles, potatoes, mussels, shrimp, chicken, beef or pork steak, you name it! Once you know the technique, you can apply it to many other things and you can make your own dish a la Mexicana.

I think for many Mexican cooks, this is the default way of making things. If I’m uninspired, I reach for this technique and I can make a LOT of things, so make this part of your arsenal! All you need are ripe tomatoes, white onions (in Mexico we prefer to cook with white Spanish onions, but if all you have is red or yellow, it is perfectly fine - just do not substitute green onion, that is a different flavour profile), some sort of spicy chiles - Serranos would be my choice, but where I am in Canada they are hard to find, so my next choice is Jalapeños. Use whatever you have available, but the chiles should pack some punch. The last ingredient, and this is optional, is cilantro. In essence, you will be making your own cooked salsa and then whatever you add to it will be stewed in it. That’s it! Brilliant, isn’t it?

So let’s get down to the recipe. It is a very easy technique, and you can vary quantities as you wish, adding more tomato if you want it saucier, or more corn if you love corn. You can omit the corn if you don’t have it and you can even cook in some chorizo at the beginning with the onion (that is another delicious variation!). The most important thing is not to overcook the zucchini - you want it to be tender, but still retain its shape. I love cilantro, but if you don’t, then omit it. 

I hope you make this recipe and learn the “a la Mexicana” technique. Let me know what you create!

Calabacitas a la Mexicana
Zucchini, Mexican Style

1 Tbsp vegetable oil
1 small onion, diced (about 2/3 cup)
1 Serrano or Jalapeño chile, minced (seeded if you want less heat)
2 small cloves garlic, minced
1 large ripe tomato, diced (about 1 cup)
2 small zucchini, cut into 1/2” pieces
1 large ear of corn, kernels cut off with a knife
1/4 cup water or broth
Salt to taste
2-4 Tbsp chopped cilantro (optional)

In medium sauté pan, heat oil and cook onion and chiles over medium high heat until soft and translucent, about 5 minutes. Add garlic and cook for 1 minute.

Add tomato and cook until tomatoes break down and become saucy. Add zucchini and corn and stir well. 

Add water and bring to a boil. Cover and simmer for 10-15 minutes, until zucchini is tender but still firm. Season with salt to taste and stir in cilantro at the last minute.

Serve warm.

Serves 4. 

Comment

Stewed Beans with Wild Greens, comfort in a bowl.

August 1, 2021 Maria Garza
IMG_3977.jpeg

It is at times like these that I am so glad to be “working” all the time. You see, I have a full-time job and The Cultural Kitchen is my beloved side gig. That does not mean that I only work when I have classes, instead the brain is engaged full time, and when I cook something epic I know I can use in the future, I go ahead and write my recipes and take the photos I need for future posts.

That’s what happened with this recipe. Last weekend, as I told you, I went to visit my friend Thuy at her garlic farm, and she gave me wild greens - purslane and amaranth. Last post was about eggs with purslane, which was my epic breakfast then, but the following day I used the amaranth, knowing full well that on week days, after full days in a test kitchen, I come home and only cook quick meals (the ironic life of a chef, I know).

So fast forward a few days and you find me laid low, sick as a dog… so much so that I even went to get tested for Covid-19. As I sit here, I’m waiting for results, hoping for a negative outcome, of course. I am double vaccinated, so I really hope it’s just a case of a bad summer cold. 

Which brings me back to the fact that I routinely go through the exercise of writing new recipes as I make them (usually on weekends), and taking photos to use at a later date. For this weekend’s blog post, am I ever glad I do this, as I am laying on the couch writing these words.

So back to the recipe… last week we talked about Quelites, or wild greens as we know them in Mexico. Thuy gave me a bunch of gorgeous, crisp, red and green Amaranth, and I could not let those go to waste. Amaranth, Amaranto or what you may know as Callalloo is used in many parts of the world, including Asia, Africa, the Caribbean and Latin America. It is a super green, a great source or vitamins, minerals and fibre. The tender leaves can be used in salads, and the tougher leaves and stems can be stewed, as I’m doing today.

These hot summer days I am all about quick, easy recipes, and these beans are not only delicious and good for you, but super quick to make. You know I always have cooked beans in the fridge, but if you don’t feel like cooking your own, just open and rinse a can and you’re good to go! If you just happen to serve a fried egg with your stewed beans, then I would say you have very good taste and you’re in for an epic breakfast. But these beans make a perfectly delicious side dish too, so go ahead and source out some amaranth and let me know if you give this recipe a try. If you can’t find it, then you can use Swiss chard, spinach or kale. Either way, it will be delicious. Buen provecho!

Guiso de Frijoles con Quelites de Amaranto
Stewed beans with wild amaranth greens

2 Tbsp manteca or oil of your choice
1/2 of a small red or white onion (about 1/4 cup), diced
1 clove garlic, minced
1 tsp ground ancho or guajillo chile (optional)
2 cups cooked beans (pinto, black turtle or bayos)
1-2 cups bean broth (use chicken or vegetable stock if you’re using canned beans)
4 cups wild amaranth (or Swiss Chard, spinach or kale), chopped into 1” strips
Salt to taste
Crumbled queso fresco, cotija or feta cheese for garnish
Salsa
Corn tortillas 

In large deep frying pan, heat manteca and cook onion until softened. Add garlic and cook only until fragrant, about 1 minute. Add ground chile and cook for another two minutes.

Add beans and bean broth and bring mixture to a slow boil.

Add greens and stir to combine. Lower temperature to simmer and cover pot. Cook for 10 minutes.
Season with salt to taste.

Serve hot garnished with cheese, with salsa and tortillas on the side.

Serves 2-4


Comment

Quelites star in these Huevos con Verdolagas en Cazuela.

July 25, 2021 Maria Garza
IMG_3952.jpeg

Many, many years ago, before I started The Cultural Kitchen, I was teaching workshops for Loblaws Upstairs Cooking School, and that’s where I met Chef Thuy Nguyen. Thuy is a bundle of energy, with a sparkling and lovable personality. We hit it off and I can humbly say that Thuy was my teacher for everything Vietnamese and other Asian cuisines. She took me for a foodie tour through Chinatown at a time when I did not know much about Asian cuisines. It was an education for sure and to this day I frequent the same shops she showed me.

My trajectory and Thuy’s were parallel - we both taught for Loblaws and then the OCDSB, she even taught classes for me in the early days of The Cultural Kitchen, and her classes were always sold out! Later on we went our separate ways and as it often happens, years went by without any contact.

Fast forward to today… Thuy found me through social media and we reconnected immediately. I found out Thuy and her friend Navin have a garlic farm on Moodie Drive and when I saw they were selling fresh organic garlic I just had to visit!

So that’s were my friend Alex and I went yesterday morning. First of all, seeing Thuy after almost 20 years was amazing, she has the same energy and spirit as always and it was great to catch up. She gave us a tour of the farm and as we walked she kept pointing out many “weeds” that have all kinds of medicinal properties. She really is a fountain of information! We made our way to the giant garlic patch where she showed us the varieties they are growing, from the medium hot Majestic to the hotter Red Russian, to the giant Elephant Garlic. They have everything from mild to hot and it’s all organic and beautiful. Thuy loves having people visit the farm and anyone can volunteer to help out with everything from weeding to harvesting, so if you’re in Ottawa and want to go help out, Thuy and Navin will appreciate it!

I learned a lot about garlic and how it’s grown and harvested and of course I came home with a bundle of the most beautiful medium hot Majestic that will last me through the coming year, but what this post is about is those “weeds” Thuy kept showing us along the way. You see, in Mexico we treasure “Quelites”. The word comes from the Náhuatl “quilitl”, meaning edible herb. Quelites are wild edible greens and there are up to 500 varieties in Mexico. Most of these quelites are not grown as crops, but instead are just “picked” when in season - they grow in fields, near other crops, as long as there is a water source. Some of the most known quelites are verdolagas (purslane), amaranto (amaranth), radish tops, watercress, lamb’s quarters and epazote. Many of these are grown as proper crops, but hundreds of others are wild and collected just after the rainy season, and they will mostly show up at the local mercados. In the world of food, quelites can range the gamut from greens that can be used in salads to more hearty ones that can be used in “guisos” or stews, or even stuffed, as in the case of zucchini blossoms. But what is certain, quelites are a great source of nutrition in the form of vitamins, minerals, folic acid and fibre.

At the end of our walk at the farm, Thuy picked a whole bunch of amaranth and verdolaga, what you would know as purslane, so that’s what I’m going to show you today. I will make something with the amaranth later today, but this morning I made the most delicious and healthy breakfast.

Verdolagas are very commonly used in Mexico, they show up at the table stewed in salsa or scrambled in eggs. More contemporary cooks use the tender leaves in salads. We could say verdolagas are a super food, as they are loaded with potassium, magnesium, iron, calcium, beta carotene, vitamins A, B and C and omega-3 fatty acids!

This morning I made a quick “guiso” (stew) with vegetables from my garden and some of that delicious garlic I got yesterday from Thuy. You can make this mixture and scramble the eggs into it, but I prefer an egg with a runny yolk, so I simply cracked the eggs on top and covered the pan for a couple of minutes to set the whites. Serve garnished with cotija or queso fresco, some cilantro and your favourite salsa - and lots of corn tortillas on the side. If you don’t have verdolagas, you can use spinach or any other greens you may have on hand, like kale or Swiss chard. It’s a delicious way to start your day!

Huevos con Verdolagas en Cazuela
Skillet Eggs with Purslane Stew

2 Tbsp vegetable or olive oil
1/2 cup white onion, chopped
1 small serrano or jalapeño chile, minced
1 garlic clove, peeled and minced
2 Roma tomatoes, chopped (1 1/3 cups)
3 cups verdolaga (purslane) leaves and tender stems
1/4 cup chicken stock or water
Salt to taste
4-6 eggs
1/4 cup crumbled cheese, like cotija, queso fresco or feta
A few sprigs cilantro
Salsa
Corn Tortillas

In medium frying pan (cast iron works great), heat oil over medium heat and cook onion and chile until translucent and starting to get a little golden. Add garlic and cook only until fragrant, 1-2 minutes.

Add tomatoes and cook for 2-3 minutes, until they start to break down and become saucy.

Add verdolaga leaves and tender stems and chicken stock or water and bring to a boil. Turn heat down to simmer and cook until verdolaga is tender, about 5 minutes. Season to taste with salt.

Crack the eggs into the pan and cover with lid. Cook 5-6 minutes, until whites are set but yolks remain soft.

Serve straight out of the pan, garnished with cheese and cilantro. Make sure salsa and tortillas are available for everyone to help themselves.

Serves 4-6.

Comment

Cantaloupe Agua Fresca two ways.

July 18, 2021 Maria Garza
Agua_de_Melon.jpg

As many of you know, I grew up in Mexico and my culinary curiosity, at a young age, was fed on the most part by my Nanny and my Dad. My Nanny cooked the traditional Mexican fare every day and oftentimes you’d find me right there beside her in the kitchen, taking it all in. My dad, on the other hand, was the foodie of the house, and he would spend some of his free time on Sundays reading his favourite food magazine: the now defunct Condé Nast Gourmet. With every new issue, he would find inspiration to make whatever he craved (now you know where I got that from!). My Dad only cooked when Nanny was off, so on Sundays I would watch him make his favourite food, as he explained to my young self what he was doing. Dad created many amazing meals and I hold beautiful memories of those days with him in the kitchen.

When I left home - and Mexico, I just had to get my own subscription to Gourmet! Not only did it make me feel close to my Dad, but I learned a lot from it: I learned to read about food and later on to talk about food, and it also influenced me on how to write recipes so they would be understandable and achievable for the home cook. As you may imagine, I was very sad when Gourmet shut down, but I still have many of my favourite issues in my library!

Eleven years after I left Mexico (and at the very beginning of my career in food) Gourmet published my first recipe: Agua de Semilla de Melón. It was one of my proudest moments, and the first thing that came to my mind was: "look Dad! Gourmet published one of my recipes!” In fact, when I told him, he immediately went out to buy his own issue (those days, you could not buy a subscription in Mexico, you had to buy magazines on the newsstands) and he didn’t waste any time telling all his friends about it.

Twenty four years later, I am still at it and enjoying every minute of this creative process. My life and profession revolves around food and I would not have it any other way. Food is so linked to culture and it creates those special moments with the ones we love. I don’t think I will ever get tired of sharing my humble knowledge and passing it on to others.

So in memory of that very first publication, I share with you these recipes: Agua de Melón, two ways. The first one is what Gourmet published, it is made with the seeds of the cantaloupe (us Mexicans are frugal people and we don’t like to waste anything!), and the second one is made with the flesh. Whenever I make Agua de Melón, the seed drink (called horchata) is my own particular treat, as it only makes 2-3 cups of this light cantaloupe water. The second one is a full flavoured, beautifully coloured and refreshing drink.

Agua de Melón can be made with cantaloupe or any melon you may have on hand, and it can be spiked with rum, tequila or vodka, if you are so inclined. Either way, I hope you make it part of your Aguas Frescas repertoire!

Horchata de Melón
Cantaloupe Seed Agua Fresca

Seeds from one large cantaloupe
2 cups water
Sweetener of choice to taste

Scrape seeds and soft membrane off a large cantaloupe into blender jar. Add 2 cups water.
Process for a full minute on high speed. If your blender is not too powerful, you may have to process a bit longer.

Pour through a fine sieve into a small pitcher. You can add up to one more cup of water if you want a lighter tasting drink.
Sweeten to taste. Refrigerate to chill or serve over ice.

Makes 2-3 cups

AGUA DE MELÓN
Melon Agua Fresca

4 cups fresh melon chunks (such as cantaloupe, honeydew melon, watermelon) peeled, and seeded
1 1/2 cups water
Sweetener of choice, or to taste
2 tablespoons lime or lemon juice, or more to taste

Place fruit and water in blender jar. Blend until smooth and pour into large pitcher.
Add more water to make 2 litres. Add sweetener and lime juice to taste.
Refrigerate to chill or serve over ice.

* You can add extra flavorings (mint to honeydew, orange juice to cantaloupe, and blended raspberries to watermelon) if you like.

Makes about 2 litres.

Comment

Gorgeous and golden-hued, these Sweet Potato Scones are heavenly.

July 11, 2021 Maria Garza
IMG_3819.jpeg

I have a hidden sweet tooth, but a very discerning one. I am not one for eating just anything sweet, instead opting for indulging in pastries that are simple, yet divine. Enter the scone here - I could have lived a past life in Britain, because I simply adore scones, the richer and flakier the better. My favourite ones are currant scones, but these sweet potato ones are a very close second.

Sweet potatoes are part of my Mexican heritage, and are one of the native ingredients of my country. The orange golden spuds feature prominently in Mexican cooking and are very often used to make sweet custards or desserts. There’s nothing better than a roasted sweet potato simply served drizzled with crema and garnished with chopped pecans (look for that recipe here in the blog), or a puree mixed in with eggs and baked into a delicious custard. Another favourite is a candied sweet potato called “fruta cristalizada” famous all over Mexico. So for me, it’s not a stretch to want to include sweet potatoes in a pastry that I love so much. So here it is worked into a rich, beautifully coloured scone.

In the Southern United States you will often find sweet potato biscuits - those are the cousins of the scones. I prefer a tall, flaky pastry and for this we need to have a dough that’s a bit firmer and handled as little as possible so the butter does not have a chance to soften - that will help it with the flakiness. If you don’t happen to have buttermilk on hand, you can use whipping cream instead. My mashed sweet potatoes were very firm, so if yours are moist, you may have to reduce the amount of liquid by 1 or 2 tablespoons, the clue is not to have a sticky dough. As we shape the scones, we also need to cut the dough straight down so that the scones can bake tall and straight (I use a pastry cutter for this, but a chef’s knife works just fine), and for best results, the dough must be fridge cold (or even frozen) before it goes into the oven.

Biscuits often bake at a higher temperature for a shorter time, but I like to bake my scones at 375°F for a bit longer so they have time to cook on the inside as they brown beautifully on the outside. Serve scones warm, slathered with butter and your favourite jam - I love apricot preserves.

You can double the recipe and freeze unbaked scones, or you can bake and freeze baked scones. Either way, you won’t regret having them on hand for your next afternoon tea or decadent breakfast.

Sweet Potato Scones

2 1/2 cups All Purpose flour (300g)
1/3 cup granulated sugar (66g)
3/4 Tbsp baking powder (9g)
1/2 tsp Diamond Crystal kosher salt (1.5g) (or 1/4 tsp table salt) 
1/4 tsp ground Mexican canela or freshly grated nutmeg
3/4 cup cold unsalted butter, cut into small bits (170g)
1/2 cup cold mashed roasted sweet potato (105g)
1/2 cup buttermilk (125ml)
1/4 cup whipping cream (63ml) + 2 Tbsp for brushing scones
1-2 Tbsp coarse sugar for garnish

Optional add-ins: zest of one lemon, candied ginger, pumpkin seeds (they look great as a garnish)

Preheat oven to 375°F.

In food processor, place flour, sugar, baking powder, salt and canela or nutmeg. Add cold butter and pulse a few times, until you have small pea sized butter pieces. If you’re adding lemon zest or candied ginger, add them at this point.

Mix buttermilk and cream and add to mixture in food processor. Pulse a few times until mixture comes together in processor bowl.

Turn out dough onto your board and knead gently a few times, just until it comes together, but do not overwork the dough, and most importantly, don’t let the dough get too warm. Press the dough into a circle that’s 1 1/2” thick and cut with a knife or pastry cutter into 8 wedges.

Place dough wedges on parchment-covered baking tray and refrigerate at least 30 minutes before baking. (You can also freeze dough and then bake from frozen).

Before baking, brush wedges with cream and sprinkle with coarse sugar. Place in hot oven and bake for about 25 minutes, until bottoms are golden brown. If you’re baking from frozen, bake for 32-36 minutes, until golden brown.

Cool baked scones on rack and serve with your favourite jam.

Makes 8 scones.


Comment

A Mother Sauce: Roasted Poblano Salsa

July 4, 2021 Maria Garza
IMG_3727.jpeg

In the world of Salsas, the sheer variety is immense. I have posted many recipes for all different kinds of them, and yet, there is so many more to write about! I have always said there are as many salsas as there are cooks out there, and that is a very true statement. Each person puts his or her own spin or shall we say “flavour” into their creations.

I have always made poblano salsas in the traditional way - that is, charring the poblanos over live fire until blackened, then steaming them before peeling and deveining. That yields a very smooth and terse sauce that is delicious. Today, though, I decided to simplify the process and create something that can be used in many ways. You can, of course, use this salsa on your tacos, but where this sauce shines is in the classic poblano creamy sauces for either chicken or pasta. The next place I’m going to experiment is using it in an aguachile, but it would also work really well mixed into a chicken broth for a poblano seasoned soup, or cooked into shredded pork carnitas or poblano rice. So many delicious variations in my head!

But who am I to dictate your gastronomic creations? When you make this salsa, go ahead and let your imagination fly. I love that it works on its own or it can be the base for many different dishes. This recipe makes a large batch, enough to use some in your first dish and then freeze the rest for another few later on.

This salsa has just the right amount of spice, that kind of heat that comes on slowly and then just lingers on the tongue… but if you want more, just add more Serranos or Jalapeños to the mix. Up here in Canada, poblanos are never spicy, but wherever you are, it is a good idea to seed and devein them just in case you get the scorcher types like they sometimes are in Mexico.

Go ahead and make a batch of this salsa and taste something that all of us Mexicans adore - Poblano chiles. If you want to see a step by step, visit my Instagram highlights.

Salsa Asada de Chile Poblano
Roasted Poblano Salsa

4 large poblano chiles (500g)
1 large white onion (200g)
4 large tomatillos, husked (200g)
5 Serrano chiles, stemmed (50g), or substitute Jalapeños if you cannot find Serranos
6 large cloves garlic, unpeeled (20g)
3 Tbsp olive oil
1/2 tsp salt, or to taste
1 1/2 cups chopped cilantro (50g)
1 cup water

Stem, seed and devein poblanos, then cut into 2” chunks. Cut onion into 2” chunks, and quarter tomatillos.

Place poblanos, onion, tomatillos, whole Serranos and unpeeled garlic on rimmed baking sheet. Drizzle with olive oil and sprinkle with salt. Toss to coat and roast in a 425°F oven for 30-45 minutes, tossing once or twice, until nice and soft and slightly browned.

Remove from oven and let cool for 10 minutes. Peel garlic cloves and then place all vegetables in blender jar. Add chopped cilantro and 1/2 cup water. Blend until smooth, adding up to 1/2 cup more water to get to the consistency you want. Taste and adjust salt content.

Makes about 3 cups.

2 Comments
← Newer Posts Older Posts →

Copyright © 2025 The Cultural Kitchen
All Rights Reserved

1936 Ranchwood Way Orleans, Ontario K1C 7K7
613.762.0940