• Welcome
  • About
  • Workshops
  • FOOD FOR BLOG
  • Contact
Menu

The Cultural Kitchen

Street Address
City, State, Zip
Phone Number
COOKING CLASSES ON DEMAND

Your Custom Text Here

The Cultural Kitchen

  • Welcome
  • About
  • Workshops
  • FOOD FOR BLOG
  • Contact
Brushes Mercado-1.jpg

FOOD FOR BLOG

Berry Jam, the healthier version.

June 16, 2024 Maria Garza

Mixed berry chia jam is a delightful and flavourful spread that combines the natural sweetness of berries with the nutritional benefits of chia seeds. Easy to make and versatile, this jam is perfect for spreading on toast, swirling into yogurt, or dolloping on top of your favourite pancakes, waffles or even ice cream! Whether you prefer it smooth or with chunks of fruit, berry chia jam is a delicious addition to any meal or snack, and the most important thing, it’s a breeze to make.

I have been trying my best to eat very clean, eating healthy carbs, minimal sugar and zero ultra processed foods. Even though I cut out sugars, I still crave sweet things every so often - I’m not sure if I’ll ever stop - but I try to find healthier ways to eat sweets. Berries are great - containing minimal sugar and adding fibre and nutrients. To me, they are the perfect ingredient, and chia seeds provide the texture needed to make the perfect jam. To top things off with the proverbial cherry on top, it’s a cinch to make and it’s nutritious to boot!

I make my jam with only mixed berries and chia seeds, but if you like, you can add sugar or honey, or any other sweetener of your choice, along with vanilla or cinnamon or any flavouring you like. I use frozen mixed berries because you simply defrost, mash, add chia and you’re done! What could be easier than that?

Mixed Berry Chia Jam

2 cups mixed berries
2 Tbsp chia seeds
Sweetener to taste, optional
1/2 tsp vanilla extract, optional

Place berries in a medium bowl and let them thaw completely.

Once thawed, using a fork or masher, crush berries into a pulp, to the consistency you like. I like mine chunky.

Add chia seeds and sweetener and vanilla, if using and mix to combine.

Transfer jam to a jar and refrigerate for 4 hours to let the chia bloom.

Enjoy with your favourite toast, yogurt, granola, pancakes, waffles or ice cream.

Makes about 1 1/2 cups.

2 Comments

This rustic Italian loaf is one of the easiest breads you can make.

June 9, 2024 Maria Garza

This is one of the first bread recipes I ever made, I’m talking about a 30 year recipe here! It is super simple, even for the beginner bread maker, which is what I really was back then!

Since then, I have advanced my bread making abilities, but this little loaf is still a favourite. You can make it with all purpose flour, which is what we usually have in the pantry, but it is better if you use bread flour, as the protein content is higher, resulting in a chewier bread.

You can make it as written, or you can give it a double proof, which makes it more tender. If that’s what you want to do, simply let it rest after kneading in an oiled bowl, covered, until doubled in size. Than, shape it and let it rise on the tray for the second proof. After it’s doubled it's size, bake as directed.

Either way, you will be rewarded with a delicious bread. I love to use it in sandwiches or simply with olive oil and balsamic vinegar on a nice charcuterie board.

SIMPLE RUSTIC ITALIAN LOAF

2/3 cup warm water
1 1/2 tsp instant dry yeast
Pinch sugar
1 1/4 - 1 3/4 cups bread or all-purpose flour
1 tsp kosher salt

In medium bowl, mix warm water, yeast and sugar. Let rest for about 5 minutes, until yeast blooms.

When sponge is ready, add 1 cup flour and salt. Mix well, adding more flour as needed to form a smooth dough that’s not sticky. Transfer mixture to a floured board.

Knead for 5-10 minutes, and then let it rest, covered with a towel, on a greased baking tray until almost doubled in size, about 30 minutes.

Preheat oven to 375°F.  

When ready to bake, using a sharp knife or bread lame to slash the top of the loaf.

Place a shallow tray or bowl on the bottom of the oven. Place the bread in the oven and pour boiling water or a handful of ice cubes onto the hot roasting tray; this should release a blast of steam that will help give the loaf a crust.

Bake for approximately 20-24 minutes or until loaf is golden and the bottom sounds hollow when tapped. Internal temperature should be around 200°F. Let cool completely before slicing.

Makes 1 loaf.

Comment

Turkish Shepherd's Salad, so fresh it tastes like summer!

May 31, 2024 Maria Garza

Turkish Shepherd Salad, known as Çoban Salatasi in Turkish, is a refreshing and colourful dish made with finely diced tomatoes, cucumbers, red onions and green peppers, all tossed together with herbs and a simple dressing of olive oil, lemon juice, pomegranate molasses, sumac, salt, and black pepper. This light and flavorful salad is a staple in Turkish cuisine, often served as a side dish or enjoyed on its own as part of a healthy meal. The combination of fresh vegetables and tangy dressing makes this Turkish shepherd salad a perfect accompaniment to grilled meats or as a side for kebabs.

When I visited Istanbul a few years back, this salad was part of many of our meals, it is one of those iconic dishes that make part of the rich Turkish culinary arsenal. Use the ripest, juiciest tomatoes you can find and you will enjoy a memorable Summer salad.

ÇOBAN SALATASI
Turkish Shepherd’s Salad

2 1/2 cups diced ripe vine or Roma tomatoes (about 4)
1 1/2 cups English cucumber, diced (1/2 cucumber)
3/4 cup green bell pepper, seeded and diced (1 small)
1/2 cup thinly sliced red onion, soaked in cold water for 5 minutes, drained and rinsed (1/2 small)
1/4 cup loosely packed coarsely chopped parsley
1 Tbsp chopped dill
2 Tbsp chopped mint
1 tsp sumac
2 Tbsp fresh lemon juice, or more to taste
1 Tbsp pomegranate molasses
4 Tbsp extra virgin olive oil
Salt to taste

Combine tomatoes, cucumber, green pepper, red onion, parsley, dill and mint in large bowl.

In a smaller bowl, whisk sumac, lemon juice, pomegranate molasses, olive oil and salt to taste. 

Toss dressing with vegetables and refrigerate for 30 minutes.

After 30 minutes toss again, taste, and adjust seasonings as required.

Serves 6.

Comment

This rustic summer salad is wholesome and satisfying.

May 25, 2024 Maria Garza

Panzanella salad is a traditional Italian dish made with stale bread, tomatoes, cucumbers, red onions, basil, and a simple olive oil and vinegar dressing. The beauty of panzanella lies in its use of leftover bread, which is revitalized when combined with the fresh, juicy tomatoes and crisp cucumbers. The flavours are bright and refreshing, perfect for a summer meal. This salad is versatile and open to interpretation, with variations including the addition of capers or even fresh mozzarella. Panzanella is a delicious way to minimize food waste while savouring the essence of Italian cuisine.

I learned to make this simple salad when I was working at DiVino Wine Studio. It is one of the simplest recipes to make and it always tastes amazing. For this purpose, I tear some bread into bite size pieces and let them dry on the counter overnight, until they are hard. This implies a bit of planning ahead, but if you don’t have time for that, simply drizzle bread with olive oil and toast in the oven until crispy, as if you’re making croutons. If you are going this way, don’t sprinkle the croutons with water, simply skip that step and proceed with the recipe as written.

This is an amazing summer salad. I hope you make it and let me know how you like it!

PANZANELLA TOSCANA
Tuscan Bread Salad

2 cups dry crusty bread, cubed (I like to use a good quality sourdough)
1 large ripe and juicy tomato, cut into chunks
1/2 cup thinly sliced red onion
3/4 cup cucumber, cut into chunks
1/2 bell pepper, cut into chunks
10 large basil leaves, torn
2 Tbsp red wine vinegar
6 Tbsp extra virgin olive oil
Salt and pepper to taste

Place bread in large salad bowl. Sprinkle or mist with enough water to moisten bread.

Add tomato and sprinkle with salt. Let sit for 10 minutes.  

Add red onion, cucumber and bell pepper, then drizzle with vinegar and olive oil.

Add salt and pepper to taste. Toss to coat. Add fresh herbs and serve immediately.

Serves 4

Comment

Beets and Yogurt are a match made in Turkish heaven.

May 19, 2024 Maria Garza

One of the easiest salads I know how to make is this Turkish style Beet and Yogurt salad. Indeed, the hardest thing about this recipe is to roast the beets, but even if you don’t want to spend time doing that, you can buy them already cooked, saving you tons of time making this outrageously good and healthy salad.

Many recipes blend the beets with the yogurt, making a bright purple sort of spread, but I prefer to keep things separate. First, mix thick Greek yogurt with a bit of garlic and salt and pepper to taste. Then, once your beets are cooked, peel and cut into wedges - those will go on top of the yogurt. Last, make a simple lemon vinaigrette to drizzle on top, add a bit of herbs and that’s it! Enjoy!

YOĞURTLU PANCAR SALATASI
Roasted Beet Salad with Garlic Yogurt

8 medium beets, trimmed
2 garlic cloves, minced
1 1/2 cups plain Greek yogurt
2 Tbsp lemon juice, or more to taste
6 Tbsp extra virgin olive oil
Salt and pepper to taste
Handful of chopped dill, mint and/or flat leaf parsley

Preheat oven to 450°F. 

Wrap beets in foil and bake until tender, about an hour, depending on size. When they are soft, let them cool slightly and peel. Cut them into 1/2” thick wedges.

In medium bowl, mix yogurt with garlic. Season with salt and pepper. Spread mixture on the bottom of a plate. Arrange beet wedges over yogurt.

In small bowl or measuring cup, mix lemon juice with salt. Whisk in olive oil slowly to emulsify. Add black pepper. Pour dressing over beets and garnish with mint and parsley.

Serves 8-10.

Comment

One of the best salsas, made in the Molcajete.

May 4, 2024 Maria Garza

I love making salsas - red salsas, green salsas, black salsas, all kinds of salsas! This technique is really simple and it makes a very tasty salsa. I love using both tomatoes and tomatillos, together they provide more interesting flavour tones, and if they are roasted or braised as in this case - before grinding in the molcajete - the flavour is intensified.

I am using chicken stock to braise the vegetables, but you could easily make this salsa Borracha by using beer instead. If you decide to go that route, add some to braise and then add a bit at the end for extra beer flavour.

Three chiles make this salsa pretty spicy, but it is delicious! The guajillo gives that gorgeous colour, the jalapeño adds brightness and the tiny piquín chiles add plenty of heat. If you don’t have all these chiles, don’t let that stop you! Use whatever you have, and if you have other dried chiles, feel free to substitute.

I am using my Mom’s molcajete, but not everyone has one. Use a blender or food processor, just make sure you don’t over process. This salsa is all about that chunky texture.

This salsa goes great with your favourite tacos, tostadas or antojitos. Make some today to celebrate Cinco de Mayo!

Salsa Molcajeteada de Tres Chiles
Three Chile Molcajete Salsa

1 guajillo chile, stemmed and seeded
2 tsp dried piquín chiles
2 tsp vegetable, avocado oil or manteca
1 jalapeño chile, stemmed and sliced thick
1 clove garlic
3 large tomatillos (250g), cleaned and quartered
1 small tomato (120g), quartered
Salt to taste
1/3 cup chicken stock or beer
1/2 cup diced white Spanish onion, rinsed and drained
1/2 cup chopped cilantro
Juice of 1 small lime

Heat medium skillet over medium heat and toast guajillo for a few seconds on each side, until aromatic. Remove to a bowl and add piquín chiles. Toast only for a few seconds and remove to bowl with guajillo.

Add oil to skillet and add jalapeño, garlic, tomato and tomatillos and 1/2 tsp salt. Stir and sauté until golden brown, 4-5 minutes.

Add guajillo and piquín chiles to the skillet and add chicken stock (or beer). Bring to a boil, then turn down heat to simmer and cook, covered, for 10 minutes.

Transfer vegetables and liquid to molcajete and grind until you have a chunky consistency.

Add rinsed onion, cilantro and lemon juice (or a bit more beer). Adjust salt level and stir until everything is combined.

Makes about 1 1/2 cups.

Comment

A more wholesome flour tortilla, made with whole grain wheat flour.

April 26, 2024 Maria Garza

In my quest for eating and feeling better, I have made quite a few changes both in lifestyle and diet. I incorporated a steady exercise routine, cut out most refined flours and sugars, and have been dedicating myself to making these changes stick.

Along the way, I have discovered that I love what I remember eating as a child, items made with whole grains - old fashioned if you will - but better for you in every way. I love that old fashioned rye, pumpernickel and whole wheat breads my grandparents ate, simply with a smear of butter and a pinch of salt. Hailing from northern Mexico, I grew up eating wheat flour just as much as corn tortillas, my Nana used to make them every day. I remember as kids we preferred white whole wheat tortillas, but my Mom wanted us to eat healthier food, so we were served whole wheat ones as well. As kids, we did not appreciate our parents’ good intentions, but now, I know my mom and grandparents were so right!

There are some things I simply cannot give up, and tortillas are some of those things. I eat them in moderation, but I enjoy them every so often. Flour tortillas are a favourite, so now I make them with whole grain wheat flour. I get my freshly milled wheat flour from a local bakery and urban mill called Almanac Grain. If you are in Ottawa, I encourage you to go visit. They mill all their flours and make the best sourdough breads. Two of my favourites are Red Fife and Einkorn wheat flours. They are old fashioned and wholesome grains and much better for our bodies than their ultra processed white conterparts.

These tortillas are heartier and sturdier than white wheat flour tortillas, but they are also much more nutritious and wholesome. They remain soft and pliable even when they are cool. You can use them the same way as any other tortillas, but I love them with scrambled eggs for breakfast, with eggs and chorizo and for making amazing quesadillas.

Tortillas de Harina Integral
Whole Wheat Flour Tortillas

2 cups whole wheat flour
1 tsp kosher salt
1/2 tsp baking powder
1/4 cup avocado or vegetable oil
up to 1 cup very hot (almost boiling) water

In large bowl, place flour, salt and baking powder and stir to combine.

Add oil and stir until incorporated.

Start adding the water, starting with 1/2 cup and then more as needed, while you stir, until you have no dry spots left. Start kneading until it forms a ball.

Turn out onto a board and knead for about 5 minutes. If you feel like you need to add flour as you knead, go ahead and add it in small increments. Let dough lest, covered for 10 minutes.

Divide the dough into 10 portions and smooth pieces into balls. Let them rest, covered with plastic, for 30-60 minutes. It is important to let the dough rest so it can completely hydrate.

Once the dough has rested, roll each ball with a rolling pin, turning as you go, to make a nice circle. Dough should be about 1/8” thick. You can roll all dough balls and let them rest as you work until they are all done.

When ready to cook, preheat your comal, cast iron pan or griddle over medium high heat. Once you start cooking your tortillas, lower heat to medium.

Place tortillas on comal and let them cook for about 5 seconds. Flip, and when you see small bubbles forming on the surface, flip again. The tortillas should puff up in places, but if they don’t it’s OK. Cook until tortillas no longer look dark (raw), up to 2 minutes total. It is normal to flip tortillas up to 3 times per side as they cook.

When they are done, remove from comal and place on a clean tea towel. Stack them as you cook, as they will steam in the towel. Enjoy immediately or let them cool completely before storing them in a zip top bag.

Makes 10 tortillas.

Comment

Pastry Cream should be part of everyone's arsenal.

April 13, 2024 Maria Garza

Pastry cream is one of those things that everyone should know how to make! Best of all, it is so easy to put together for something that is absolutely delicious.

You can use pastry cream to fill pastries - hello eclairs and churros! It makes a great filling for pies like Boston Cream and you can use it as a custard for a beautiful trifle. It has a lot of uses, but honestly, it’s so good you could even eat it with a spoon just by itself.

All you need is milk, cornstarch, salt, eggs, flavouring and butter. I’m using the best wild vanilla beans from my friends at Akih vanilla in Oaxaca, but if you add cocoa powder then you have a chocolate pastry cream. Adding almond extract would give it and almond flavour, and orange zest would give it a citrus twist.

I wanted to dress up some very special French Toast I had for Easter brunch. Since I cannot go eat with my favourite Chef in Monterrey (that is Pepe, from Yokot’an) I am channeling him with this recipe. If you live in the City of Mountains, you need to go try his French toast, it is absolutely divine.

So what do you think? Will you make some? It will transform your French Toast!

Vanilla Bean Pastry Cream
 

2 cups whole milk
1 vanilla bean, split and seed scraped, or 1 tsp vanilla extract
1/2 cup white sugar
3 Tbsp cornstarch
Pinch of salt
4 egg yolks from 4 large eggs
2 Tbsp unsalted butter

In medium saucepan, over medium heat, place milk and add vanilla bean and seeds.

Bring to a simmer and then turn off the heat. Cover the pan and steep for 20-30 minutes.

* If using vanilla extract, you can skip this step and add the extract to the milk. In this case, the milk does not need to be heated.

Meanwhile in small bowl, whisk together the sugar, cornstarch and salt.

In medium bowl, whisk egg yolks and add dry ingredients. Whisk vigorously (mixture may be stiff at first) until mixture is a pale yellow colour and everything is combined.

Remove vanilla bean from milk mixture and start adding the warm milk very slowly into the egg mixture - start in a thin stream so you can temper the egg yolks. Once you have about half of the mixture incorporated, you can pour a bit faster. Whisk until everything is combined and then pour mixture back into the saucepan.

Place on the stove over medium heat and whisk constantly until mixture is thickened. It will start bubbling up. Once it does, cook for another minute, then remove from heat and whisk in butter.

Pour mixture through a sieve into a medium bowl and cover immediately with plastic. Make sure it’s touching the custard so it does not form a skin.

If you are using the cream right away, cool it quickly by setting the bowl over an ice bath and whisk until cooled. Otherwise, you can let it cool for 10 minutes on the counter, then refrigerate until chilled.

Pastry cream lasts for about 3 days in the fridge.

 Makes about 2 1/2 cups.

Comment

Tamarindos Enchilados, a childhood favourite.

April 6, 2024 Maria Garza

If you were to ask me what my favourite childhood treat is, I would instantly say Tamarindos! I would also say many Mexicans would agree with me. You may be thinking this is a strange children’s treat, but in Mexico, we are introduced to sour and spicy flavours from a very early age. I can jokingly venture to say they are almost part of our DNA!

Tamarind is native to Africa and is extensively used in India, Southeast Asia, the Middle East and the Caribbean. It came to Mexico after the conquest and besides a thriving candy industry, we use it to make a fabulous agua fresca or margaritas. Tamarind is one of the ingredients in Worcestershire sauce, so you have probably tried it without even knowing it!

There are many candies in Mexico that are made with tamarind, or a mixture of tamarind and other fruits such as apricot, plum or guava, all mixed in with various proportions of sugar, salt, lime and chili. Usually children would prefer the sweeter treats, but for me, it has never been about the sweet, I am all about the sour and spicy flavours!

Living in Canada, it is not easy to find these types of treats, so that leaves me with the need of recreating them at home. Luckily, I can find really fresh tamarind pods, and besides that, all I need is lime juice, salt and Tajín seasoning, all available to me.

I know this is not for everyone, but if you are a fan of sour, tangy, salty and spicy, these tamarindos are for you! If you prefer them a bit sweet, feel free to add a bit of sugar as you cook them. Give them a try and let me know what you think. For me, just the thought of them makes my mouth water. That is my Mexican palate, and it is very fine indeed!

Tamarindos Enchilados
Spicy Tamarind

400g very fresh tamarind pods, peeled and stringy fibres removed
1/2 cup water
Juice of 1 large lime
1/2 Tbsp kosher salt, or more to taste
3-4 Tbsp Tajín seasoning

Place tamarind in a medium saucepan and add water, lime juice and salt.

Bring to a simmer and cook, covered, for 10 minutes. Remove lid and simmer until all liquid has evaporated, 5-10 minutes longer.

As soon as liquid has evaporated, remove from heat.

Place Tajín seasoning in a small bowl and toss tamarind pods in bowl, making sure they are coated all over. Place in single layer on a plate and let dry for 30-60 minutes.

Store at room temperature.

Makes about 2 1/2 cups.

Comment

Roasted, Spicy Edamame all day, every day.

March 8, 2024 Maria Garza

If you’ve been following me for a while, you probably know I am a huge fan of crispy chickpeas, so much so that I put them in my salads every day. A couple of days ago I actually ran out (I know, how is that possible!), so when I saw I had frozen edamame soybeans, I thought to myself that those could probably work the same way as the chickpeas. So, I tried making them and I am pleased to say they are delicious!

I usually use my air fryer for making crispy chickpeas, but since I had quite a bit of soybeans, I baked them in the oven - only so I could do them all in one batch. I’m sure the edamame would turn out great if done in the air fryer in case you want to try that. For the technique, see the crispy chickpea recipe here. I used Asian flavours for these edamame, but feel free to swap out seasonings to whatever you like!

These roasted edamame are so tasty in salads, but they are also a handy snack. They are not as fully crispy as the chickpeas, but they are just as delicious and addictive. These soften as they sit, so if you like them on the crisper side, they are best eaten the same day they are made. I hope you make some and when you do, please let me know what you think.

ROASTED SPICY EDAMAME

3 cups shelled edamame soybeans, thawed
1 Tbsp extra virgin olive oil
2 Tbsp soy sauce
2 Tbsp toasted sesame seeds
1 Tbsp gochugaru (Korean chili powder) or Aleppo pepper
Juice of 1 large lime
Salt to taste

Preheat oven to 425°F.

In large bowl combine edamame, olive oil, soy sauce, sesame seeds, gochugaru and lime juice. Toss to coat well.

Place on parchment covered sheet pan and bake for about 30-35 minutes, stirring every 10 minutes, until golden brown.

Let cool completely.

Makes about 2 cups.

2 Comments

Enfrijoladas are my comfort food.

March 1, 2024 Maria Garza

If you were to ask any Mexican if they like Enfrijoladas, I can guarantee they would emphatically say YES! This type of enchilada, bathed in a thick and flavourful bean sauce is iconically Mexican and absolutely comforting and delicious.

Best of all, they are so easy to make! In their simplest form, and the ones we had at least once a week growing up, are simply soft fried tortillas dunked in bean sauce and then plated, topped with cheese, crema and salsa. That is all you need! When you put together a corn tortilla with beans, they become a complete protein, so a plate of enfrijoladas is pretty filling and healthy. And oh so yummy.

You can dress up Enfrijoladas by filling them with chicken or sautéed vegetables, but this version is truly a match made in heaven. Queso fresco or panela mixed in with chorizo and onions make the perfect combo for these. If you cannot find queso fresco feel free to use a feta cheese that’s not too salty, or even a dry cottage cheese. If you use a very bland cheese, make sure you taste the filling and season as needed.

Once you have rolled up your tortillas with the filling, plate them and drown them in sauce. All enchiladas are served with a ton of sauce, so every bite is coated. Trust me, it is the way it should be. Garnish with more cheese, add avocado, some onions and a drizzle of crema and you’re ready for a feast!

ENFRIJOLADAS DE QUESO CON CHORIZO
Cheese and Chorizo Bean Bathed Tortillas

2 1/2 cups cooked black beans with a bit of broth or water
2 dried avocado leaves
2-4 Tbsp rendered pork lard (manteca), or vegetable oil
2 Tbsp vegetable oil, divided
1/2 cup raw Mexican chorizo
1/2 small onion, cut into thin julienne
3/4 cup crumbled queso fresco or panela cheese, plus 2 Tbsp grated for garnish
6 corn tortillas
1 ripe avocado, sliced
2 Tbsp pickled red onion or thinly sliced red onion
2-3 Tbsp crema, crème fraîche or sour cream for serving
Salsa

Place beans with broth and avocado leaves in blender jar and process until completely smooth.

In medium skillet, melt lard and pour in beans. Cook over medium low heat, stirring every so often, until slightly thickened and they coat the back of a spoon.

Meanwhile, in a small skillet, add 1 tsp oil and cook chorizo, breaking up with a spoon, for 4 minutes.

Add onion and cook until onion is completely soft. Mix in 3/3 crumbled cheese.

In a comal or medium skillet, heat 1 1/2 Tbsp oil and soft fry tortillas, turning them, until pliable and soft. Remove to a plate and continue until all tortillas are done.

Divide cheese and chorizo filling amongst tortillas, rolling up tightly and placing seam side down on two plates.

Top generously with bean sauce, sprinkle with more cheese and garnish with avocado and onions. Drizzle with crema and serve immediately with salsa.

Serves 2.

Comment

Eggplant, Moroccan style, never tasted so good.

February 24, 2024 Maria Garza

Moroccan eggplant and tomato salad is a delightful dish that beautifully combines the rich flavours of eggplant with the freshness of tomatoes. Typically seasoned with a blend of aromatic spices like cumin, paprika, and fresh herbs such as parsley and cilantro, this salad offers a burst of flavours with every bite. This dish is a popular feature in Moroccan cuisine, often served as a side dish or part of a mezze spread, showcasing the diverse and flavourful nature of Moroccan cooking.

This salad could be thought of as a dip, and it is typically served with bread as part of an array of salads at the beginning of a meal. It can be served warm or room temperature and it gets better as it sits, so feel free to make it a day ahead. The seasoning here is the spice blend known as ras-el-hanout, a mixture of different spices. If you don’t have it, you can use cumin and paprika. If you like a bit of spice, you could also add a bit of harissa paste as it cooks. The lemon juice at the end is essential to brighten and make this salad perfect. I like it a bit loose, but if you prefer a firmer texture, just cook all the moisture out before adding the lemon juice and herbs.

MOROCCAN EGGPLANT SALAD          

Ras-el-hanout spice blend:
2 tsp each ground cumin, paprika and salt
1 1/2 tsp black pepper
1 tsp each ground cinnamon, ground ginger, ground coriander, cayenne and turmeric
1/4 tsp each ground allspice and ground cloves

Salad:
1 large eggplant, 4 strips peeled lengthwise, then cut into 1” cubes
3 ripe Roma tomatoes, peeled, seeded and chopped
4 cloves garlic, minced
1 Tbsp Ras el Hanout spice blend (or 2 tsp paprika and 1 tsp cumin)
1 tsp salt, or to taste
4 Tbsp extra virgin olive oil, plus more for garnish
2/3 cup water, or more as needed
Juice of half a lemon, or more to taste
3 Tbsp parsley, chopped
3 Tbsp cilantro, chopped
Paprika for garnish
Pita bread for serving

To make spice blend, mix all ingredients together in a small bowl. Use 1 Tbsp for this salad and reserve the rest for another use.

To peel tomatoes, make a shallow X cut on the tip ends and blanch in a pot of boiling water for 1 minute. Remove from pan and immediately dunk in an ice bath. Let cool for a minute, then peel, cut into quarters lengthwise and remove seeds.

In medium sized saucepan combine eggplant, tomatoes, garlic, ras el hanout, salt, olive oil and water. Stir and cook over medium high heat and bring to a boil. Turn temperature down to low and simmer, covered, for 25-30 minutes or until the eggplant and tomatoes are completely tender and starting to break down. Stir every so often, and if mixture starts to stick, add a bit more water.

Once vegetables are tender, use a spoon or fork to mash to a chunky consistency.  Add the vinegar and mix to combine. Adjust seasoning and stir in parsley and cilantro. Serve at room temperature, drizzled with olive oil and paprika.

Serves 8.

Comment

Turkish Zucchini and Carrot Fritters, so good!

February 18, 2024 Maria Garza

Turkish zucchini and carrot fritters, also known as "Mücver," are a delightful combination of tender zucchini, sweet carrots, bell peppers, cheese and savoury herbs, bound together with a delicate mixture of flour and eggs.

These fritters are a popular dish in Turkish cuisine, appreciated for their crispy exterior and soft, flavourful interior. The grated zucchini and carrots lend a subtle sweetness and earthy taste, while the inclusion of fresh dill adds a fragrant, aromatic dimension to these fritters. Very easy to make, the most important aspect of this recipe is to make sure you squeeze out as much moisture from the zucchini and carrots before you put the mixture together. If you skip this step, you will have a very runny batter and they will not turn out right.

Whether enjoyed as a delicious appetizer, a light lunch, or a side dish, Turkish mücver showcase the artful simplicity and vibrant flavours that are characteristic of traditional Turkish cooking.

MÜCVER
Zucchini and Carrot Fritters

2 cups grated zucchini
1 cup grated carrot
3 large eggs
¼ cup all purpose flour
½ tsp baking powder
½ tsp salt (or less if your cheese is very salty)
½ cup crumbled feta cheese
1 small red pepper, finely chopped (2/3 cup)
¼ cup chopped dill
½ cup vegetable oil or olive oil to fry

Mix shredded zucchini and carrots in a large bowl. Sprinkle with 1 tsp of salt and let them sit for 10 minutes.  Squeeze zucchini and carrot mixture to get rid of excess liquid. Put it aside.

In a large mixing bowl, whisk the eggs. Add the zucchini and carrots, red bell pepper, salt, feta cheese, dill, flour and baking powder and mix until evenly combined.

Heat oil in a frying pan over medium high heat. Drop tablespoonfuls of the batter into the hot oil, flattening fritters as you drop them in. Don’t overcrowd the pan.

Cook both sides until golden brown, about 3-4 minutes per side. Transfer onto a paper towel lined tray. Repeat until all batter is used.

Serve warm, at room temperature or cold with some yogurt on the side.

Makes about 14 fritters.

Comment

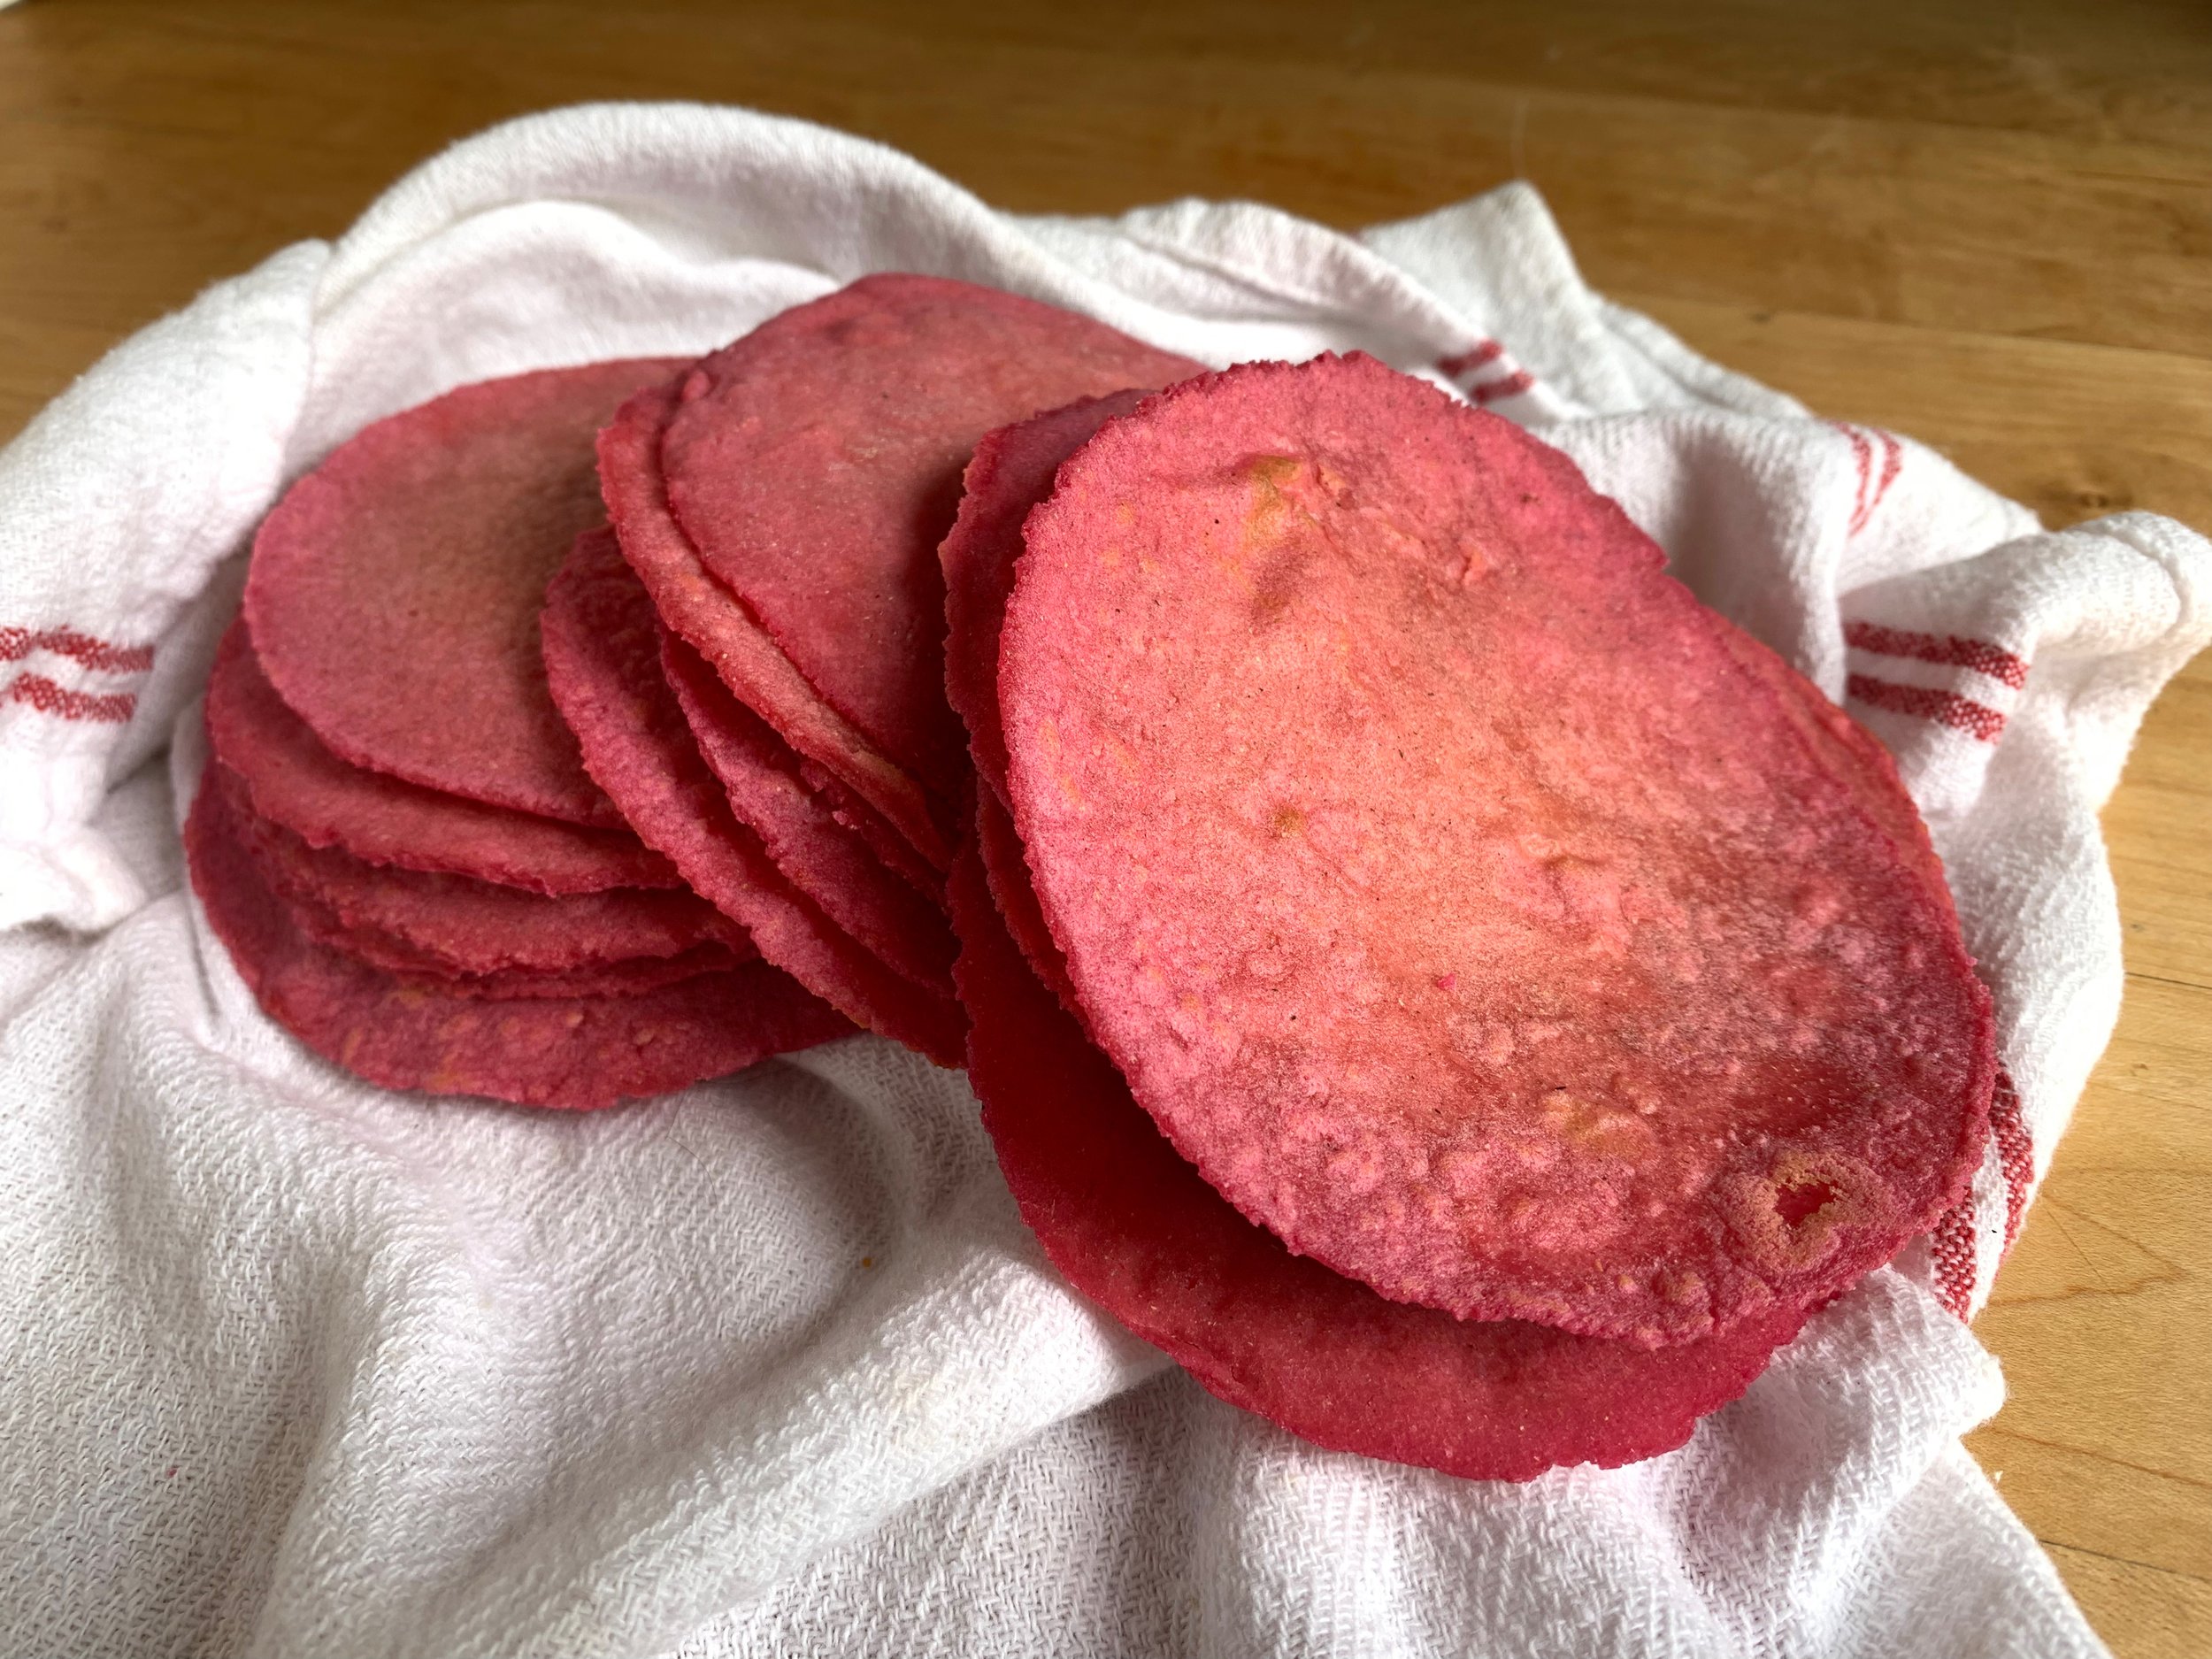
Pretty in Pink (Beet) Tortillas

February 10, 2024 Maria Garza

I have been wanting to experiment with making different coloured tortillas, and not from the variety of the corn itself. Of course, you are probably familiar with red, blue, white and yellow corn tortillas, but those colours come from the type of corn the masa is made with. These tortillas I’m talking about start with a white masa, with vegetable or herbal additions to colour them. The most popular are green tortillas made with nopal (cactus paddles), or red tortillas made with dried chiles (used in some enchilada recipes). These pink tortillas are made with beet purée and I must say I loved them. In fact, I have also made red tortillas made with rehydrated ancho chiles and those are fabulous too. This is a really fun spin on otherwise plain tortillas, so I invite you to try them!

Since Valentine’s Day is around the corner, I thought these were very appropriate. I have used them to make hibiscus tacos (recipe here in the blog), but they can be used for anything, as they really don’t taste sweet from the beets.

The only thing you need to be aware of, is these tortillas don't not last as long as the plain tortillas, due to the added moisture from the beet puree - they should be used within 5 days. If you want to keep them for longer, go ahead and freeze them.

TORTILLAS ROSAS (DE BETABEL)
Pink Beet Corn Tortillas

1/2 cup diced cooked beet
1 cup water
3 cups Maseca
1 1/2 cups hot tap water, approximately

In blender jar, process beet and water until completely smooth. If your blender is not very powerful, then strain the mixture.

In medium bowl, place Maseca and add beet purée. Mix until combined and then start adding warm water, a bit at a time, until you have a smooth masa that does not crack around the edges when you press a ball of dough.

Let masa rest, covered, for 30-60 minutes.

Portion masa into balls, depending on the size of your tortilla press. I like to make 5 or 6” tortillas, so this amount of masa makes about 28.

Heat a comal, griddle or frying pan over medium heat. Press masa balls between sheets of plastic and place one at a time on comal. Cook for about 10 seconds, as soon as the tortilla releases from the comal, turn it and cook the second side for about 15 seconds. 

Flip tortilla again and cook for another 20 seconds or until masa no longer looks dark. If your tortilla puffs, that is excellent, but if it does not, it’s OK too.

Place cooked tortillas on a clean tea towel set over a cooling rack. Stack tortillas in towel as you cook. Let them cool before storing in a resealable bag.

 Makes about 28 5” tortillas.

Comment

Papas a la Huancaína, the quintessential Peruvian potatoes with cheese.

January 27, 2024 Maria Garza
Papas a la Huancaína

I have never been to Peru, but it is definitely on my bucket list. The food there, from everything I’ve learned, is exciting, flavourful and delicious! Peru is the land of potatoes (with 4000 of varieties available!) and their peppers, which they call Ajíes, are something that really captures my interest.

A few years ago, my friend Tito taught me how to make this recipe. Papas a la Huancaína is quintessentially Peruvian, perfect in its simplicity. A beloved dish that features tender boiled potatoes topped with a creamy, zesty sauce known as huancaína (from the area of Huancayo, in the central highlands of Peru). The sauce is made from a blend of fresh cheese, spicy aji Amarillo peppers, onion, garlic, and evaporated milk, resulting in a vibrant orange color and a rich, indulgent flavour. The dish is typically garnished with hard-boiled eggs, olives, and a sprinkle of chopped parsley. The creamy, slightly spicy huancaína sauce paired with the comforting potatoes creates a harmonious balance of textures and flavours, making this dish both comforting and exciting at the same time. It is traditionally made with sliced potatoes, but I like to make mine with the small baby potatoes we find here in Canada.

My friend Tito is no longer with us, but every time I make this dish, I remember the times we spent talking about food, cooking and enjoying a meal together. He was a real foodie, and a real pleasure to discuss recipes with. This recipe is dedicated to him.

PAPAS A LA HUANCAÍNA
Potatoes with Ají Amarillo Cheese Sauce

680g baby potatoes
1 tsp salt
1 Tbsp vegetable oil
½ onion, chopped
1 clove garlic, chopped
3 Tbsp ají amarillo paste
200 g farmer’s cheese, cottage cheese or feta cheese
½ cup evaporated milk
2 Tbsp vegetable oil
3-6 saltine crackers
Salt to taste
4 hardboiled eggs, cut into quarters
12 black olives
Parsley for garnish

In medium saucepan, place baby potatoes and a teaspoon of salt. Cover with water by about 2 inches and bring to a boil. Simmer, uncovered, until potatoes are tender, 15-20 minutes. Drain and reserve.

Meanwhile, in medium frying pan, heat 1 Tbsp oil and sautée onions until starting to brown, about 5 minutes.. Add garlic and cook for 1 minute.  

Add ají paste and cook for another minute. Let cool slightly.

In blender container, place evaporated milk, cheese and onion and aji paste mixture. Blend until smooth. Add 3 saltine crackers, vegetable oil and salt to taste. Blend, and adjust the texture – more milk if too thick, or more crackers if too thin. Taste for seasoning. Sauce should be thick.

Serve sauce over potatoes, with hardboiled eggs and black olives and a bit of parsley.

Serves 6.

Comment

Bright and Cheerful: Mediterranean Orange and Olive Salad.

January 21, 2024 Maria Garza

We are in the midst of citrus season, so to take advantage of that, why not make this delicious and fresh Mediterranean Orange and Olive Salad?

This is a vibrant and refreshing dish that captures the essence of the Mediterranean coast. This simple yet elegant salad combines the sweetness of ripe oranges with the briny saltiness of the olives (use green or black, whatever you like best!), creating a delightful contrast of flavours. The juicy orange slices provide a burst of citrusy freshness, while the red onions add a hint of spice and the rich, earthy flavour of the olives adds depth to each bite. Drizzled with your best extra virgin olive oil and seasoned with sea salt and freshly ground black pepper, this salad is a perfect balance of sweet, tangy, and savoury flavors.

I love the simplicity of this recipe as is, but beautiful add-ins would be feta cheese, pomegranate arils and herbs like parsley or mint. This Mediterranean Orange and Olive Salad is a delightful celebration of the sun-kissed ingredients and vibrant flavors of the region and I hope it brings some sunshine to your winter!

MEDITERRANEAN ORANGE and OLIVE SALAD

2 navel, blood or Cara Cara oranges, or a combination
2 Tbsp thinly sliced red onion
10 black or green olives
1-2 Tbsp extra virgin olive oil
Sea salt and freshly cracked black pepper to taste

Using knife, cut skin off oranges, leaving no white pith. Cut oranges into round slices.

Arrange oranges on platter, then top with red onion and olives. Drizzle with olive oil, and season with salt and pepper to taste.

Let salad rest for a few minutes before serving.

Serves 2.

Comment

Fresh and flavourful: Turkish Style Potato Salad

January 14, 2024 Maria Garza

When I went to Turkey, one of the things that struck me the most is how flavourful the food is. The cuisine is made in the Mediterranean style, but with a spin all their own. Some simple but iconic ingredients characterize their dishes and they make them distinctive and delicious.

Three of the ingredients I am talking about are Aleppo pepper, sumac and dried mint. They feature prominently in many Turkish recipes, and they work beautifully in this dish. Potatoes can be bland but in this recipe they are anything but! The combination of fresh herbs with lemon juice, Aleppo, sumac and mint make this salad a party.

Next time you need to bring something to a potluck or the family gathering, make this salad. It will be a fantastic addition to any table!

TURKISH STYLE POTATO SALAD

6-7 medium white potatoes
1 tsp salt
1/2 cup parsley, chopped
1/2 cup dill, chopped
6 green onions, sliced
2 tsp sumac
2 tsp sweet pul biber (Aleppo red pepper flakes)
1 1/2 tsp dried mint
Juice of one large lemon, or more to taste
6-8 tbsp extra virgin olive oil 
Salt and pepper to taste

Place whole potatoes in medium saucepan and cover with water and add salt, cook until tender, then cut into bite sized chunks (I like to leave skins on). This may take up to 30 minutes, depending on the size of your potatoes.

Let potatoes cool and then place in large bowl. Add parsley, dill, green onions, sumac, Aleppo pepper, dried mint, lemon juice and olive oil.  

Toss salad well, making sure all ingredients are well mixed. Add salt and pepper to taste; add more lemon juice if it needs it. If salad seems dry to your taste, add a bit more olive oil.

Let salad rest for 30 minutes before serving.

 Serves 6-8.

Comment

Plant based sides never tasted so good! Poblano, Zucchini and Swiss Chard sauté.

January 5, 2024 Maria Garza

January in my household usually starts with fairly healthy meals, after the indulgence of the holidays. Searching for lighter, plant based alternatives for meals, I came up with this delicious sauté. I had it as a vegetable side dish for dinner, and with the leftovers I made some amazing enchiladas.

The combination of earthy poblanos, fresh zucchini, and nutritious Swiss chard creates a satisfying and vibrant dish that is both simple to prepare and full of robust flavours. If you want to keep it vegan, omit the cotija cheese, or substitute with a plant based alternative.

This Poblano, Zucchini, and Swiss Chard Sauté is a wonderful side dish that pairs well with grilled chicken, fish, or doubles up as a filling for vegetarian enchiladas, gorditas or sopes.

GUISO DE POBLANO, CALABACITA Y ACELGAS
Poblano, Zucchini and Swiss Chard Sauté

1 Tbsp vegetable oil
1 large poblano chile, stemmed, seeded and cut into 1/2” dice
1 small red onion, thinly sliced
1 medium zucchini, cut into 1/2” dice
1 bunch Swiss Chard, trimmed: leaves cut into 1/2” strips, stems sliced into 1/4” pieces
1/2 cup chicken or vegetable broth
1/2 cup shredded cotija or feta cheese
Salt and pepper to taste
1/4 cup chopped cilantro

In large skillet, heat oil over medium heat and add poblanos and onions. Cook until softened and starting to brown, 4-5 minutes.

Add zucchini and cook until zucchini starts to brown, about 4 minutes.

Add Swiss chard - leaves and stems - and stir to soften slightly. Add chicken broth and a bit of salt and pepper. Bring to a simmer and cook, covered, for 10-12 minutes, or until vegetables are tender.

Remove lid and if there is still broth left in skillet, cook uncovered until it evaporates.

Stir in cheese and cilantro and adjust seasoning. Serve warm.

Serves 4.

Comment

The best Canela Shortbread: Hojarascas Norteñas.

December 16, 2023 Maria Garza

These cookies are ever so popular in Monterrey and the surrounding areas, not only at Christmas time, but year round. They are tender, flaky and the best ones have a strong canela flavour. These are the gift of choice if you have to bring a hostess gift to a party or visit with friends and everyone loves them.

Mexican canela (also known as Sri Lanka cinnamon or true cinnamon) is absolutely delicious. If you have never tried it, I urge you to find some and use it. Its flavour profile is much milder than cassia cinnamon, but it’s floral, aromatic and it engages your senses in the best possible way. Every time I go home, I make sure I find a market where I can buy the long sticks and grind them myself for the freshest taste.

Traditionally, these cookies are made with rendered pork lard, and they are really good, but I have made a small change by adding a bit of butter for taste. The other important ingredient in this recipe is the canela tea that is used as a liquid in the dough. Brew a strong tea and it will give the cookies a deeper canela flavour.

This dough can be made by hand, in which case I recommend you refrigerate the dough after mixing it so it will be easier to roll. If you use a mixer, the lard and butter don’t have to be too soft, as the machine will do the work. In this case, since the dough will be fairly cold, you can roll and cut your cookies right away. Roll the dough on a lightly floured board and place two chopsticks on either side, these will serve as a guide so your cookies will all be the same thickness. Regardless of which method you use, if your cookies are warm after rolling and cutting, chill them for at least 15 minutes before baking, this will give your cookies a better texture.

Whether it’s for Christmas or for a tea party with friends, give these cookies a try and be sure to let me know what you think.

HOJARASCAS NORTEÑAS
Northeastern Mexican Cinnamon Shortbread

Canela Tea:
2 cups water
2 sticks Mexican canela 

Cookies:
3 1/2 cups + 1 Tbsp (500g) all-purpose flour
1/4 cup (50g) granulated sugar
1/2 tsp salt
3/4 cup (160g) rendered lard or vegetable shortening, room temperature, but not too soft
1/2 cup + 2 Tbsp butter (125g), room temperature, but not too soft
1/4 cup canela tea, or more as needed
1 cup sugar mixed with 1 1/2 Tbsp canela for coating

Preheat oven at 350°F.

In small saucepan bring 2 cups water to a boil. Add Mexican canela and simmer uncovered for 15-20 minutes. Cool completely, then strain and measure out 1/4 cup.

In medium bowl combine flour, sugar and salt. Rub in lard and butter and mix until everything is combined and mixture looks like sandy crumbs. 

Start adding canela tea while you mix until you have a smooth dough. If dough is too dry, add a bit more tea, one teaspoon at a time until dough is smooth. Cover and refrigerate for 30 minutes.

On a lightly floured surface, roll out dough to a 1/2 cm thickness (1/4”). Cut out using cookie cutters and carefully place on parchment lined sheet pans. If dough is too warm, refrigerate on trays for 15 minutes.

Bake for 20-25 minutes, until golden underneath, rotating pans halfway through.

Remove cookies from oven and while still warm, coat with cinnamon sugar. Let cool completely.

* This dough can be made in a mixer using the paddle attachment.

 Makes about 50 2” cookies.

Comment

Comforting and Cozy Chicken Paprikash.

November 24, 2023 Maria Garza

One of my favourite dishes in Hungarian cuisine is the iconic Chicken Paprikash. This traditional dish is a true embodiment of the rich culinary heritage of Hungary, with its roots dating back to the 18th century. Chicken paprikash is a comforting and flavourful meal that showcases the unique combination of tender chicken, vibrant paprika, tomatoes and sour cream.

The humble dish begins with chicken pieces, usually thighs or drumsticks, seared to perfection. Then, the magic happens as Hungarian paprika – the star ingredient – takes the stage. This bright brick red spice lends its distinct smoky and earthy flavour, infusing the chicken and the sauce with a rich, warm taste. The paprika not only adds a vibrant colour to the dish but also holds a significant place in Hungarian culture, representing its folklore and traditions.

The key to mastering a batch of perfect chicken paprikash lies in the balance of flavours and textures. The sauce, made from a combination of onions, garlic, tomatoes and paprika, envelopes the chicken, creating a dish that is both comforting and delicious.

Finished with a generous dollop of sour cream, chicken paprikash becomes incredibly creamy and tangy, mellowing out the gentle heat from the paprika. Typically served with egg noodles or dumplings, this hearty meal is incredibly cozy and satisfying.

CHICKEN PAPRIKASH WITH EGG NOODLES

6 chicken pieces (skin on or skinless)
Coarse salt and ground pepper to taste
2 Tbsp vegetable oil
1 large onion, halved and thinly sliced lengthwise
3 garlic cloves, minced
2 Tbsp sweet Hungarian paprika
3 Tbsp flour
1 ½ cups low-sodium chicken broth
1 can (14 oz) diced tomatoes
1/2 cup sour cream or thick plain yogurt
300g wide egg noodles
2 Tbsp butter
Chopped parsley for garnish

Season chicken with salt and pepper. In a large heavy pot, heat oil over high heat. Cook chicken, until golden and crisp, about 5 minutes. Turn chicken and cook until browned, 5 minutes more. Transfer to a plate and reserve.

Reduce heat to medium. Add more oil if needed and add onion. Cook, stirring frequently and scraping up any browned bits with a wooden spoon, until beginning to soften, 3 minutes. Add garlic and cook, stirring frequently, 2 minutes.

Add paprika and flour, season with salt and pepper, and stir constantly until mixture begins to stick, about 1 minute.

Add broth and stir, scraping up brown bits until smooth. Add tomatoes and bring to a boil over high heat. Return chicken to pot and reduce heat to medium. Cover and cook until chicken is cooked through, 25-30 minutes, or until internal temperature reaches 165°F. Stir sour cream into sauce.

* To finish in the oven, prepare as described, use an oven-safe dish and bake, covered, at 375°F for 25-30 minutes, until internal temperature of chicken is 165°F. Remove from oven, stir in sour cream and serve.

Meanwhile, in a large pot of boiling salted water, cook noodles according to package directions. Drain noodles and place back in the pot. Stir in butter and season with salt and pepper.

Divide noodles amongst serving plates. Top with chicken, then ladle sauce over chicken and noodles. Garnish with parsley.

Serves 6.

Comment
← Newer Posts Older Posts →

Copyright © 2025 The Cultural Kitchen
All Rights Reserved

1936 Ranchwood Way Orleans, Ontario K1C 7K7
613.762.0940